Notice: this Wiki will be going read only early in 2024 and edits will no longer be possible. Please see: https://gitlab.eclipse.org/eclipsefdn/helpdesk/-/wikis/Wiki-shutdown-plan for the plan.
Difference between revisions of "JWT DeveloperFAQ"
(→Working with the JWT Source Code) |
|||
| Line 26: | Line 26: | ||
* jwt.wam-inbox@eclipse.org | * jwt.wam-inbox@eclipse.org | ||
* jwt.desktop-inbox@eclipse.org | * jwt.desktop-inbox@eclipse.org | ||
| + | |||
== How to Extend/Modify JWT == | == How to Extend/Modify JWT == | ||
Revision as of 12:06, 8 December 2008
Frequently Asked Questions for Developers
Contents
Working with the JWT Source Code
Installing JWT Source Code from CVS
For information on how to access the JWT source code, the layout of the CVS repositories and the dependencies of JWT components, please refer to JWT CVS Information. For write access to the CVS you need to replace the anonymous access with your Eclipse committer account data.
Internal Layout of the JWT Source Code
Working with Bugzilla
All developments are tracked using the Eclipse Bugzilla, be it a bug patch, a new feature, a user requirement or a build system enhancement.
How to get a Bugzilla account
Go there to get an Eclipse Bugzilla account : https://bugs.eclipse.org/bugs/createaccount.cgi .
How to watch all JWT bugs
Log into the eclipse Bugzilla, then in the Bugzilla Preferences page https://bugs.eclipse.org/bugs/userprefs.cgi?tab=email , add the following emails in the "User watching" list at the bottom and save it:
- jwt.we-inbox@eclipse.org
- jwt.wam-inbox@eclipse.org
- jwt.desktop-inbox@eclipse.org
How to Extend/Modify JWT
Legal Stuff
A comic that explains how to commit code correctly can be found here: IP Process in Cartoons.
Extending the Workflow Editor
The article Extending JWT-WE contains information on how JWT can be extended by user-defined plugins that provide e.g. external actions or additional views.
Modifying the Workflow Editor
The article Modifying JWT-WE provides information on how several recurring tasks (like adding preferences to the preferences menu) can be accomplished.
How to prepare a new Release
Legal Process
- Make sure CQs have been approved for all components on the CVS which should be released (IP Log). This may take a while, so submit them early.
- Prepare review slides
- Submit the IP Log (IP Log)
- Ask the PMC for approval of the release (PMC Mailing List)
- Ask for release review at EMO: Reviewed IP Log, PMC approval, review slides
Releasing the Workflow Editor
1. Preparing
- Make sure the copyright/year information in the Java headers is up to date
- Synchronize plugin*.properties translations for all languages
- tutorial_url and tutorial_path must be updated in the plugin*.properties
- Remove unneccessary plugin dependencies using the Plugin.xml-editor
- Make sure the description of the JWT extension points is up to date
- Close finished Bugzilla tasks and move open ones to the next release (create bugzilla version tag for the next release if not already present)
- Update the internal documentation in JWT-WE (e.g. README, abouttext.txt, about.html, the package.html files in each Java package...)
- Make sure the internal version of the Workflow Editor and all its plugins is set to the new release version
- The converter must be updated to the newest file format
- Ensure that all keybindings for Eclipse commands (menu/toolbar) are set correctly
- Make sure the licence information is valid (notice.html)
- Update the release notes
2. Generating Packages
- Generate new Javadocs for each component to be released
- Generate a release package and a source package for the Workflow Editor
- Generate a release package and a source package for the WE View Creator
- Generate release and source packages for all WE Plugins
- Update the example processes and create a ZIP archive
- Sign packages
3. Deploying
- Tag the release state of the Workflow Editor, View Creator and the Plugins on the CVS as a new version (e.g. v040)
- Archive old release (move files to "archive.eclipse.org") and upload new release packages to the download server "download.eclipse.org" (in a new directory with subdirectories for plugins and documentation)
- Update the links of archived and new downloads on the wiki download page ( Downloads) and related Wiki pages
- Update the Eclipse JWT page (add an entry to the news section, adapt direct download link for the Workflow Editor and direct download link for documentation, update project pages, ...)
- Adapt the feature in the JWT Eclipse Update Site for automatic download
- Notify Mailing List and partners
Releasing the AgilPro LiMo/Simulator
- update release notes
- update tutorial
- update javadoc
- update howtos
- update install informations
- valid licence in installer?
- valid update splashscreen?
- copy emf model to simulator
- convert sample processes
- test installer for all operating system versions
- SVN: branch, javadocs
- CVS: tag version
- mylyn: close finished bugs, move open ones to next release
Preparing
Generating Packages
Signing the Packages
1. Using your favourite SSH application (such as Putty), log in to build.eclipse.org using your CVS committer credentials.
2. Move or copy the files to be signed to the Downloads Staging area. You cannot sign files anywhere else. The Staging Area is at /opt/public/download-staging.priv/, and it is structured like the downloads area. If you don't have a staging directory, or if you cannot access it, please contact webmaster.
3. Use the 'sign' command, as such: sign <file> <mail|nomail> [outputDir]
where file is the name of the ZIP or JAR file you want signed. Because signing is computationally intensive work, wildcards are not supported.
mail|nomail will allow you to receive an e-mail notice that signing is completed.
outputDir is optional: if specified, signed files will be placed in this directory. If omitted, the original file will be overwritten with the signed one.
4. When signing is complete, you can verify the signed JAR file with the following command (to verify ZIP files, unzip them first, then verify the JARs inside):
jarsigner -verify <file>
5. Move the signed files back to the downloads area, and delete any other files in the Staging Area.
Deploying
Eclipse Maintenace Stuff
Putting Files on the Download Server
- Old files should be moved to archive.eclipse.org:
- ssh yourcommitterid@dev.eclipse.org
- mv ~/downloads/your/project/oldrelease/ /home/data/httpd/archive.eclipse.org/your/project/oldrelease/
- Connect to download1.eclipse.org using SCP/SFTP and upload the new files
- Update the JWT Download Site
- Update the main JWT site (news area, download area)
Updating the Web Site
- Connect to the CVS repository /cvsroot/org.eclipse on dev.eclipse.org
- The files concerning the JWT page are in the directory /www/jwt
- Refer to http://www.eclipse.org/phoenix/ for information on how to set up the pages
Adapting the Eclipse Update Site
In order to adapt the Eclipse update site you need to create a feature first. This shall include all plugins that will be deployed.
Creating the feature
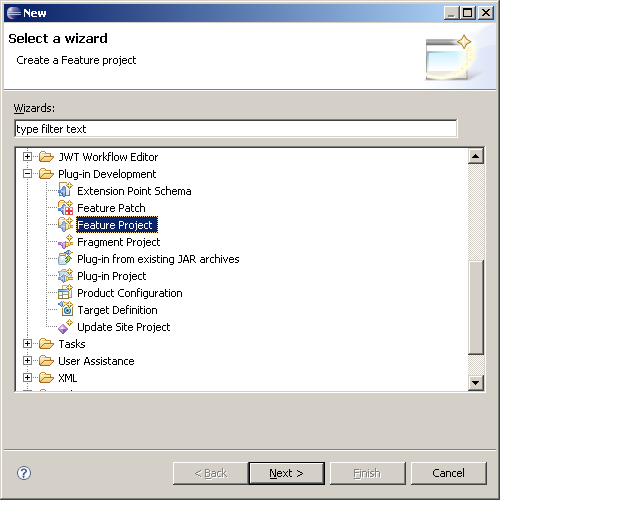
You'll first need to create a new feature project via the "File -> New -> Other..." dialog.
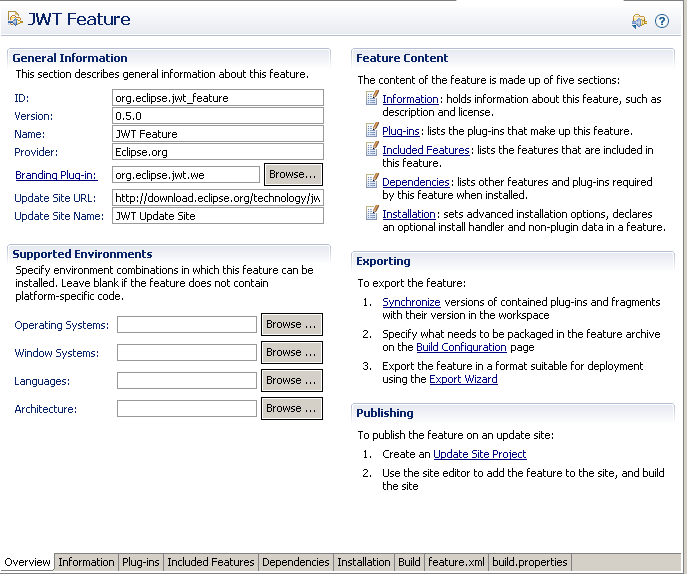
Then, open the feature.xml to specify all your requirements. The name of the feature, who the provider is, etc. You should also specify the copyright and licensing information there, add the plugins you want to be part of the feature and then compute the dependencies. Afterwards you can go back to the overview page and go through the steps in the Exporting area.
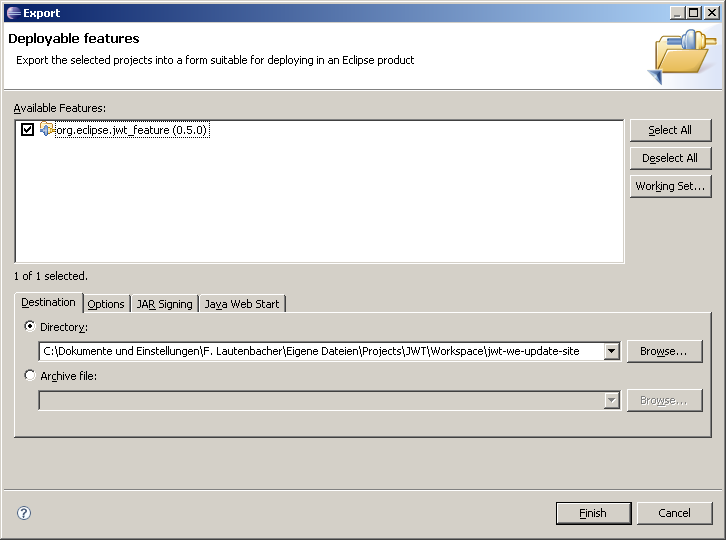
First, synchronize your plugins with their versions in the workspace, specify the Build configuration and then Export the feature.
In this dialog you will be asked where to create this new feature. Since we want to create a new update-site it makes sense to select already the path of this update site. You can specify several options there and start the process of signing the JAR (if not happened already) and can then click on Finish.
Creating the update-site
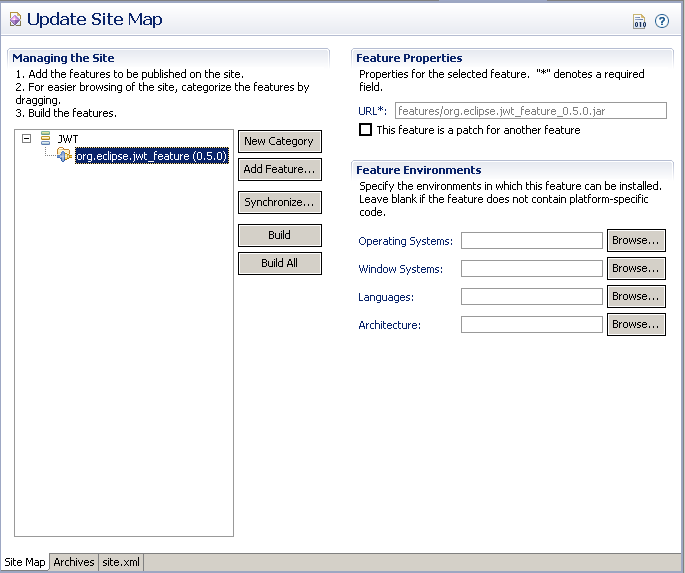
The feature overview allows you also to create an update site project in the Publishing area. There you can open the update site map (site.xml) and specify the feature as well as system requirements. Finally, build the feature and your update-site will be finished.
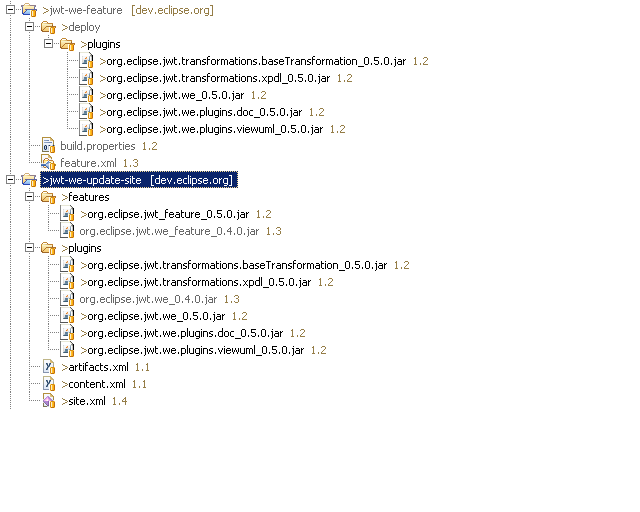
Now all there is needed is that you upload your update-site to the Eclipse-server. Probably you'll have a directory structure as the following:
Notify
- Existing mailing lists for JWT, AgilPro, SEMPRO, SCOrWare and OW2
- the JWT Newsportal
- SourceForge.Net AgilPro Announcement Forum
- SourceForge.Net Wf-Codegen Announcement Forum
- JWT Website
- AgilPro Website
- InfoQ
- openPR.de

