Notice: this Wiki will be going read only early in 2024 and edits will no longer be possible. Please see: https://gitlab.eclipse.org/eclipsefdn/helpdesk/-/wikis/Wiki-shutdown-plan for the plan.
Difference between revisions of "JFace"
(→Create the Eclipse SWT/JFace Project) |
(→Create the Eclipse SWT/JFace Project) |
||
| Line 49: | Line 49: | ||
In this step, we will create one project that will point to all of the JAR files needed for SWT and JFace development. Here are the steps: | In this step, we will create one project that will point to all of the JAR files needed for SWT and JFace development. Here are the steps: | ||
| − | # Download the SWT stable release for your Eclipse version and your operating system from [http://www.eclipse.org/swt Eclipse SWT Project Page]. For example, for Eclipse version 3.3 and Windows, select the Windows link under Releases / Stable, as shown in the screenshot below.[[Image:swt_web_page.png]] | + | # Download the SWT stable release for your Eclipse version and your operating system from [http://www.eclipse.org/swt Eclipse SWT Project Page]. For example, for Eclipse version 3.3 and Windows, select the Windows link under Releases / Stable, as shown in the screenshot below.[[Image:swt_web_page.png|frame|center]] |
# This will download a zip file that contains our org.eclipes.swt project. (For example, for Eclipse 3.3 and Windows, the file is called swt-3.3.1.1-win32-win32-x86.zip.) Do not unzip this file. Just download it and note the directory where you saved it. | # This will download a zip file that contains our org.eclipes.swt project. (For example, for Eclipse 3.3 and Windows, the file is called swt-3.3.1.1-win32-win32-x86.zip.) Do not unzip this file. Just download it and note the directory where you saved it. | ||
| − | # Inside Eclipse, select Import / Existing Projects into Workspace, as shown below.[[Image:import_wizard1.png]] | + | # Inside Eclipse, select Import / Existing Projects into Workspace, as shown below.[[Image:import_wizard1.png|frame|center]] |
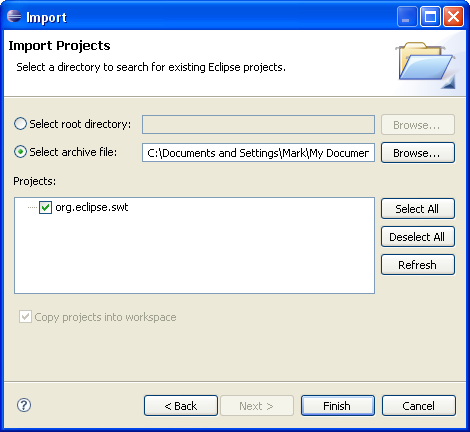
| − | # Press Next and select the option Select archive file. Browse to the zip file you just downloaded. A project called org.eclipse.swt will display in the Projects list. Make sure it is checked, as shown below, and press Finish.[[Image:import_wizard2.png]] | + | # Press Next and select the option Select archive file. Browse to the zip file you just downloaded. A project called org.eclipse.swt will display in the Projects list. Make sure it is checked, as shown below, and press Finish.[[Image:import_wizard2.png|frame|center]] |
# Eclipse will create the project org.eclipse.swt in your workspace. This project already has the required SWT JAR file. | # Eclipse will create the project org.eclipse.swt in your workspace. This project already has the required SWT JAR file. | ||
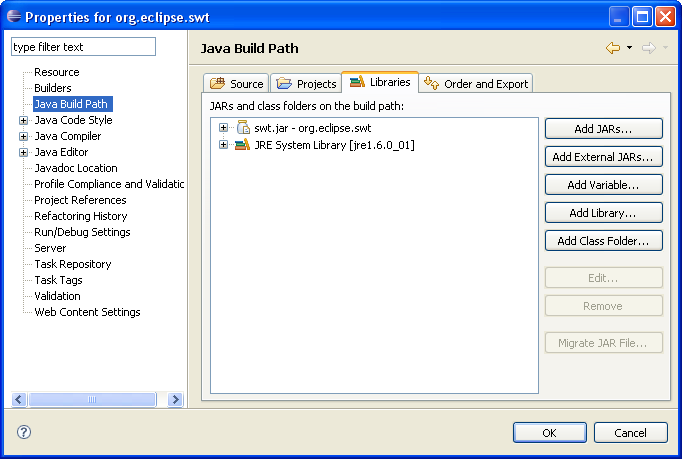
| − | # Now we just need to add the JFace JAR files to the project. Make sure the org.eclipse.swt project is highlighted and select Project / Properties / Java Build Path | + | # Now we just need to add the JFace JAR files to the project. Make sure the org.eclipse.swt project is highlighted and select Project / Properties / Java Build Path and select the Libraries tab.[[Image:build_path_before.png|frame|center]] |
| − | + | # First, we'll create a new Variable called Eclipse_Home that points to the directory where Eclipse is installed. This will make it easier to keep this project updated as you install new Eclipse versions in the future. | |
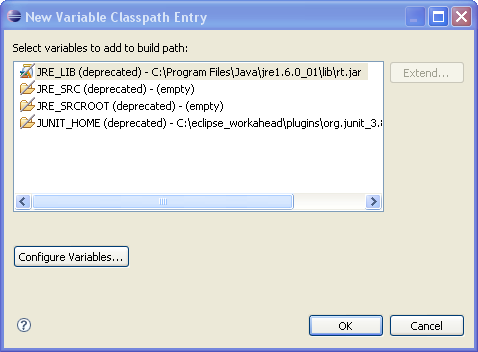
| − | # Press the Add Variable button to display the New Variable Classpath Entry dialog. | + | # Press the Add Variable... button to display the New Variable Classpath Entry dialog.[[Image:new_variable_classpath_entry.png|frame|center]] |
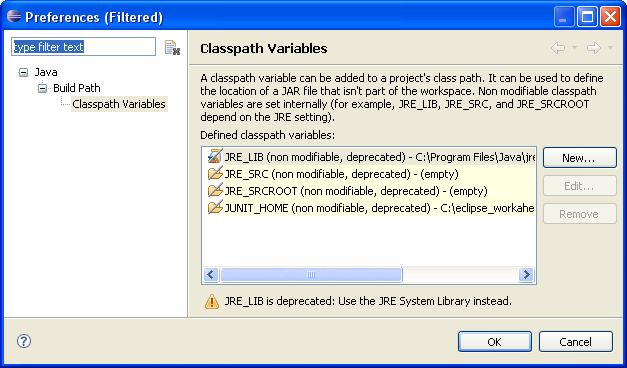
| − | # Press the Configure Variables button to display the Classpath Variables dialog. | + | # Press the Configure Variables button to display the Classpath Variables dialog.[[Image:classpath_variables.png|frame|center]] |
# Press New to display the New Variable Entry dialog. Enter ECLIPSE_HOME in the Name field. For the Path field, browse to the directory where Eclipse is installed. In the example, Eclipse is installed in “c:\eclipse”. | # Press New to display the New Variable Entry dialog. Enter ECLIPSE_HOME in the Name field. For the Path field, browse to the directory where Eclipse is installed. In the example, Eclipse is installed in “c:\eclipse”. | ||
# Press OK. Now the ECLIPSE_HOME variable will display in the Classpath Variables list. Press OK again to return to the New Variable Classpath Entry. Press Cancel to return to the Libraryies tab of the Java Build Path dialog. | # Press OK. Now the ECLIPSE_HOME variable will display in the Classpath Variables list. Press OK again to return to the New Variable Classpath Entry. Press Cancel to return to the Libraryies tab of the Java Build Path dialog. | ||
Revision as of 22:17, 24 March 2008
Template:Platform UI JFace is a UI toolkit with classes for handling many common UI programming tasks. JFace is window-system-independent in both its API and implementation, and is designed to work with SWT without hiding it. JFace includes the usual UI toolkit components of image and font registries, text, dialog, preference and wizard frameworks, and progress reporting for long running operations. Two of its more interesting features are actions and viewers. The action mechanism allows user commands to be defined independently from their exact whereabouts in the UI. Viewers are model based adapters for certain SWT widgets, simplifying the presentation of application data structured as lists, tables or trees.
New in Eclipse 3.2 is the JFace data binding framework. Data binding allows linking UI elements and models so that users can edit or view the data in the model. The framework makes it easy to connect data sources to widgets such as text fields, combos, tables and trees, for viewing and editing. Using it relieves developers from writing and registering listeners with widgets and model objects.
Contents
More information
- Platform UI home page
- Plug-in Developer's Guide: JFace
- Workbench and JFace Articles
- JFace code snippets
Using JFace outside the Eclipse platform
JFace can be used in standalone SWT+JFace apps, without requiring the Eclipse Runtime or other parts of the Eclipse Platform. This was made easier to do in 3.2, with the only prerequisites for JFace being reduced to SWT, the new org.eclipse.equinox.common plug-in, and org.eclipse.core.commands plug-in.
For more details, see Bug 49497.
In 3.3 an optional dependency on the org.osgi.framework package was added which is defined in the org.eclipse.osgi. If this plug-in is absent JFace will continue to function but without the benefit of internationalization support for it's images.
Setting Up an Eclipse Project to use SWT and JFace
This section contains detailed instructions for creating an Eclipse project for developing a stand-alone Java program that uses SWT and JFace. This will be broken down into three steps, as follows:
- Identify the required external JAR files for JFace.
- Create an Eclipse project (called org.eclipse.swt) that will have all of the required SWT and JFace JAR files on it's build path and configure the Order and Export tab of the Build Path to export these files. This project will supply the required JAR files to any other Eclipse project that needs them.
- On any new Java projects that need to use SWT or JFace, simply add the org.eclipse.swt project as a required project on the Projects tab of the Build Path.
Detailed instructions for each of these steps are outlined below.
Identify the Required External JAR Files for SWT and JFace
For Eclipse version 3.3.1.1, the required JAR files for JFace are as follows (where <version info> is the specific version information):
- org.eclipse.core.commands_<version info>.jar
- org.eclipse.equinox.commands_<version info>.jar
- org.eclipse.jface_<version info>.jar
- org.eclipse.osgi_<version info>.jar
- org.eclipse.ui.workbench_<version info>.jar
The file org.eclipse.ui.workbench_<version info>.jar is not required to run the standard JFace classes. However, since it adds a number of very useful Dialogs (such as ListDialog, ListSelectionDialog, and others), it is included here as well.
You can find the JFace dependencies for any Eclipse version if you have the Plug-in Development Environment, which includes the Plug-ins and Plug-in Dependencies views. To do this:
- Select Window/Show View/PDE/Plug-ins. (Note, if you don't have a PDE view folder, it means you don't have the Plug-in Developer Environment plug-in in your Eclipse installation.)
- Select the org.eclipse.jface plug-in from the list.
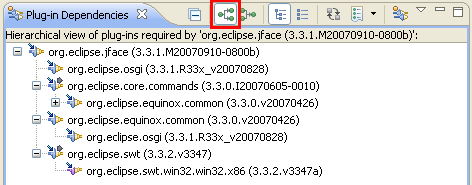
- Right-click and select Open Dependencies. This will open the Plug-in Dependencies view. An example of this view for Eclipse version 3.3.1.1 is shown below.
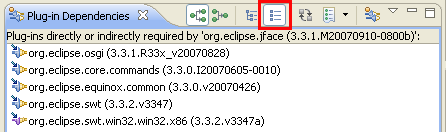
- Press the Set Flat Layout button to see a simple flat list of the required plug-ins, as shown below.
- Each plug-in on the list corresponds to a JAR file in the plugins directory for your Eclipse installation. If the list for your Eclipse version is different than the list above, make a note of it and modify the remaining instructions accordingly. At this point, we have the list of JAR files that we need.


Create the Eclipse SWT/JFace Project
In this step, we will create one project that will point to all of the JAR files needed for SWT and JFace development. Here are the steps:
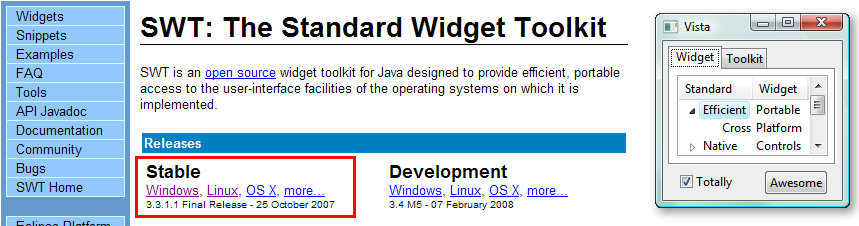
- Download the SWT stable release for your Eclipse version and your operating system from Eclipse SWT Project Page. For example, for Eclipse version 3.3 and Windows, select the Windows link under Releases / Stable, as shown in the screenshot below.
- This will download a zip file that contains our org.eclipes.swt project. (For example, for Eclipse 3.3 and Windows, the file is called swt-3.3.1.1-win32-win32-x86.zip.) Do not unzip this file. Just download it and note the directory where you saved it.
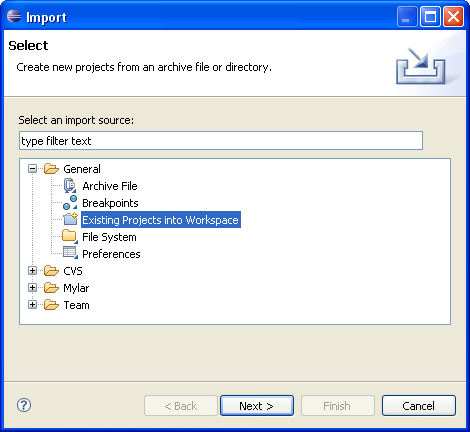
- Inside Eclipse, select Import / Existing Projects into Workspace, as shown below.
- Press Next and select the option Select archive file. Browse to the zip file you just downloaded. A project called org.eclipse.swt will display in the Projects list. Make sure it is checked, as shown below, and press Finish.
- Eclipse will create the project org.eclipse.swt in your workspace. This project already has the required SWT JAR file.
- Now we just need to add the JFace JAR files to the project. Make sure the org.eclipse.swt project is highlighted and select Project / Properties / Java Build Path and select the Libraries tab.
- First, we'll create a new Variable called Eclipse_Home that points to the directory where Eclipse is installed. This will make it easier to keep this project updated as you install new Eclipse versions in the future.
- Press the Add Variable... button to display the New Variable Classpath Entry dialog.
- Press the Configure Variables button to display the Classpath Variables dialog.
- Press New to display the New Variable Entry dialog. Enter ECLIPSE_HOME in the Name field. For the Path field, browse to the directory where Eclipse is installed. In the example, Eclipse is installed in “c:\eclipse”.
- Press OK. Now the ECLIPSE_HOME variable will display in the Classpath Variables list. Press OK again to return to the New Variable Classpath Entry. Press Cancel to return to the Libraryies tab of the Java Build Path dialog.
- Now, we're ready to add our JFace JAR files. We'll use the ECLIPSE_HOME classpath variable we just created. That way, if the location of our Eclipse installation changes, we can just change the ECLIPSE_HOME variable once.
- Press the Add Variable button to again display the New Variable Classpath Entry dialog. Make sure ECLIPSE_HOME is selected and press the Extend... button to display the Variable Extension dialog, shown below.
- This will display the subdirectories of the ECLIPSE_HOME directory. The JAR files we need are in the plugins directory.
- Expand the plugins directory and browse down to the org.eclipse.core.commands and select it. You can select multiple JAR files from this list using Ctrl+Click. Scroll down the list and select the remaining JAR files. The complete list for Eclipse 3.3 is shown below:
- org.eclipse.core.commands_<version info>.jar
- org.eclipse.equinox.commands_<version info>.jar
- org.eclipse.jface_<version info>.jar
- org.eclipse.osgi_<version info>.jar
- org.eclipse.ui.workbench_<version info>.jar
- If there are any other JAR files that displayed for your Eclipse version, select them here as well. When you have selected all of the required files, press OK. The Libraries tab should now show all of the JAR files, similar to the screenshot below.
- It may be desirable to be able to browse the JFace source code. If so, you can add the source code to the JFace JAR file. Expand the JFace JAR file and select the Source Attachment, as shown below.
- Press Edit to display the Source Attachment Configuration dialog. Press the Variable button, select the ECLIPSE_HOME variable, and press OK.
- Now press the Extension... button. This will open the Variable Extension Selection dialog. Again, expand the plugins directory. Find the directory called org.eclipse.rcp.source_<version infomation>. Note that this is a directory, not a JAR file.
- Expand this directory, expand the src directory, scroll down to the directory called org.eclipse.jface_<version information>. Expand this, and select the file called src.zip. Press OK twice to return to the Libraries tab. At this point, you have attached the JFace source code.
- Finally, select the Order and Export tab and check the check boxes next to each of the ECLIPSE_HOME JAR files.
- Press OK. At this point, the org.eclipse.swt project is set up and will supply all of the required libraries for a SWT and JFace project.


