Notice: this Wiki will be going read only early in 2024 and edits will no longer be possible. Please see: https://gitlab.eclipse.org/eclipsefdn/helpdesk/-/wikis/Wiki-shutdown-plan for the plan.
Hudson-ci/Containers/Tomcat.
Contents
- 1 Hudson
- 1.1 Introduction
- 1.2 Features
- 1.3 Industry standard products supported by Hudson
- 1.4 Hudson Best Practices
- 1.5 Hudson Installation
- 1.5.1 Download
- 1.5.2 Installation
- 1.5.3 Access Hudson dash board
- 1.5.4 Basic Setup
- 1.5.5 Set up a new project
- 1.5.6 Configure Build trigger
- 1.5.7 Build command configuration
- 1.5.8 Configure Post build action
- 1.5.9 Build project for the first time
- 1.5.10 Monitor status in console
- 1.5.11 Job Status
- 1.5.12 Schedule Build
- 1.5.13 Build History
- 1.5.14 Job Dashboard
- 1.5.15 Disable a project
- 1.6 Security
- 1.7 Apache Tomcat
Hudson
Introduction
Hudson monitors the execution of repeated jobs, such as building a software project or jobs run by cron. Among those things, currently Hudson focuses on the following two jobs:
- Building/testing software projects continuously, just like CruiseControl or DamageControl. In a nutshell, Hudson provides an easy-to-use so-called continuous integration system, making it easier for developers to integrate changes to the project, and making it easier for users to obtain a fresh build. The automated, continuous build increases productivity.
- Monitoring executions of externally-run jobs, such as cron jobs and procmail jobs, even those that are run on a remote machine. For example, with cron, all you receive is regular e-mails that capture the output, and it is up to you to look at them diligently and notice when it broke. Hudson keeps those outputs and makes it easy for you to notice when something is wrong.
Features
Hudson offers the following features:
- Easy installation: Just java -jar hudson.war for testing. Use a native package or deploy it in a servlet container for production use. No additional install, no database.
- Easy configuration: Hudson can be configured entirely from its friendly web GUI with extensive on-the-fly error checks and inline help. There's no need to tweak XML manually anymore, although if you'd like to do so, you can do that, too.
- Change set support: Hudson can generate a list of changes made into the build from SCM systems like CVS, Subversion, Git and many others. This is done in a fairly efficient fashion, to reduce the load on the repository.
- Permanent links: Hudson gives you clean readable URLs for most of its pages, including some permalinks like "latest build"/"latest successful build", so that they can be easily linked from elsewhere.
- RSS/E-mail/IM Integration: Monitor build results by RSS or e-mail to get real-time notifications on failures.
- After-the-fact tagging: Builds can be tagged long after builds are completed
- JUnit/TestNG test reporting: JUnit test reports can be tabulated, summarized, and displayed with history information, such as when it started breaking, etc. History trend is plotted into a graph.
- Distributed builds: Hudson can distribute build/test loads to multiple computers. This lets you get the most out of those idle workstations sitting beneath developers' desks.
- File fingerprinting: Hudson can keep track of which build produced which jars, and which build is using which version of jars, and so on. This works even for jars that are produced outside Hudson, and is ideal for projects to track dependency.
- Plugin Support: Hudson can be extended via 3rd party plugins. You can write plugins to make Hudson support tools/processes that your team uses.
Industry standard products supported by Hudson
Hudson supports hundreds of standard products via plugins. To name a few
- SCM vendors: Git, CVS, SVN, Perforce, Mercurial, Team Foundation
- Build tools: Ant, mave, gradle, MSBuild, Nant, Rake
- Unit Testing frameworks: JUnit, NUnit, Selenium, CppUnit, TestNg, XUnit
- Code Coverage tools: Clover, Cobertura, Emma, Serenity, Sonar, NCover, Jacoco
- Code Analysis Tools: Checkstyle, PMD, Dry, Findbugs, Warnings, CCM, Violations
- Security Tools: LDAP, Active Directory, Crowd, OpenID
- Applications servers: Weblogic, Glassfish, Tomcat, JBoss, IIS, JRebel
- Virtual Environment: EC2, Virtual Box, VmWare, JCloud
- Social communication: E-mail, IRC, Jabber, SMS, Twitter
Hudson Best Practices
Continuous Integration with automated test execution has seen broad adoption in recent years. The ideas behind Continuous Integration have changed how companies look at Build Management, Release Management, Deployment Automation, and Test Orchestration. This section provides a set of best practices for Hudson - A Continuous Integration Solution to provide executives, business managers, software developers and architects a better sense of the development progress and code quality of projects throughout the development lifecycle.
Hudson Installation
Note: the below steps are executed on Red hat Enterprise Linux.
Download
Download Hudson war file (version 3-0-0) from the below link
http://eclipse.org/hudson/download.php
Pre-requisites
Make sure Java version >=6 is installed by executing the below command
|
prompt >java -version
|
Installation
Execute the below command to extract war file and start the Hudson basic setup process.
| prompt > cd /home/Hudson prompt > ls hudson-3.0.0.war prompt > export HUDSON_HOME=/home/Hudson prompt > java -jar hudson-3.0.0.war /home/hudson/hudson-3.0.0.war War - /home/hudson/hudson-3.0.0.war 2013-03-14 11:47:17.892:INFO:oejs.Server:jetty-8.1.7.v20120910 2013-03-14 11:47:17.913:INFO:oejw.WebInfConfiguration:Extract jar:file:/home/hudson/hudson-3.0.0.war!/ to /home/hudson/war/webapp 2013-03-14 11:47:19.391:INFO:oejw.StandardDescriptorProcessor:NO JSP Support for /, did not find org.apache.jasper.servlet.JspServlet 2013-03-14 11:47:19.433:INFO:oejsh.ContextHandler:started o.e.j.w.WebAppContext{/,file:/home/hudson/war/webapp/},file:/home/hudson/hudson-3.0.0.war 2013-03-14 11:47:19.433:INFO:oejsh.ContextHandler:started o.e.j.w.WebAppContext{/,file:/home/hudson/war/webapp/},file:/home/hudson/hudson-3.0.0.war Mar 14, 2013 11:47:19 AM org.eclipse.hudson.HudsonServletContextListener contextInitialized INFO: Home directory: /home/hudson Mar 14, 2013 11:47:21 AM org.eclipse.hudson.HudsonServletContextListener contextInitialized INFO: ================> |
NOTE: This way of execution is only preferred in test environment, It is recommended to deploy Hudson as a application in containers as servlet. Tomcat container example is shown in later section.
Access Hudson dash board
The command extracts war file in HUDSON_HOME directory and starts the server. User is required to perform some basic setup required to complete the installation. Open browser and access the Hudson using below url.
Note: If url is not accessible, please disable firewall Or contact your administrator.
Basic Setup
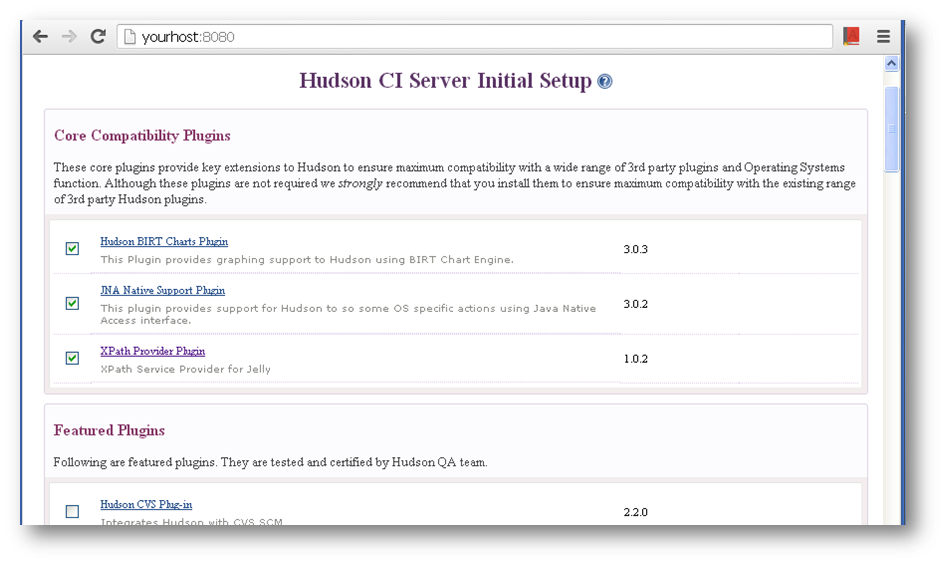
I n the initial page of Hudson url, it displays all plug-ins available for current installed version of Hudson. Based on project need, user can select the required plug-ins and install them.
For example let’s consider a project which is using SVN (Source version control) and build the project using Hudson. Chose following recommended plug-ins.
- JNA Native Support Plugin
- Hudson Subversion Plug-in
- Dashboard View
- Hudson disk-usage plugin
- Email-ext plugin
- SSH plugin
- SCP plugin
Once selection is done, click on “INSTALL” button, Hudson downloads and installs the selected plug-in in Hudson server.
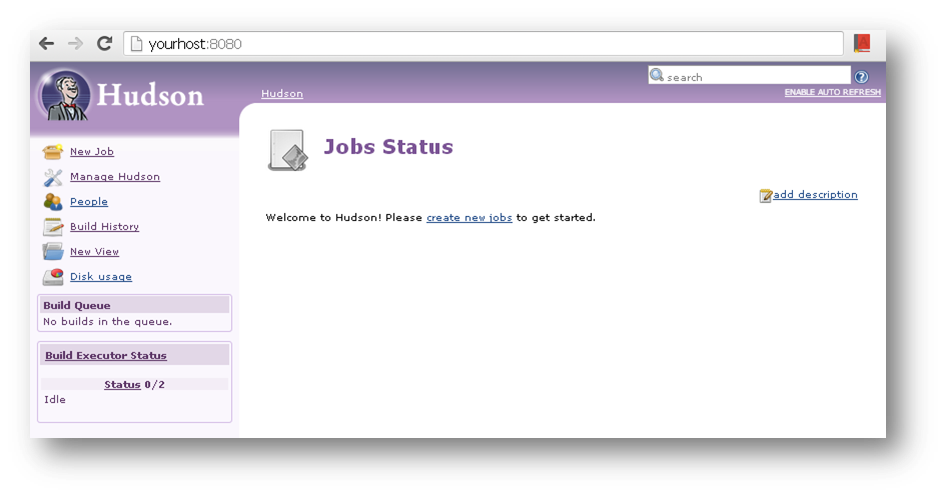
Once installation completes, click “FINISH” button, which will redirects to the Hudson dash board which is shown in below figure.
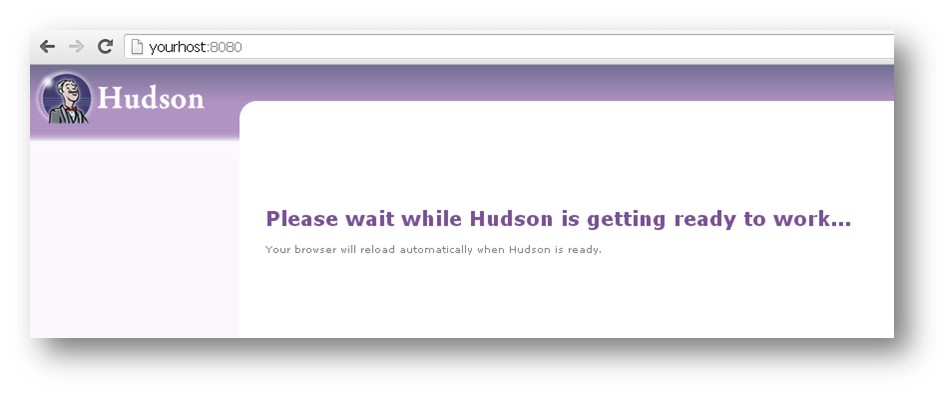
This page is redirected to Hudson dash board, once Hudson server is ready. Now it is ready, one can add jobs and performs builds.
Set up a new project
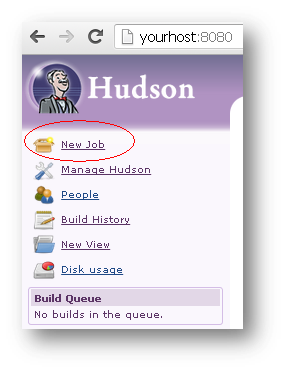
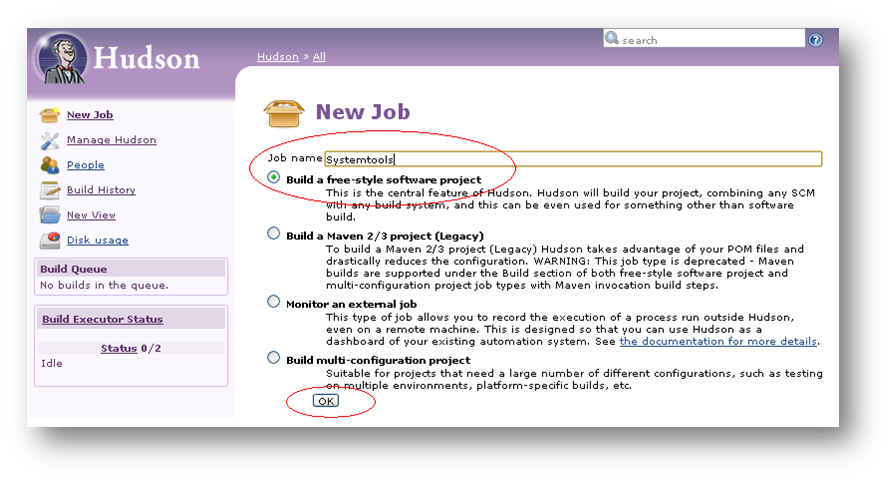
To create a new job to add project Click on “new job” in Hudson left panel.
- Enter Job name, a unique identifier to identify project in Hudson configuration.
- Select “Build a free-style software project” option to start with, also based on project need, other options can be explored.
- Click on “ok”.
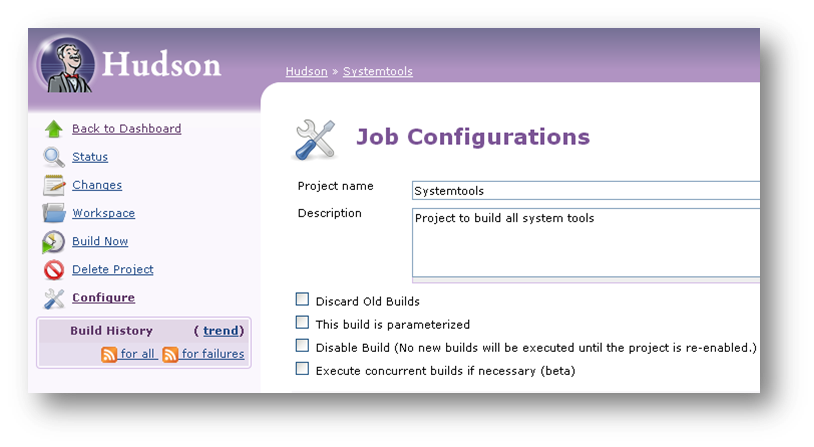
All other configuration options are available in the next screen which is shown below.
Add project description.
Select appropriate options, based on need.
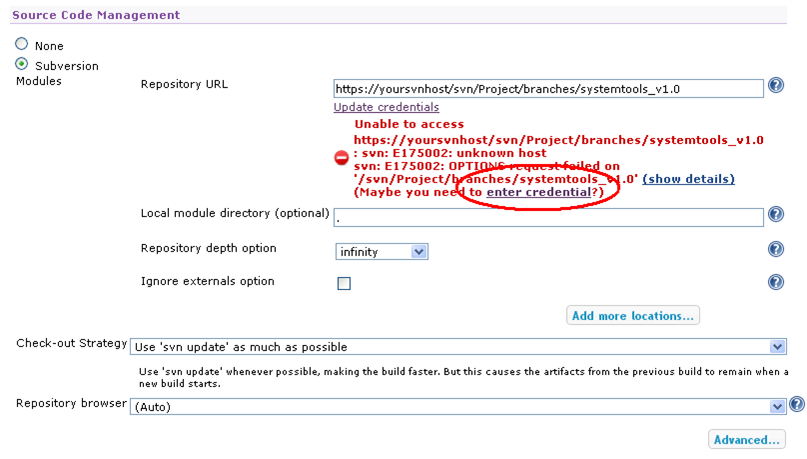
In Source code management configuration section, Configure SVN branch path of the selected project If any specific module needs to be loaded, specify module name in “Load module directory”, which is optional. Specify the checkout strategy, which indicate the type of project code checkout.
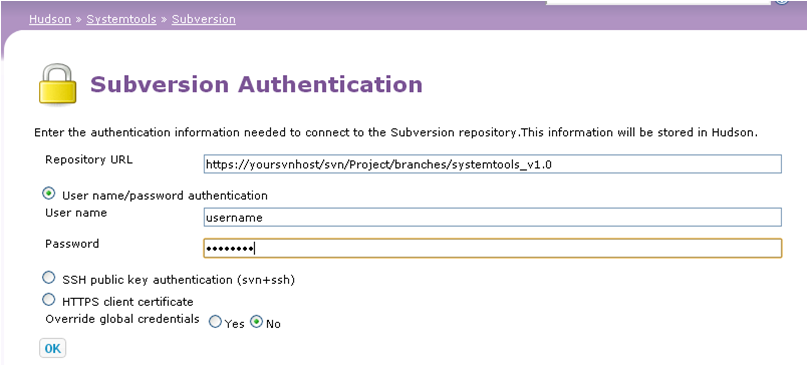
Hudson requires access details to check out the specified branch from SVN. To provide user and password to access SVN, click on “enter credentials” Or “update credentials” option which is shown above. The following screen appears where you can enter credentials and click “OK”
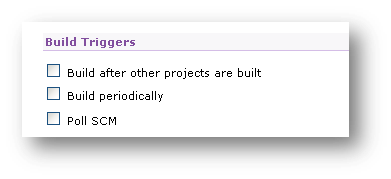
Configure Build trigger
Select type of trigger which initiates build.
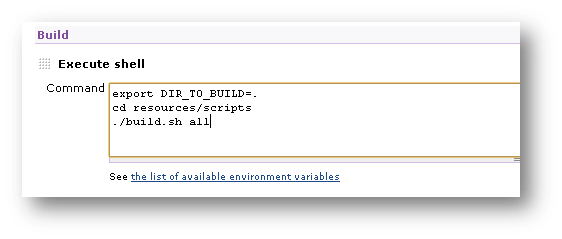
Build command configuration
Specify command to execute to build the project. The following command are added to build project on Linux Host. If it is on windows, chose associated build step to execute batch command.
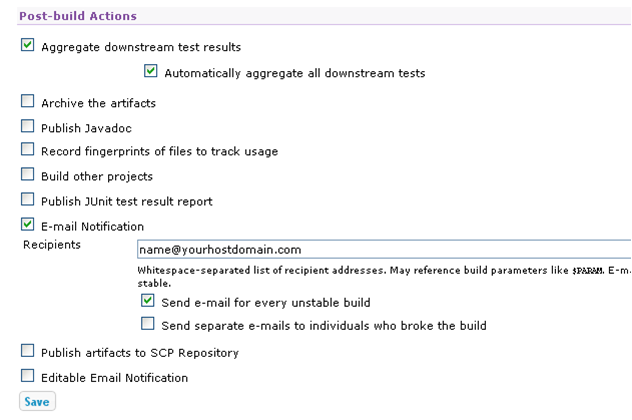
Configure Post build action
Te final step in configuring a project is to add post build actions. Select appropriate options in below screen. Add email addresses in “Email notification” box, to get build notifications.
Click on “save” to save the job configuration.
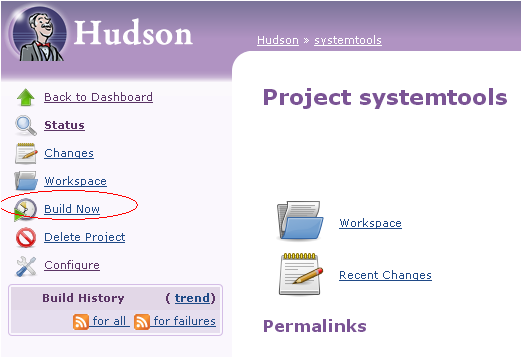
Build project for the first time
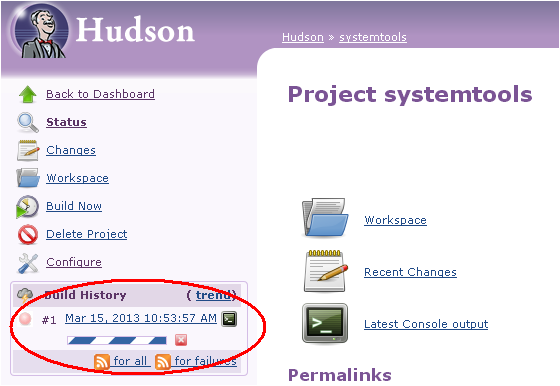
Once project is configured as Hudson job, project can be build using “build now” option available in left panel of Hudson dashboard. This is for very first build of the project.
Once build is started, the progress can be seen in the dash board as shown in below screen.
Monitor status in console
Build progress can be monitored by looking at the status bar, as shown in above figure. Hudson also provides console output monitor option. Clock on the console output icon to see the live output of the build command.
Job Status
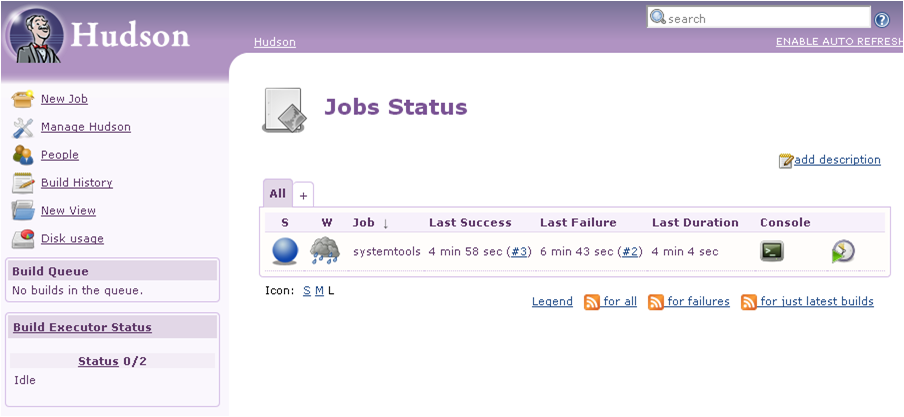
Click on “Back to Dashboard” to go to dash board screen, where all jobs are listed.
Schedule Build
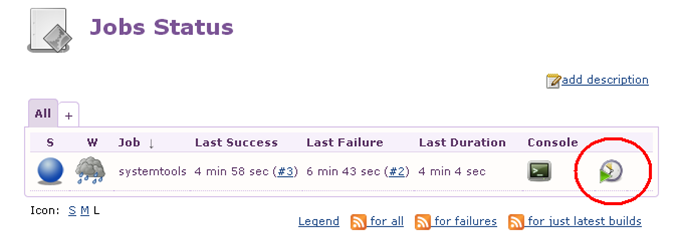
If you want to schedule a build immediately, click on the “schedule a build” option in Job status screen as shown below.
Build History
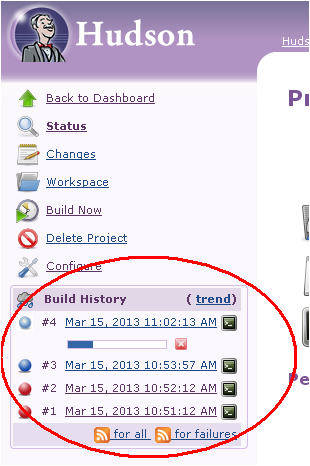
Hudson shows all build history in the left panel of the selected job.
Job Dashboard
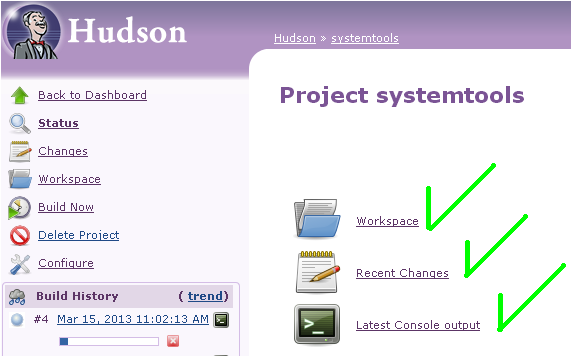
Hudson job status screen provides 3 options.
Workspace: using this option to view entire workspace as filesystem
Recent Changes: Use this option to see what changes caused the build. Hudson queries SVN to get the changes that had been checked-in compared to last build. If source version control is different the Hudson uses respective command to fetch the change history.
Latest Console Output: Use this option to view the last build console output.
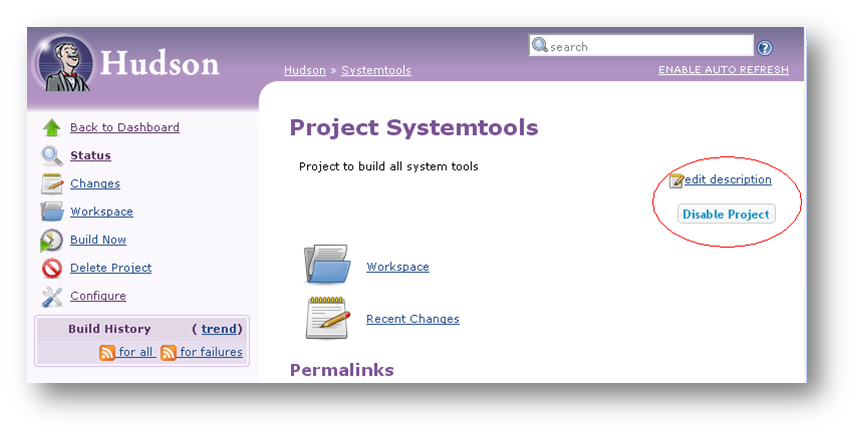
Disable a project
If project does not require any more builds, then project build can be disabled by chosing the “disable Project” option in project workspace as shown in below screen.
Security
Users and groups
So far, all operation performed in the Hudson are as a anonymous user. It is very important to protect configuration and other sensitive details like SVN username and password. For this, Hudson allows to configure login user and password. Using this, access can be given to set of users or group to access the project. Also one can limit the user access to the Hudson just to view the dash board, do not allow guest user to build project.
Let us see how to configure user.
Select “Manage Hudson” -> ”Configure Security”
Configure Security Screen is shown below.
- Check “enable security” check box
- Security Realm:
o Select type of security Realm, to make it simple, chose “Hudson’s own user database”. Using this option, Hudson maintains user access details on its own.
o Disable “Allow user to sign up” to get full control on admin.
- Authorization:
o Select “Matrix based security”, to give limited access to the users.
o Add “admin” in “User/group to add” text box and click add.
o Add “Guest” user also.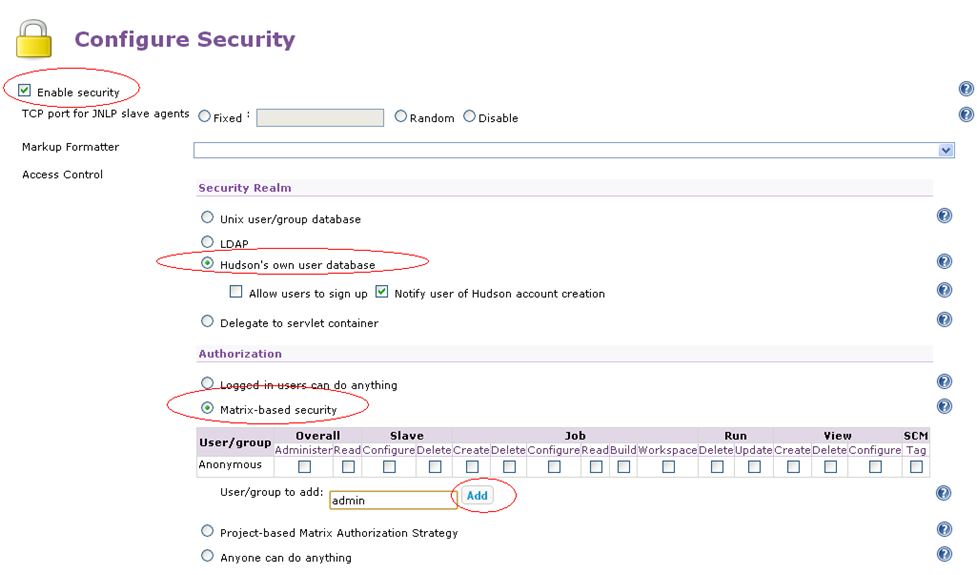
Once user is added, provide access authorization to the users as follows
- Give full administration access to “admin” user. Admin user has full access to Hudson. Admin can create users, change user password, manage jobs, build jobs and publish jobs.
- Give only read access to guest user, who can view the dashboard but such user can modify or build any job.
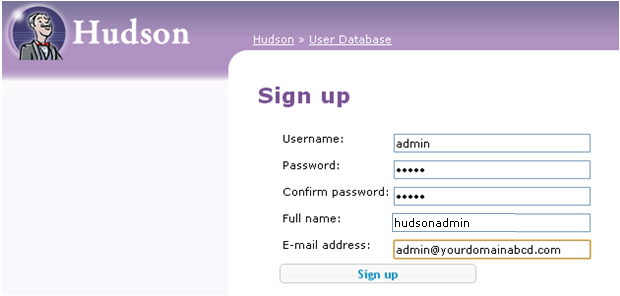
Once after configuration completes, click on “Save”, which will shows the below screen. Enter username, password, Name and Email address to finish the one time sign up process.
Once sign up is completed, the admin user is automatically in logged in status as shown below. User can use “log out” option available in Hudson screen to logout.
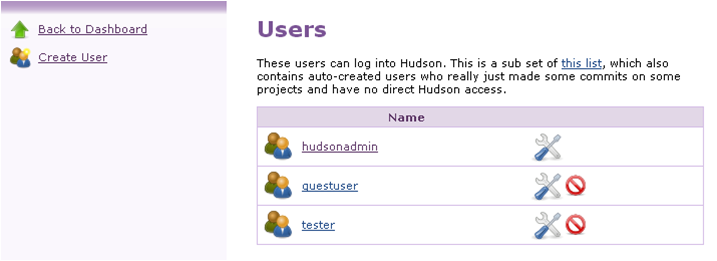
Create new user:
Follow below steps to create new users.
- Select Manage Hudson -> Manage Users.
- Select “Create user” from the left panel
- Fill up the signup form with following details.
o Username
o Password
o Full name
o Email address
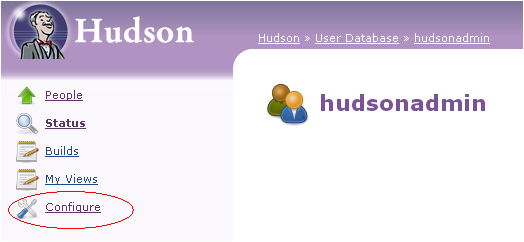
Modify existing user details:
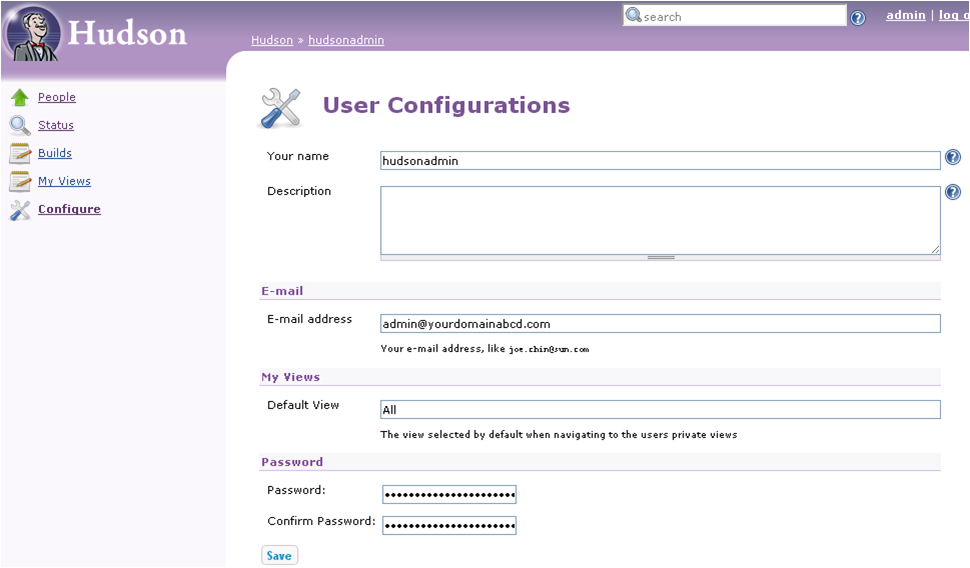
Follow below steps to Modify user details such as emailed, password etc.
- Select Manage Hudson -> Manage Users.
- Select user from the screen
- Select configure from the left panel
- Modify user password or other details from the below screen
- Click on “Save”
Apache Tomcat
Apache Tomcat is an open source software implementation of the Java Servlet and JavaServer Pages technologies. The Java Servlet and JavaServer Pages specifications are developed under the Java Community Process.
Apache Tomcat is developed in an open and participatory environment and released under the Apache License version 2. Apache Tomcat is intended to be a collaboration of the best-of-breed developers from around the world. We invite you to participate in this open development project. To learn more about getting involved, click here.
Apache Tomcat powers numerous large-scale, mission-critical web applications across a diverse range of industries and organizations. Some of these users and their stories are listed on the PoweredBy wiki page.
Apache Tomcat, Tomcat, Apache, the Apache feather, and the Apache Tomcat project logo are trademarks of the Apache Software Foundation.
Download
Down load Apache Tomcat version 7.x from the below link
http://tomcat.apache.org/download-70.cgi
Or run the command to download
| prompt $ cd /home/ prompt $ wget http://mirrors.ibiblio.org/apache/tomcat/tomcat-7/v7.0.37/bin/apache-tomcat-7.0.37.tar.gz --2013-03-22 15:03:02-- http://mirrors.ibiblio.org/apache/tomcat/tomcat-7/v7.0.37/bin/apache-tomcat-7.0.37.tar.gz Resolving mirrors.ibiblio.org... 152.19.134.44 Connecting to mirrors.ibiblio.org|152.19.134.44|:80... connected. HTTP request sent, awaiting response... 200 OK Length: 7814288 (7.5M) [application/x-gzip] Saving to: âapache-tomcat-7.0.37.tar.gzâ 100%[===================================================================================================================>] 7,814,288 65.0K/s in 2m 0s 2013-03-22 15:05:03 (63.6 KB/s) - âapache-tomcat-7.0.37.tar.gzâ |
Install Tomcat
| prompt $ cd /home/ prompt $ tar xvf apache-tomcat-7.0.37.tar.gz |
Start Tomcat server
| Prompt $ export JAVA_HOME=/usr/java/jre1.6.0_32/ prompt $ cd /home/apache-tomcat-7.0.37/bin prompt $ ./startup.sh Using CATALINA_BASE: /home/apache-tomcat-7.0.37 Using CATALINA_HOME: /home/apache-tomcat-7.0.37 Using CATALINA_TMPDIR: /home/apache-tomcat-7.0.37/temp Using JRE_HOME: /usr/java/jre1.6.0_32/ Using CLASSPATH: /home/apache-tomcat-7.0.37/bin/bootstrap.jar:/home/apache-tomcat-7.0.37/bin/tomcat-juli.jar prompt $ |
NOTE: Make sure that you export JAVA_HOME variable with proper location.
Log files
Monitor the status of the Tomcat server startup in log file located at /home/apache-tomcat-7.0.37/logs/catalina.out
| prompt #tail -f /home/apache-tomcat-7.0.37/logs/catalina.out Mar 22, 2013 3:12:15 PM org.apache.catalina.core.AprLifecycleListener init INFO: The APR based Apache Tomcat Native library which allows optimal performance in production environments was not found on the java.library.path: /usr/java/jre1.6.0_32/lib/amd64/server:/usr/java/jre1.6.0_32/lib/amd64:/usr/java/jre1.6.0_32/../lib/amd64:/usr/java/packages/lib/amd64:/usr/lib64:/lib64:/lib:/usr/lib Mar 22, 2013 3:12:15 PM org.apache.coyote.AbstractProtocol init INFO: Initializing ProtocolHandler ["http-bio-8080"] Mar 22, 2013 3:12:15 PM org.apache.coyote.AbstractProtocol init INFO: Initializing ProtocolHandler ["ajp-bio-8009"] Mar 22, 2013 3:12:15 PM org.apache.catalina.startup.Catalina load INFO: Initialization processed in 950 ms Mar 22, 2013 3:12:15 PM org.apache.catalina.core.StandardService startInternal INFO: Starting service Catalina Mar 22, 2013 3:12:15 PM org.apache.catalina.core.StandardEngine startInternal INFO: Starting Servlet Engine: Apache Tomcat/7.0.37 Mar 22, 2013 3:12:15 PM org.apache.catalina.startup.HostConfig deployDirectory INFO: Deploying web application directory /home/apache-tomcat-7.0.37/webapps/ROOT Mar 22, 2013 3:12:16 PM org.apache.catalina.startup.HostConfig deployDirectory INFO: Deploying web application directory /home/apache-tomcat-7.0.37/webapps/docs Mar 22, 2013 3:12:16 PM org.apache.catalina.startup.HostConfig deployDirectory INFO: Deploying web application directory /home/apache-tomcat-7.0.37/webapps/host-manager Mar 22, 2013 3:12:16 PM org.apache.catalina.startup.HostConfig deployDirectory INFO: Deploying web application directory /home/apache-tomcat-7.0.37/webapps/manager Mar 22, 2013 3:12:16 PM org.apache.catalina.startup.HostConfig deployDirectory INFO: Deploying web application directory /home/apache-tomcat-7.0.37/webapps/examples Mar 22, 2013 3:12:16 PM org.apache.coyote.AbstractProtocol start INFO: Starting ProtocolHandler ["http-bio-8080"] Mar 22, 2013 3:12:16 PM org.apache.coyote.AbstractProtocol start INFO: Starting ProtocolHandler ["ajp-bio-8009"] Mar 22, 2013 3:12:16 PM org.apache.catalina.startup.Catalina start INFO: Server startup in 1107 ms |
Stop Tomcat server
| Prompt $ cd /home/apache-tomcat-7.0.37/bin prompt $ ./shutdown.sh Using CATALINA_BASE: /home/apache-tomcat-7.0.37 Using CATALINA_HOME: /home/apache-tomcat-7.0.37 Using CATALINA_TMPDIR: /home/apache-tomcat-7.0.37/temp Using JRE_HOME: /usr/java/jre1.6.0_32/ Using CLASSPATH: /home/apache-tomcat-7.0.37/bin/bootstrap.jar:/home/apache-tomcat-7.0.37/bin/tomcat-juli.jar |
Server Page
After starting the Tomcat server, Enter the below url in the browser to access the server page. http://<yourhost>:8080
NOTE: Replace <yourhost> with the hostname or ip address of the machine in which Tomcat server is deployed.
Once you are able to see the below page, it indicates that the tomcat server is successfully started and running.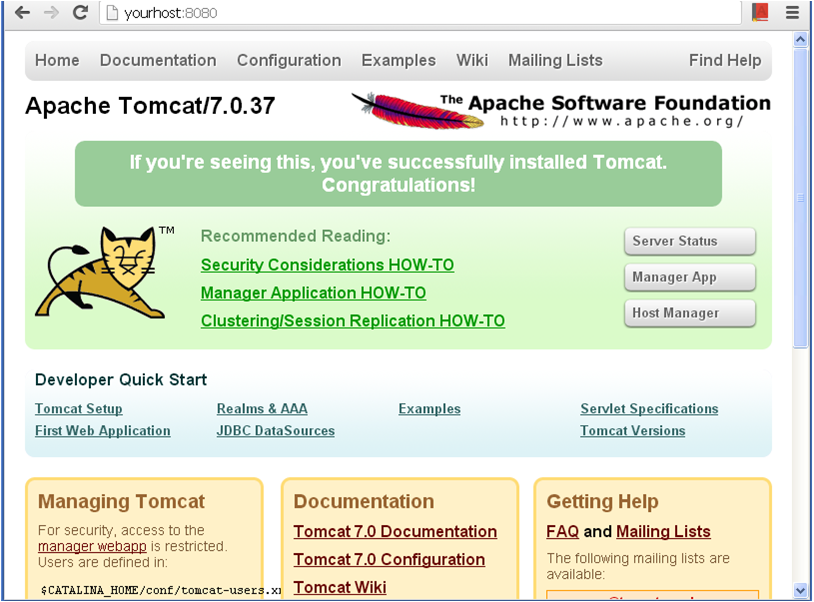
Deploy Hudson in Tomcat
To deploy any application , follow these steps after starting the Tomcat server.
- Download Hudson war file. Refer Down load Hudson section.
- Copy the war file into /home/apache-tomcat-7.0.37/webapps
| prompt $ cp /home/hudson-3.0.0.war /home/apache-tomcat-7.0.37/webapps prompt $ ls docs examples host-manager hudson-3.0.0 hudson-3.0.0.war manager ROOT |
After copying the war file, Tomcat automatically starts extracting war application in the directory /home/apache-tomcat-7.0.37/webapps
Once installation is completed, User can access the application using the below url.
| http://<yourhost>:8080/hudson-3.0.0/ |
By this time, Application is in ready state. Let us see the web page using the url.
From this point, Follow the install Hudson steps mentioned in the previous sections.
NOTE: I am still working on adding more content to this page. Please consider this stage as incomplete.

