Notice: this Wiki will be going read only early in 2024 and edits will no longer be possible. Please see: https://gitlab.eclipse.org/eclipsefdn/helpdesk/-/wikis/Wiki-shutdown-plan for the plan.
Graphical Modeling Framework/Tutorial/Part 4
In this fourth part of the GMF Tutorial, we will begin to explore alternative generation options; namely, the lite runtime option and targeting RCP.
Please note that this portion of the tutorial was created using the 2.0 development stream codebase, just prior to the M2 release. Things may vary, so you may find inaccuracies contained here. If you do, remember... this is a wiki ;) Your help in maintaining, correcting, expanding, etc. the content here is most welcome (as are posts to the newsgroup and bugzilla, actually).
Contents
Lite Runtime Generation to RCP
Let's begin with a new workspace to keep things isolated from the main tutorial a bit. This also eases maintenance of the tutorial content. We will begin by generating the EMF code for an RCP application. Your EMF .genmodel settings will be picked up by the GMF generator, in this case.
GMF Dashboard View
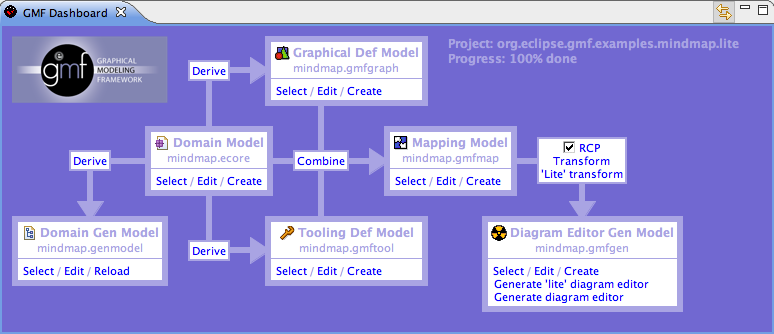
First, let's create a new org.eclipse.gmf.examples.mindmap GMF Project and keep the option to use the dashboard view this time. Below is an image of the dashboard view we will use to work through the flow of producing a GMF-based editor. As you can see, it invokes actions for many of the steps we routinely use in GMF-based development, but all from a single location.
Generating EMF for RCP
First, let's obtain our same mindmap.xsd model from the main tutorial as the input. Copy this file to your project's model folder.
Using the dashboard view's 'Select' link in the Domain Model section, locate your mindmap.xsd file. To produce an .ecore and a .genmodel from the xsd, select the 'Derive' link between Domain Model and Domain Gen Model. This will launch the New EMF Model wizard. Work your way through the dialogs and accept the defaults to Finish.
In the opened editor, view the properties of the root 'Mindmap' element. Within the Editor category, select 'true' for the Rich Client Platform property. This will be picked up by our GMF generator later. Expand the root in the editor and change the 'Base Package Name' property of the 'Mindmap' package to 'org.eclipse.gmf.examples' and save the model. Right-click the root and generate your Model, Edit, and Editor (if desired) code. You can run it now, if you wish by creating a new Eclipse Application runtime configuration and selecting 'Run an application' with your org.eclipse.gmf.examples.mindmap.editor.MindmapEditorAdvisorApplication class as the Program to Run.
Creating the GMF Generator Model
Now that our domain is set, we'll need to copy our graphical, tooling, and mapping models from the main tutorial. Save them to your model folder (where your domain models are) and update the state of the dashboard for each using its respective 'Select' link.

