Notice: this Wiki will be going read only early in 2024 and edits will no longer be possible. Please see: https://gitlab.eclipse.org/eclipsefdn/helpdesk/-/wikis/Wiki-shutdown-plan for the plan.
Difference between revisions of "Getting Started With Aggregator (Buckminster)"
(Redirecting to Buckminster Aggregator User Guide) |
|||
| (31 intermediate revisions by 3 users not shown) | |||
| Line 1: | Line 1: | ||
| − | + | #REDIRECT [[Buckminster Aggregator User Guide]] | |
| − | # | + | |
| − | # Start | + | __TOC__ |
| − | + | =Installing Eclipse and the Aggregator= | |
| − | # Click the ''Add...'' button | + | {| |
| − | + | |- | |
| − | + | | colspan="2" | | |
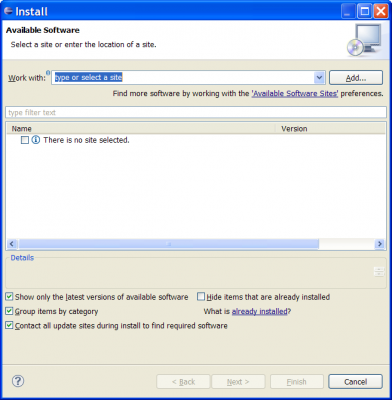
| − | # | + | # Start by installing a fresh Eclipse 3.5 SDK from http://www.eclipse.org/downloads/ (The latest version used at the time of writing was http://download.eclipse.org/eclipse/downloads/drops/R-3.5.1-200909170800/index.php) |
| − | + | # Start your Eclipse installation and open the '''''Install New Software wizard'''''. You'll find in under the top menu ''Help'' | |
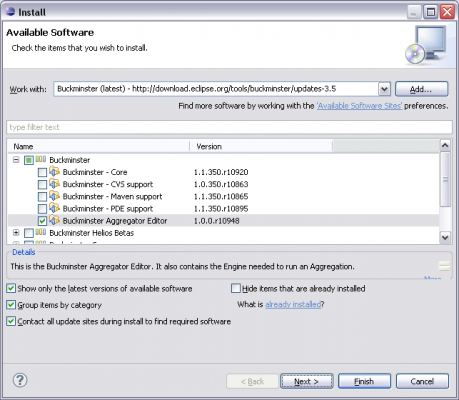
| − | + | # Click the ''Add...'' button and enter the URL <nowiki>http://download.eclipse.org/tools/buckminster/updates-3.5</nowiki> in the ''Location'' field. | |
| + | # Select the '''''Buckminster Aggregator Editor''''' and click ''Next'' twice. | ||
# Accept the Eclipse Public License and click ''Finish'' | # Accept the Eclipse Public License and click ''Finish'' | ||
# Restart the IDE once the installation is finished. | # Restart the IDE once the installation is finished. | ||
| − | + | |- | |
| + | | | ||
| + | [[Image:Buckminster_Install_New_Software.png|thumb|center|580x400px|'''''Install New Software wizard''''']] | ||
| + | | | ||
| + | [[Image:Buckminster_Install_Aggregator.png|thumb|center|580x400px|'''''Buckminster Aggregator Editor''''' selection]] | ||
| + | |} | ||
| + | |||
| + | =Creating your first aggregation= | ||
| + | {| | ||
| + | |- valign="top" | ||
| + | | | ||
# Create a new empty project. Here it's called '''aggregation.example''' but any name will do. | # Create a new empty project. Here it's called '''aggregation.example''' but any name will do. | ||
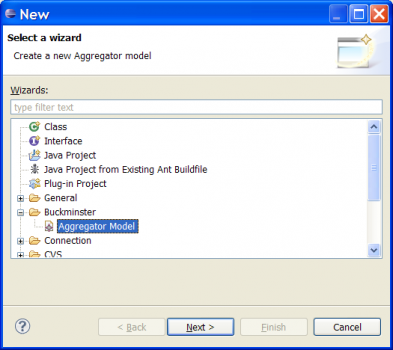
# Right click on the project and choose ''New'' -> ''Other...'' to bring up the ''New'' wizard. | # Right click on the project and choose ''New'' -> ''Other...'' to bring up the ''New'' wizard. | ||
| − | |||
# Select ''Buckminster'' -> ''Aggregator Model'' and click ''Next'' | # Select ''Buckminster'' -> ''Aggregator Model'' and click ''Next'' | ||
# Name the aggregation. Here it's called '''example.build'''. Note that the name must end with '''.build''' | # Name the aggregation. Here it's called '''example.build'''. Note that the name must end with '''.build''' | ||
# Click ''Finish''. That will bring up the Aggregation Editor on an empty model. | # Click ''Finish''. That will bring up the Aggregation Editor on an empty model. | ||
# When working with the model, it is essential that you see the ''Properties'' view. You open this view by right-clicking on the top resource (the one labeled <nowiki>platform:/resource/aggregation.example/example.build</nowiki>) and select ''Show Properties View'' in the pop-up menu. | # When working with the model, it is essential that you see the ''Properties'' view. You open this view by right-clicking on the top resource (the one labeled <nowiki>platform:/resource/aggregation.example/example.build</nowiki>) and select ''Show Properties View'' in the pop-up menu. | ||
| − | + | ||
| − | In order for validation to take place, you must add platform configurations to the model. You can start by adding a configuration that contains the default values. Expand the top resource | + | | |
| − | + | [[Image:Buckminster_New_Wizard.png|thumb|right|480x350px|'''''New Aggregator Model wizard''''']] | |
| − | + | |} | |
| + | |||
| + | ==Add a Configuration== | ||
| + | [[Image:Buckminster_Aggregation_Added_Config.png|thumb|right|480x100px|'''''New Configuration''''']] | ||
| + | In order for validation to take place, you must add platform configurations to the model. You can start by adding a configuration that contains the default values. Expand the top resource and right click on the ''Aggregation'' element. Select ''New Child'' -> ''Configuration''. | ||
| + | |||
| + | The result of adding a sample configuration of type ''Operating System = win32'', ''Windowing System = win32'', ''Architecture = x86'' is shown in the screenshot. | ||
| + | |||
| + | Note that you can add as many configurations as you want, it may however be the case that they are recognized as invalid or dependencies cannot be satisfied during the aggregation process. | ||
| + | |||
| + | ==Add a Contribution== | ||
Everything that is mirrored is based on ''Contributions''. A Contribution defines one or several P2 repositories to include in the aggregation. You may also specify one or several contacts that will receive emails when problems are encountered that can be associated with the contribution. The contacts are optional. If no one is specified and an email needs to be sent, that email will be sent to the ''buildmaster''. | Everything that is mirrored is based on ''Contributions''. A Contribution defines one or several P2 repositories to include in the aggregation. You may also specify one or several contacts that will receive emails when problems are encountered that can be associated with the contribution. The contacts are optional. If no one is specified and an email needs to be sent, that email will be sent to the ''buildmaster''. | ||
You add a ''Contribution'' the same way that you added the ''Configuration''. | You add a ''Contribution'' the same way that you added the ''Configuration''. | ||
===Adding a P2 repository=== | ===Adding a P2 repository=== | ||
| − | Once a contribution is added, you can add a ''MappedRepository'' to it. Again by right clicking and selecting ''New Child''. The repository has some properties that will become visible and editable in the ''Properties'' pane. Type a URL to a valid repository in the ''Value'' column of the property named ''Location'' and hit return. A short delay where the UI feels locked is to be expected here since the repository is loaded. | + | [[Image:Buckminster_Aggregation_Added_Repository.png|thumb|right|480x100px|'''''Adding repositories''''']] |
| − | + | Once a contribution is added, you can add a ''MappedRepository'' to it. Again by right clicking and selecting ''New Child''. The repository has some properties that will become visible and editable in the ''Properties'' pane. Type a URL to a valid repository in the ''Value'' column of the property named ''Location'' and hit return. A short delay where the UI feels locked is to be expected here since the repository is loaded. A sample is shown in the screenshot. | |
| + | |||
===Adding content to the repository=== | ===Adding content to the repository=== | ||
A repository can either be mapped verbatim, in which case you cannot make any changes to categories or, it can be mapped piece by piece. A piece in this case is a category, a feature, a product, or a bundle. | A repository can either be mapped verbatim, in which case you cannot make any changes to categories or, it can be mapped piece by piece. A piece in this case is a category, a feature, a product, or a bundle. | ||
====Mapping verbatim==== | ====Mapping verbatim==== | ||
| − | You can a whole repository | + | You can map a whole repository as it stands by just adding it to the contribution. You can also specify an optional ''category prefix'' which is automatically added to each category label from the original repository. |
====Choosing specific content==== | ====Choosing specific content==== | ||
| + | [[Image:Buckminster_Select_Feature.png|thumb|right|580x400px|'''''Adding repositories''''']] | ||
You can map specific categories, features, products, or bundles from a repository by adding them as children. When you add a child, you bind it to one of the features present in the repository denoted by the parent. Like this: | You can map specific categories, features, products, or bundles from a repository by adding them as children. When you add a child, you bind it to one of the features present in the repository denoted by the parent. Like this: | ||
| Line 42: | Line 64: | ||
# Put your cursor in the ''Installable Unit'' value field in ''Properties'' tab. It now turns into a drop-down box. | # Put your cursor in the ''Installable Unit'' value field in ''Properties'' tab. It now turns into a drop-down box. | ||
# Select the feature that you want to map and hit enter. | # Select the feature that you want to map and hit enter. | ||
| − | # | + | # The feature can be added to an added category. Such categories can be added after they have been added to the top node, i.e. right click on the ''Aggregation'' and choose ''New Child'' and then ''Custom Category'' |
| + | |||
| + | Other types of content can be added the same way. We plan to make it possible to add a category with a rename option in a coming iteration. At present, categories can only be mapped verbatim and you have to create a ''Custom Category'' and add features to it manually in case you want another name. | ||
| + | |||
| + | =Running the aggregation= | ||
| + | ==Prerequisites== | ||
| + | [[Image:Buckminster_Platform_Loaded.png|thumb|right|580x200px|'''''Running the aggregation''''']] | ||
| + | Before you run the aggregation, you must make sure that it contains all features that you intend to map along with '''all their dependencies'''. The validation will fail unless the repository is self sufficient therefore it might be a good idea to map the ''Eclipse Platform'' repository or the repository that represents the ''Galileo Release''. | ||
| + | |||
| + | Also make sure that the Aggregation and its contributions have labels and that you save the model (ctrl-s) before you run. The labels are ''required''. | ||
| + | |||
| + | ==Starting the aggregation build== | ||
| + | Running is easy. Simply right click on the top node in the tree and choose ''Build Repository''. It should take a while. If it doesn't, the you need to bring up the ''Error log'' and check what happened (subject to improvement of course). If the ''Error Log'' is not already present (as a tab in the same window as the ''Properties''), you will find the errors view by clicking ''Window'' on the top level menu of your IDE, select ''Show View'' and then ''Error Log'' | ||
| + | |||
| + | ==Where to find the result== | ||
| + | The result of the build should end up $HOME/build where the final repository is in the folder named ''final''. | ||
| − | + | [[Category:Buckminster]] | |
| + | [[Category:Buckminster Tutorials]] | ||
Latest revision as of 08:12, 10 November 2009
Redirect to:
Contents
Installing Eclipse and the Aggregator
| |
Creating your first aggregation
|
Add a Configuration
In order for validation to take place, you must add platform configurations to the model. You can start by adding a configuration that contains the default values. Expand the top resource and right click on the Aggregation element. Select New Child -> Configuration.
The result of adding a sample configuration of type Operating System = win32, Windowing System = win32, Architecture = x86 is shown in the screenshot.
Note that you can add as many configurations as you want, it may however be the case that they are recognized as invalid or dependencies cannot be satisfied during the aggregation process.
Add a Contribution
Everything that is mirrored is based on Contributions. A Contribution defines one or several P2 repositories to include in the aggregation. You may also specify one or several contacts that will receive emails when problems are encountered that can be associated with the contribution. The contacts are optional. If no one is specified and an email needs to be sent, that email will be sent to the buildmaster.
You add a Contribution the same way that you added the Configuration.
Adding a P2 repository
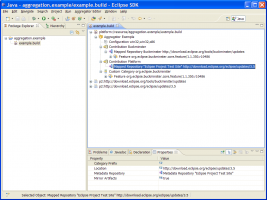
Once a contribution is added, you can add a MappedRepository to it. Again by right clicking and selecting New Child. The repository has some properties that will become visible and editable in the Properties pane. Type a URL to a valid repository in the Value column of the property named Location and hit return. A short delay where the UI feels locked is to be expected here since the repository is loaded. A sample is shown in the screenshot.
Adding content to the repository
A repository can either be mapped verbatim, in which case you cannot make any changes to categories or, it can be mapped piece by piece. A piece in this case is a category, a feature, a product, or a bundle.
Mapping verbatim
You can map a whole repository as it stands by just adding it to the contribution. You can also specify an optional category prefix which is automatically added to each category label from the original repository.
Choosing specific content
You can map specific categories, features, products, or bundles from a repository by adding them as children. When you add a child, you bind it to one of the features present in the repository denoted by the parent. Like this:
- Right click on the Mapped Repository and select New child (if this choice is not available in the menu, you probably have the Map verbatim flag set to true).
- Put your cursor in the Installable Unit value field in Properties tab. It now turns into a drop-down box.
- Select the feature that you want to map and hit enter.
- The feature can be added to an added category. Such categories can be added after they have been added to the top node, i.e. right click on the Aggregation and choose New Child and then Custom Category
Other types of content can be added the same way. We plan to make it possible to add a category with a rename option in a coming iteration. At present, categories can only be mapped verbatim and you have to create a Custom Category and add features to it manually in case you want another name.
Running the aggregation
Prerequisites
Before you run the aggregation, you must make sure that it contains all features that you intend to map along with all their dependencies. The validation will fail unless the repository is self sufficient therefore it might be a good idea to map the Eclipse Platform repository or the repository that represents the Galileo Release.
Also make sure that the Aggregation and its contributions have labels and that you save the model (ctrl-s) before you run. The labels are required.
Starting the aggregation build
Running is easy. Simply right click on the top node in the tree and choose Build Repository. It should take a while. If it doesn't, the you need to bring up the Error log and check what happened (subject to improvement of course). If the Error Log is not already present (as a tab in the same window as the Properties), you will find the errors view by clicking Window on the top level menu of your IDE, select Show View and then Error Log
Where to find the result
The result of the build should end up $HOME/build where the final repository is in the folder named final.

