Notice: this Wiki will be going read only early in 2024 and edits will no longer be possible. Please see: https://gitlab.eclipse.org/eclipsefdn/helpdesk/-/wikis/Wiki-shutdown-plan for the plan.
Difference between revisions of "FAQ How do I create an update site (site.xml)?"
| (4 intermediate revisions by 3 users not shown) | |||
| Line 1: | Line 1: | ||
| + | An update site may contain your own plugins, as well as public plugins mirrored. | ||
| + | |||
| + | == create an own plugin == | ||
| + | |||
First create a new plugin project | First create a new plugin project | ||
New -> Plug-in Development -> Plug-in Project | New -> Plug-in Development -> Plug-in Project | ||
| + | |||
[[Image:plugin.jpg]] | [[Image:plugin.jpg]] | ||
| Line 9: | Line 14: | ||
New -> Plug-in Development -> Feature Project | New -> Plug-in Development -> Feature Project | ||
| + | |||
[[Image:feature.jpg]] | [[Image:feature.jpg]] | ||
| Line 16: | Line 22: | ||
On plugins tab click on add and select your project then save the file. | On plugins tab click on add and select your project then save the file. | ||
| + | |||
[[Image:feature-plugin.jpg]] | [[Image:feature-plugin.jpg]] | ||
| − | The last | + | The last piece is the Update site project. See below |
| + | |||
| + | == create an update site out of installed plugins == | ||
| + | |||
| + | To create it go to | ||
New -> Plug-in Development -> Update Site Project | New -> Plug-in Development -> Update Site Project | ||
| + | |||
[[Image:site.jpg]] | [[Image:site.jpg]] | ||
| Line 28: | Line 40: | ||
Add Feature -> Select your project. | Add Feature -> Select your project. | ||
| + | |||
[[Image:site-feature.jpg]] | [[Image:site-feature.jpg]] | ||
| Line 36: | Line 49: | ||
The category is the name displayed when a eclipse client is installing your plugin by update-site. | The category is the name displayed when a eclipse client is installing your plugin by update-site. | ||
| − | + | '''Save''' it then click on '''Build All''' to build all features and plug-ins recursively required for this update site. | |
You can simply drag the contents of your Update Site project to an file transfer protocol (FTP) client to publish at a Web site. | You can simply drag the contents of your Update Site project to an file transfer protocol (FTP) client to publish at a Web site. | ||
| − | Alternatively, you can even test out the update site directly by selecting '''Help > Software | + | Alternatively, you can even test out the update site directly by selecting '''Help > Install New Software''', then '''Add > Local...''', find your update site in the file system, then accept all changes by pressing '''OK''', select your feature and proceed with the dialog ('''Next'''). |
| + | |||
| + | |||
| + | |||
{{Template:FAQ_Tagline}} | {{Template:FAQ_Tagline}} | ||
| + | [[Category:FAQ]] | ||
Latest revision as of 02:29, 31 March 2010
An update site may contain your own plugins, as well as public plugins mirrored.
create an own plugin
First create a new plugin project
New -> Plug-in Development -> Plug-in Project
You can select a template for creating your project or even just create a blank one in case you know how things work.
Now you have to create your feature project.
New -> Plug-in Development -> Feature Project
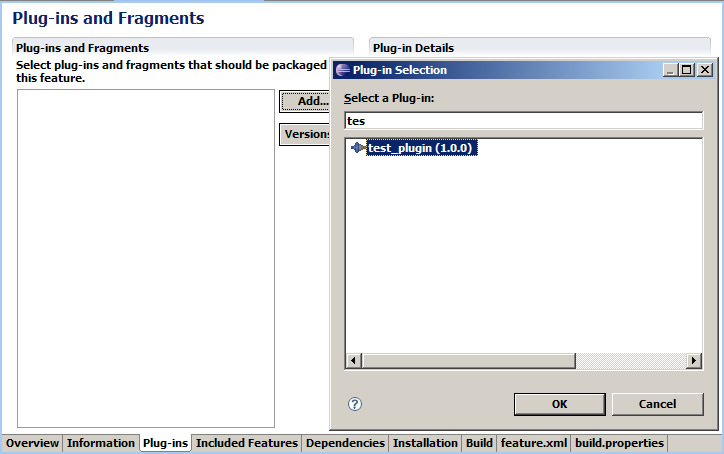
Here is the point where you link your Plugin project with your Feature Project.
Open the feature.xml file on your Feature project.
On plugins tab click on add and select your project then save the file.
The last piece is the Update site project. See below
create an update site out of installed plugins
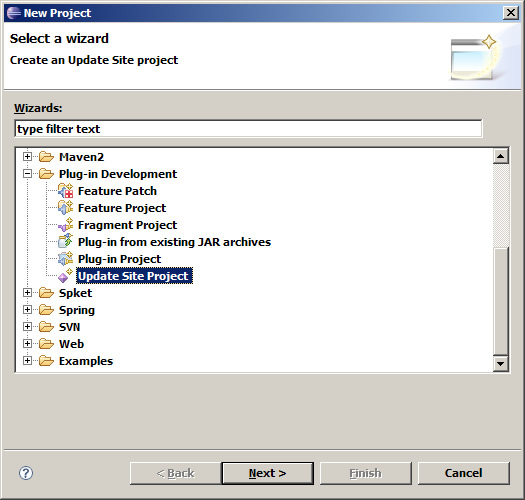
To create it go to
New -> Plug-in Development -> Update Site Project
Now we just have to link the Feature project with the Update site, and you're good to go.
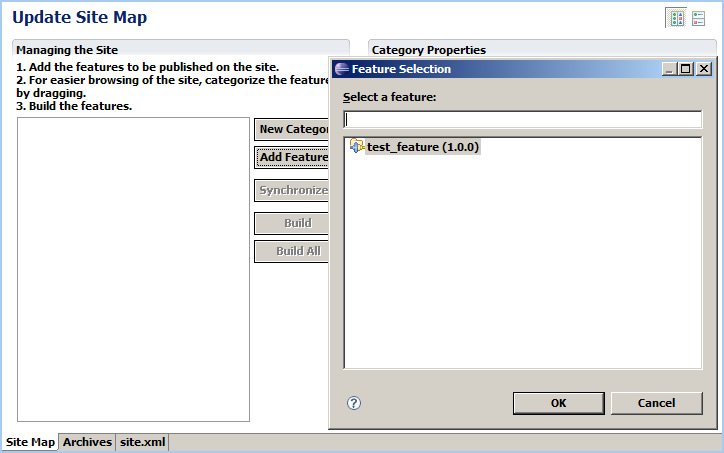
To do that, open the site.xml file on your Site project.
Add Feature -> Select your project.
In case you want to add a category for your feature, just click on New Category,
name it as you want then drag the feature site over the category.
The category is the name displayed when a eclipse client is installing your plugin by update-site.
Save it then click on Build All to build all features and plug-ins recursively required for this update site.
You can simply drag the contents of your Update Site project to an file transfer protocol (FTP) client to publish at a Web site.
Alternatively, you can even test out the update site directly by selecting Help > Install New Software, then Add > Local..., find your update site in the file system, then accept all changes by pressing OK, select your feature and proceed with the dialog (Next).
This FAQ was originally published in Official Eclipse 3.0 FAQs. Copyright 2004, Pearson Education, Inc. All rights reserved. This text is made available here under the terms of the Eclipse Public License v1.0.


