Notice: this Wiki will be going read only early in 2024 and edits will no longer be possible. Please see: https://gitlab.eclipse.org/eclipsefdn/helpdesk/-/wikis/Wiki-shutdown-plan for the plan.
Difference between revisions of "Equinox/p2/Getting Started"
m (→Steps to Install an Eclipse SDK) |
m (→Step 1 - Getting the agent) |
||
| Line 29: | Line 29: | ||
In the mean time, get the [http://download.eclipse.org/eclipse/equinox/provisioning/builds/equinox-prov-agent-M1-win32.zip Admin application], unzip it as the root of C: (very important) and use the information in the [[Equinox Provisioning Admin UI Users Guide | Admin UI user's guide]] to create your own SDK install. | In the mean time, get the [http://download.eclipse.org/eclipse/equinox/provisioning/builds/equinox-prov-agent-M1-win32.zip Admin application], unzip it as the root of C: (very important) and use the information in the [[Equinox Provisioning Admin UI Users Guide | Admin UI user's guide]] to create your own SDK install. | ||
| + | |||
| + | === Step 2 - Running the agent === | ||
| + | |||
| + | Double-click on C:\equinoxprov\eclipse.exe and the Admin UI will come up looking like ''(resized to fix here)'': | ||
| + | |||
| + | [[Image:AgentInitial.jpg]] | ||
== For more detail information, visit one or more of the following pages == | == For more detail information, visit one or more of the following pages == | ||
Revision as of 11:38, 3 August 2007
Contents
Getting Started with Equinox Provisioning (M1)
What is the first thing that you would expect to do with some provisioning code - install something, of course! This section is to guide you through a happy-path using equinox provisioning to install an Eclipse SDK.
There are four basic concepts that will help you understand the install:
- Agent - the program that will perform the install. In general, the provisioning agent could appear in various forms - a standalone application, a silent install demon, a perspective in the ide. We will use the Admin UI application to do our install.
- Metadata - the information about what can be installed. The metadata is used by the agent to analyze dependencies and perform the installation steps. Metadata lives in one or more repositories.
- Artifacts - the actual bits that will be installed. There are various kinds of artifacts that are processed differently during the install. Associated metadata determines how a given artifact is processed. Artifacts live in one or more repositories. The metadata and artifacts generally come from different repositories and may be widely distributed.
- Profile - in the most simple form, a profile is the location where the bits will be installed. The term 'profile' is not a very good term and probably will disappear from end user concepts (there's a bug about this), but it is the term we are using for now.
Steps to Install an Eclipse SDK
This week we will be installing a 3.3 SDK, but at the end of 3.4M1 we will generate metadata for that and support that SDK instead or, better yet, as well. The current install is only supported for Windows but eventually we will build and test the other supported platforms.
Step 1 - Getting the agent
The agent is available from an eclipse download site Admin application - click the link and you should see (Firefox)
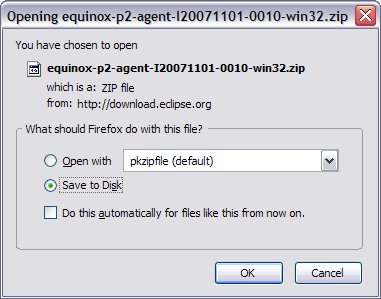

The zip file is ~15 MB. You can download and unzip into the root of your C: drive (right, that's C:) or select Open with and copy into the root of your C: drive. At some point the Admin application will be or will have a bootstrap installer that allows you to choose where to install, but at the moment we have some embedded absolute paths. (Don't have a C: drive? Sorry.)
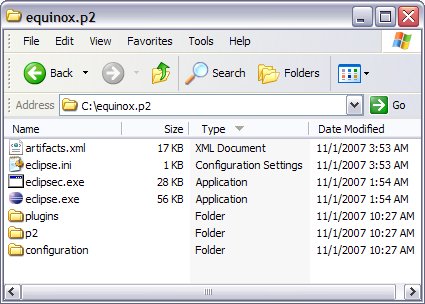
The result of this step is that you will have a directory C:\equinoxprov:

In the mean time, get the Admin application, unzip it as the root of C: (very important) and use the information in the Admin UI user's guide to create your own SDK install.
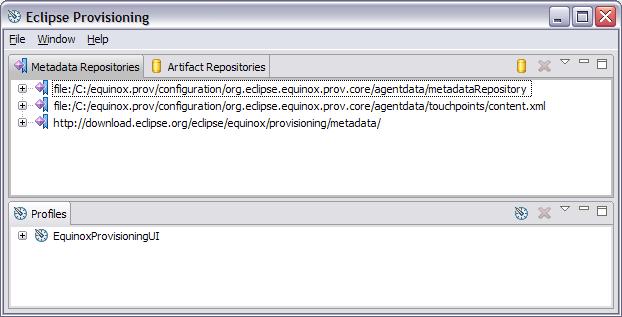
Step 2 - Running the agent
Double-click on C:\equinoxprov\eclipse.exe and the Admin UI will come up looking like (resized to fix here):

For more detail information, visit one or more of the following pages
- Equinox Provisioning Admin UI Users Guide For folks who want experiment with the equinox capabilities for installing, updating, fixing, and uninstalling capabilities.
- Equinox Provisioning Console Users Guide For OSGI geeks who enjoy starting and stopping bundles.
- Equinox Provisioning Getting Started for Developers For developers who want to create applications that extend or exploit equinox provisioning.