Notice: this Wiki will be going read only early in 2024 and edits will no longer be possible. Please see: https://gitlab.eclipse.org/eclipsefdn/helpdesk/-/wikis/Wiki-shutdown-plan for the plan.
Difference between revisions of "Equinox/p2/Admin UI Users Guide"
(→About the Eclipse Provisioning RCP Agent) |
|||
| Line 2: | Line 2: | ||
== About the Eclipse Provisioning RCP Agent == | == About the Eclipse Provisioning RCP Agent == | ||
| − | + | The Eclipse Provisioning RCP agent, also known as the "Admin UI" is used by the p2 team to try out function and configure profiles. It is also the tool we distribute for doing an initial install of an Eclipse SDK using p2. To follow step by step instructions for downloading the agent and using it to install an SDK, see [[Equinox p2 Getting Started]]. | |
| − | + | ||
| − | + | * The Admin UI in the RCP agent is simply a browsing interface into the provisioning API. It does not represent what we think actual user workflows for installing or updating an Eclipse-based application would be. See [[Equinox p2 Update UI Users Guide]] for information on the end-user update UI. | |
| − | + | * The Admin UI is very flexible in manipulating the environment, sometimes moreso than the underlying infrastructure supports. Failures can be confusing (error reporting that requires you to check your .log file, read stack traces, or understand the innards of the provisioning engine). | |
| − | + | * The UI described below can also be run from a full Eclipse SDK workbench. You can open the '''Provisioning''' perspective to see the same functionality that you see in the downloaded agent. | |
| − | * The UI | + | |
| − | * The | + | |
| − | * The UI described below can also be run from a full Eclipse SDK workbench. You can open the '''Provisioning''' perspective to see the same functionality. | + | |
== Overview of the Eclipse Provisioning RCP Agent == | == Overview of the Eclipse Provisioning RCP Agent == | ||
Revision as of 15:08, 1 November 2007
Contents
About the Eclipse Provisioning RCP Agent
The Eclipse Provisioning RCP agent, also known as the "Admin UI" is used by the p2 team to try out function and configure profiles. It is also the tool we distribute for doing an initial install of an Eclipse SDK using p2. To follow step by step instructions for downloading the agent and using it to install an SDK, see Equinox p2 Getting Started.
- The Admin UI in the RCP agent is simply a browsing interface into the provisioning API. It does not represent what we think actual user workflows for installing or updating an Eclipse-based application would be. See Equinox p2 Update UI Users Guide for information on the end-user update UI.
- The Admin UI is very flexible in manipulating the environment, sometimes moreso than the underlying infrastructure supports. Failures can be confusing (error reporting that requires you to check your .log file, read stack traces, or understand the innards of the provisioning engine).
- The UI described below can also be run from a full Eclipse SDK workbench. You can open the Provisioning perspective to see the same functionality that you see in the downloaded agent.
Overview of the Eclipse Provisioning RCP Agent
- The RCP app is comprised of three views:
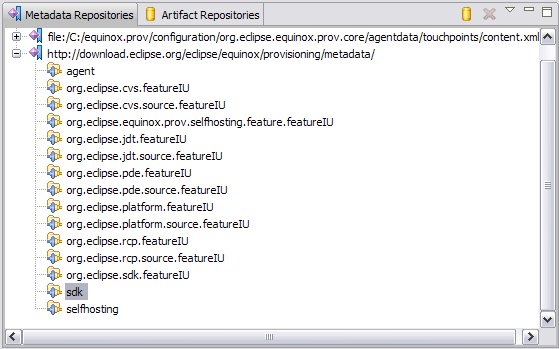
- The Metadata Repositories view shows those metadata repositories known by the provisioning infrastructure.
- The provisioning code uses local metadata repositories to store information about your environment. In general, these repositories are not shown, but you can control this using a preference on the provisioning preference page.
- The repository of interest is the repository located on eclipse.org (http://download.eclipse.org/eclipse/equinox/provisioning/metadata/).
- You may add or remove repositories using this view.
- Expanding a metadata repository will show you the installable units(IU's) available for installing.
- You may examine the properties of repositories or IU's
- You may install an IU to a specified profile using drag and drop or the popup menu.
- The Artifact Repositories view shows those artifact repositories known by the provisioning infrastructure.
- The repository of interest is the repository located on eclipse.org (http://download.eclipse.org/eclipse/equinox/provisioning/artifacts/artifacts.xml).
- You may add or remove repositories using this view.
- Expanding an artifact repository will show you what artifacts are located there
- You may examine the properties of the repository
- You can't examine the properties of the artifacts or otherwise manipulate them (yet)
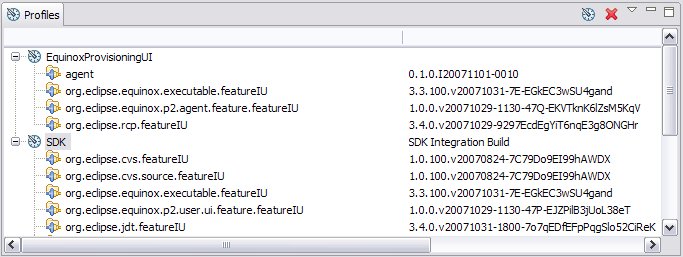
- The Profiles view shows profiles defined for installing software. Profiles are the target of an install operation.
- The EquinoxProvisioningUI profile represents the agent application itself. It contains the IU's (bundles) that comprise the RCP app.
- You may add or remove profiles using this view.
- Expanding a profile shows you what IU's have been installed in the profile.
- You may examine and change the properties of profiles and IU's.
- You may uninstall an IU from a profile using the popup menu.
- You may check for updates that may be available for an IU using the popup menu.
- The Metadata Repositories view shows those metadata repositories known by the provisioning infrastructure.
- The Window>Preferences... menu item lets you control some application preferences:
- You can control whether drag and drop operations should be confirmed first
- You can control whether you view all IU's in the repositories and profiles, or just those that have been marked as a "group" IU. Viewing only the groups helps to reduce the clutter when you are trying to find something to install like the SDK.
- You can control whether internal/implementation repositories should be shown in your repositories views.
Installing the Eclipse 3.3 SDK using the Provisioning RCP Agent
- Define a profile representing your Eclipse SDK install
- From the profile view's local menu, toolbar, or popup menu, choose Add Profile...
- Choose a unique id for your profile, such as "Eclipse SDK".
- You may optionally define a name and description to further describe your profile
- Choose an install folder for the profile (this is where the SDK will be installed).
- It is important to keep the defaults for the other values, or the install may fail with little explanation
- When you have pressed OK you should see the new profile in the view
- Locate the sdk IU in the eclipse metadata repository
- You may install the sdk in several ways by selecting the IU and dragging it to your newly created profile. You can also select the IU and choose Install... from the popup menu. You will be prompted for a target profile.
- You should see a progress indicator that reports the progress of the install. In some phases, progress reporting is very sparse. You may see some long pauses without progress.
- When it is finished, you have a full Eclipse SDK located in the install folder of your profile.
Running the Admin UI from Eclipse
You can run a full-featured version of the provisioning admin UI from an Eclipse SDK Workbench. Equinox p2 Getting Started for Developers explains how to set up your Eclipse environment to run the provisioning code. Some additional function is available when running the UI from an SDK:
- Undo support is available from the Edit menu when working in the various views. The undo support is not (yet) using rollback or operation history kept by the provisioning infrastructure. It is implemented at the UI level (undo of an install performs an uninstall, undo of an add performs a remove, etc.)
Cool stuff you can try
- If you install the SDK into the agent profile (EquinoxProvisioningUI), then the next time you launch the rcp app, you'll actually be running the Eclipse SDK with the Provisioning Perspective.
For more information
If you encounter bugs, or would like to enter enhancement requests for this work, please use the Equinox Incubator category in Bugzilla. You can add the prefix "[prov]" to the subject line of the bug report to help us with bug triage.


