Notice: this Wiki will be going read only early in 2024 and edits will no longer be possible. Please see: https://gitlab.eclipse.org/eclipsefdn/helpdesk/-/wikis/Wiki-shutdown-plan for the plan.
Difference between revisions of "EclipseLink/Examples/JPA/WebSphereCE Web Tutorial"
m (→EclipseLink JPA Deployed on IBM WebSphere CE 2.1 using Eclipse WTP) |
m (→Install WebSphere CE) |
||
| Line 23: | Line 23: | ||
*There is also an express version of [http://www-01.ibm.com/software/data/db2/express/ IBM DB2 Express C 9.5] available | *There is also an express version of [http://www-01.ibm.com/software/data/db2/express/ IBM DB2 Express C 9.5] available | ||
===<font color="green">Install WebSphere CE</font>=== | ===<font color="green">Install WebSphere CE</font>=== | ||
| − | I installed the latest [http://www-01.ibm.com/software/webservers/appserv/community/ | + | I installed the latest [http://www-01.ibm.com/software/webservers/appserv/community/ IBM WebSphere CE build 2.1.0.1 (Sept 2008)] and followed the instructions on that page. |
===Install WebSphere CE Eclipse 3.4 Server Plugin=== | ===Install WebSphere CE Eclipse 3.4 Server Plugin=== | ||
Revision as of 12:12, 18 September 2008
Contents
- 1 EclipseLink JPA Deployed on IBM WebSphere CE 2.1 using Eclipse WTP
- 1.1 Development Environment
- 1.2 Prerequisites
- 1.3 WebSphere Configuration Changes
- 1.4 JNDI Datasource Setup
- 1.5 Persistence JAR location
- 1.6 EclipseLink JAR location
- 1.7 JDBC JAR location
- 1.8 Create J2EE application
- 1.9 Persistence.xml
- 1.10 Start Server
- 1.11 Publish EAR
- 1.12 Perform CRUD operations: JPQL insert and query
- 1.13 References
EclipseLink JPA Deployed on IBM WebSphere CE 2.1 using Eclipse WTP
Note: This tutorial' is under construction for the next week as of 20080918.
If you want to get a small web application running quickly on WebSphere CE - the services provided by the Web Tools Project pluggin in the Eclipse IDE can take care of the deployment details and set the server into debug mode for you.
This basic example details how to use Eclipse to run/debug a minimum J2EE web application servlet using EclipseLink JPA as the persistence provider. The goal of this example is to detail the minimum steps required to run EclipseLink inside the IBM WebSphere Application Server Community Edition server using the Eclipse IDE. At this point no presentation/controller layer such as JSF, Spring or Struts will be used beyond a basic HttpServlet so we can concentrate on the the integration layer JPA setup.
The DALI project was used to generate Entities from a schema with sequences already populated.
Development Environment
Software: Eclipse IDE for Java EE 3.4 Ganymede (June 2008 +) with all 5 packages (DTP 1.6, EMF 2.4, GEF 3.4, WTP 3.0, XSD 2.4), Derby Database 10.4, Java JDK 1.6.0_04 - Note 1.5.0_14 comes with the server, IBM WebSphere CE 2.1.0.1
This example will run fine with any Database that EclipseLink supports.
Prerequisites
Install Eclipse EE
- I installed a clean version of Eclipse Ganymede (June 2008) with all of WTP 3.0
Install a Database
- In this example I am using the embedded Derby 10.4, the table schemas have already been created manually and all entity java classes may be generated using the Eclipse DALI tool.
- There is also an express version of IBM DB2 Express C 9.5 available
Install WebSphere CE
I installed the latest IBM WebSphere CE build 2.1.0.1 (Sept 2008) and followed the instructions on that page.
Install WebSphere CE Eclipse 3.4 Server Plugin
The WebSphere CE server plugin is not shipped by default with Eclipse - you will need to update your Eclipse IDE to pick up the WebSphere CE Eclipse plugin.
- I selected to download the zip, and treat is a a local update site in eclipse
Validating the WebSphereCE/Eclipse configuration
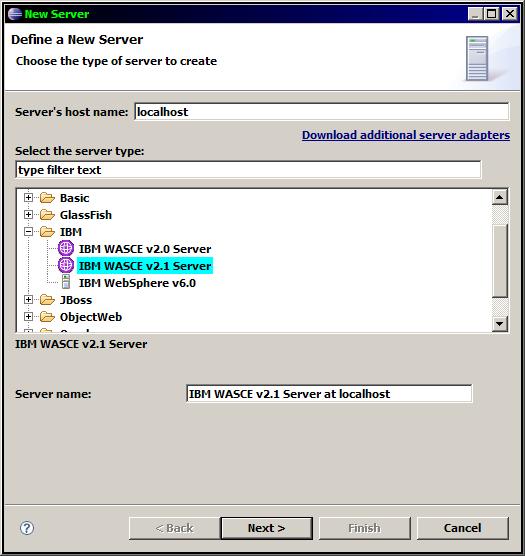
- In the servers view select New | Server
- Use the IBM|IBM WASCE v2.1 Server plugin when creating a server
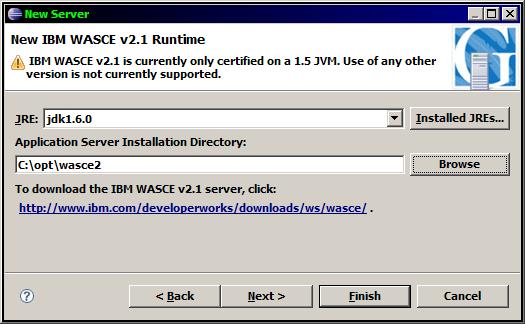
- Note: WebSphere CE 2.1 is only certified in Java SE 1.5 (However JDK 1.6 runtime support is available) - You may use a SUN 1.6 JRE and continue
- Start the server to test the plugin
- You should see the following message when running http://127.0.0.1:8080
WebSphere Configuration Changes
JNDI Datasource Setup
Global Scoped Datasource Setup
Persistence JAR location
EclipseLink JAR location
JDBC JAR location
Create J2EE application
Create your own J2EE Enterprise Application as below. File | new | project | J2EE | Enterprise Application Project Select server, use 5.0 Ear version
Create a new Web and an optional EJB project
Select generate deployment descriptor if you want to change the context-root
- Path changes
	<classpathentry combineaccessrules="false" kind="src" path="/org.eclipse.persistence.core"/>
	<classpathentry combineaccessrules="false" kind="src" path="/org.eclipse.persistence.jpa"/>
or
	<classpathentry combineaccessrules="false" kind="src" path="/eclipselink.jar"/>
- After EAR project creation - reference the org.eclipse.peristence.core and jpa projects or include a reference to eclipselink.jar in your EJB/WAR projects.
- If you don't reference the eclipselink.* projects then include a classpath reference to persistence.jar and an Oracle (or other Database) JDBC driver jar for your DB.
Persistence.xml
The WebSphere CE server is defined as generic "WebSphere"
- JTA : Put persistence.xml beside your JPA entities in yourProjectEJB/ejbModule/META-INF
<persistence version="1.0" xmlns="http://java.sun.com/xml/ns/persistence" xmlns:xsi="http://www.w3.org/2001/XMLSchema-instance" xsi:schemaLocation="http://java.sun.com/xml/ns/persistence http://java.sun.com/xml/ns/persistence/persistence_1_0.xsd">
  <persistence-unit name="unified" transaction-type="JTA">
    <provider>org.eclipse.persistence.jpa.PersistenceProvider</provider>
    <jta-data-source>jdbc/__default</jta-data-source>
    <properties>
      <property name="eclipselink.target-server" value="WebSphere"/>
      <property name="eclipselink.logging.level" value="FINEST"/>
      <property name="eclipselink.session-name" value="eclipselinkwls"/>
    </properties>
  </persistence-unit>
</persistence>
- RESOURCE_LOCAL : non-JTA : Put persistence.xml beside your JPA entities in yourProjectEJB/ejbModule/META-INF
- This one is used by a local SE Java app to create and pre-populated the derby database
  <persistence-unit name="stat.create.tables" transaction-type="RESOURCE_LOCAL">
    <provider>org.eclipse.persistence.jpa.PersistenceProvider</provider>
    <class>entity..</class>
    <properties>
      <property name="eclipselink.jdbc.platform" value="oracle.toplink.platform.database.DerbyPlatform"/>
      <property name="eclipselink.jdbc.driver" value="org.apache.derby.jdbc.EmbeddedDriver"/>
      <property name="eclipselink.target-database" value="Derby"/>
      <property name="eclipselink.jdbc.url" value="jdbc:derby:C:/opt/derby104/unified;create=true"/>
      <property name="eclipselink.jdbc.user" value="APP"/>
      <property name="eclipselink.jdbc.password" value="APP"/>
      <property name="eclipselink.logging.level" value="FINEST"/>
      <property name="eclipselink.ddl-generation" value="drop-and-create-tables"/>
      <property name="eclipselink.ddl-generation.output-mode" value="database"/>
    </properties>
  </persistence-unit>
Start Server
- Steps: Select the EAR and [Run on Server].
- The first "Run on Server" may not start the server, in this case you "Start Server" and then "Run on Server".
Publish EAR
Perform CRUD operations: JPQL insert and query
Browser Output
All of persistence.xml configuration, jpql query example - in progress ......
References
- See Developing JPA Projects in the EclipseLink User's Guide.
- Download IBM WebSphere CE
- Download IBM DB2 Express Database
- IBM WebSphere CE Documentation
- IBM WebSphere CE Eclipse Plugin
- IBM WebSphere CE edition archive
Originated on build 20080916 - Michael O'Brien


