Notice: this Wiki will be going read only early in 2024 and edits will no longer be possible. Please see: https://gitlab.eclipse.org/eclipsefdn/helpdesk/-/wikis/Wiki-shutdown-plan for the plan.
Difference between revisions of "Ebpm/Getting Started"
(→Services/Connectors) |
(→Services/Connectors) |
||
| Line 91: | Line 91: | ||
After deploying services and connectors we can see all items in the Spagic console. For installation and use of Spagic Console, please refer to the document “Spagic3 Console.pdf”. In Spagic Console, clicking on the icon Process/Services List we have the list of all the processes, services and components deployed on the service manager.Clicking on the tab Services, you can see the service transformer we have deployed, and in the tab Connectors you can see the connector of the service deployed. | After deploying services and connectors we can see all items in the Spagic console. For installation and use of Spagic Console, please refer to the document “Spagic3 Console.pdf”. In Spagic Console, clicking on the icon Process/Services List we have the list of all the processes, services and components deployed on the service manager.Clicking on the tab Services, you can see the service transformer we have deployed, and in the tab Connectors you can see the connector of the service deployed. | ||
<p>[[Image:T1.jpg]]</p> | <p>[[Image:T1.jpg]]</p> | ||
| + | <p>[[Image:T2.jpg]]</p> | ||
Revision as of 08:31, 26 August 2010
Contents
Document Goal
The goal of this document is to provide you with an introduction on using eBPM looking at a demo application that should allow you to explore some of the most interesting features of the new platform.
Introduction
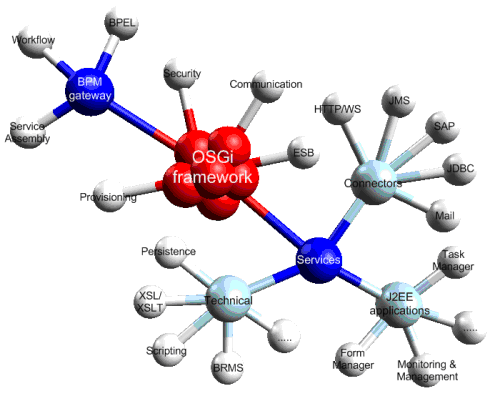
eBPM is a project whose goal is proposing an OSGi Enterprise Universal Middleware that enables the development of both single services and complex solutions including orchestration processes, workflows with human activities and features like support of rules engines, registries and multi-node distributions.
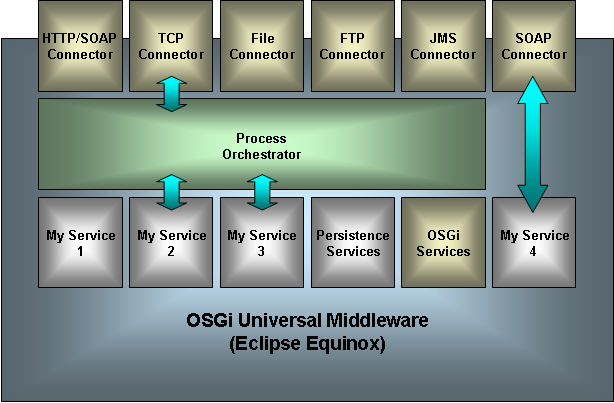
In eBPM the atomic units of execution are the services that are exposed to the external world through connectors. These services can be deployed and executed alone or composed within complex processes.
In eBPM, processes are simply “special services” built by composition of OSGi services that are hosted within an OSGi container (actually Equinox).
The services can simply be configured with a connector (also hosted on the OSGi container) like “My Service 4” in the previous figure, or they can be orchestrated in a complex process by a service called “Process Orchestrator” like “My Service 2” and “My Service 3” in the previous figure. Also this kind of complex processes can be configured with a connector, for the activation of the process.
Before proceeding with the guided tour we have to explain what is contained in the eBPM package: eBPM is the result of the contribution to Eclipse of most of the core of an open source project called Spagic (http://spagoworld.com/xwiki/bin/view/Spagic/). The contribution work is still in progress: this means that using eBPM without auxiliary tools is quite complex. For this reason, in this tour we’ll use some complementary tools provided by the original project Spagic and the eBPM runtime provided is the basic one with some additional Spagic bundles.
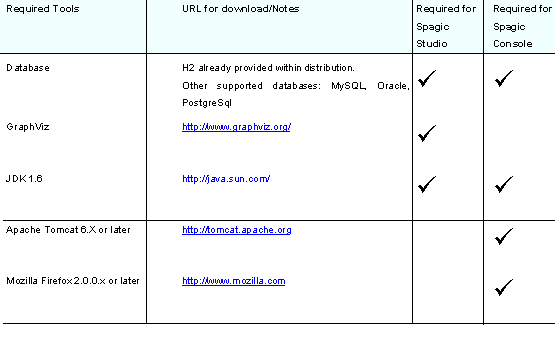
In the following table we summarize the features that are included in eBPM, and the ones that are included only in Spagic. As you can see, some features will be ported on eBPM, while others will remain on Spagic (that is the eBPM supported version).
Software Requirements
eBPM Package
The eBPM package consists of several separated applications, it contains:
- The eBPM Service Manager (a standalone Equinox server)
- The designer environment Spagic Studio (a customized Eclipse IDE).
- The monitoring application Spagic Console to install into Tomcat (or another servlet container).
Start the Service Manager
In order to start up the service manager, open the command window and start the eBPM executable that is within the Service Manager directory (from now on we will call it SERVICE_MANAGER). You can also optionally open an OSGi console, towards eBPM, opening a telnet connection on the port 9999. Use the command “help” to have the list of available commands. Then start the Tomcat containing the console: remember to install the H2 driver in Tomcat before starting it.
Creation of a new Project
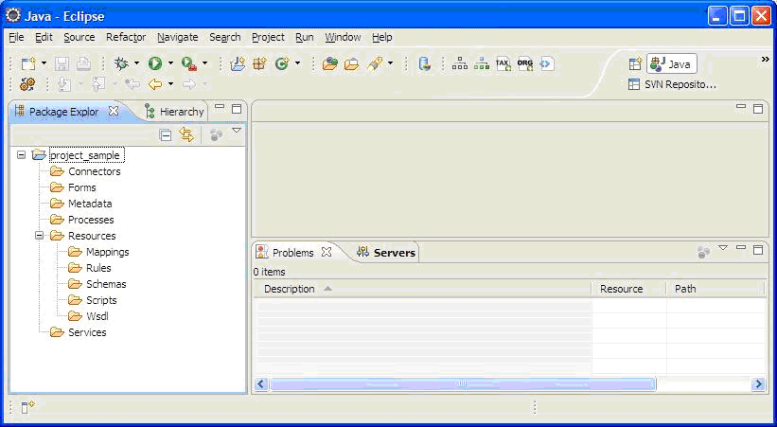
In this document we’ll use the notation: WORKSPACE_DIR as the directory of the Eclipse workspace that you will create with Spagic Studio. Once created the workspace after the start of Spagic Studio, in order to create a new Project, select File->New->Project…, choose Spagic3 Project under the category Spagic and click on Next. A Wizard is opened where you can define the name of the project you want to create. Write “project_sample” as the project name, and click on the Finish button.
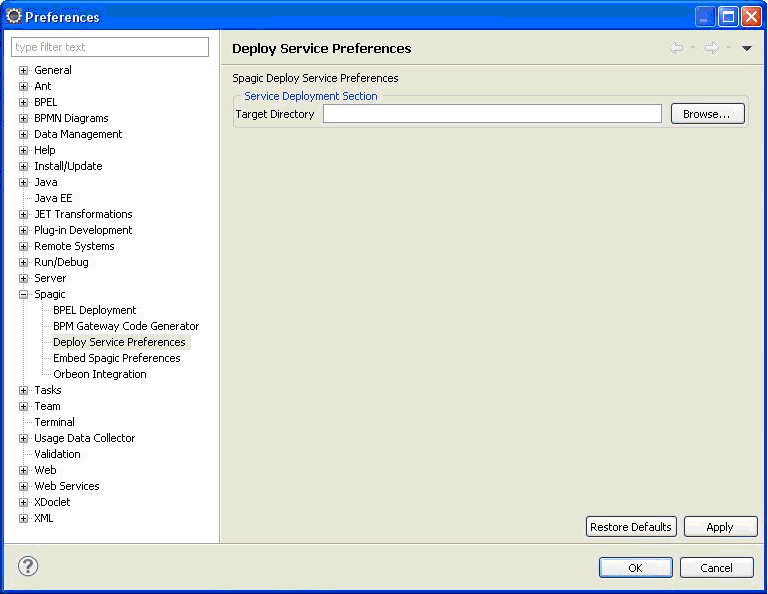
Within the project main folder you will find different subfolders where you can place the components of your project: connectors, processes, services, forms, metadata and resources, further divided in other several subfolders. Before to start the design of your project components you need to setup the Target Directory inside your Spagic Studio. The Target Directory is a folder where Spagic Deploy Manager will copy all files necessary for the execution of Spagic processes and services. By default the Target Directory is set to the folder SERVICE_MANAGER\default. If you want to change it, go in Windows-> Preferences-> Spagic->Deploy Service Preferences and change the value of the Target Directory field.
If you change the Target Directory value in Spagic Studio you need to do it also for Spagic Service Manager: you simply need to change the value of -Dspagic.home parameter of eBPM.ini file inside the SERVICE_MANAGER directory (by default it’s commented).
Services/Connectors
Configuration of a new service
In the folder Services we can place all the services definitions we need. In our example we will configure a service that performs a XSLT transformation. For simplicity we provide all the resources used in this demo, within the folder sample_resources in the eBPM package.
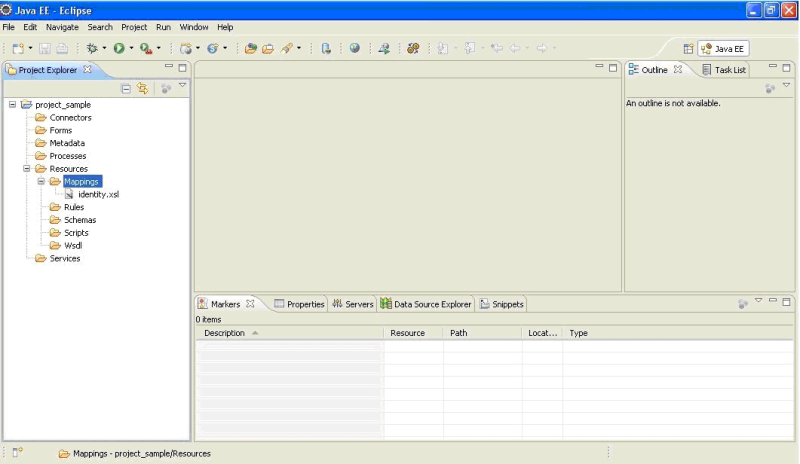
First, we need the resources necessary to configure the services we are creating: in our sample the resource used by the service is an xsl file. So we place this file in the folder Mappings, under the Resources folder. Placing all the resources used by services in project under the Resources folder before configuring the service, is more comfortable for the feature of drag and drop of files, available in several service configuration in Spagic 3.
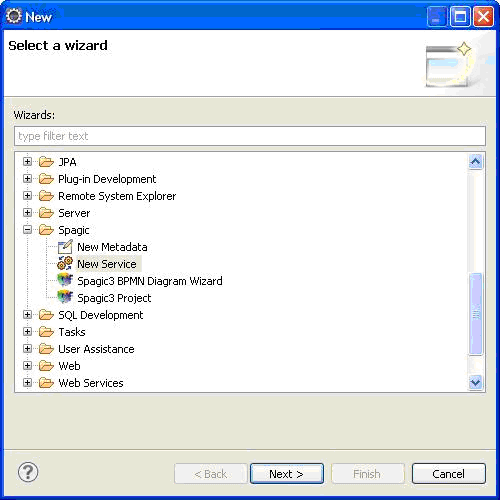
After this we can configure the service: let's go under the project and choose File New Other. The list of wizards appears. Let's go under the Spagic New Service, and click Next.
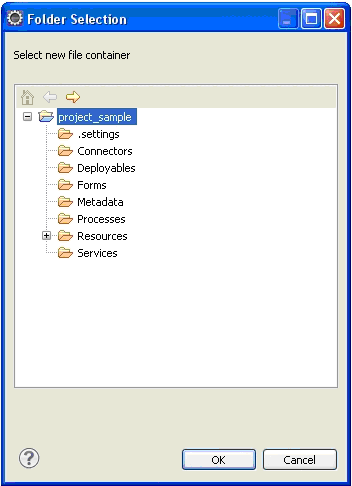
In the next window there is the list of all service and connectors available. In the text box “Container” you can specify the placement of the new service, typically under the Services folder of your project. If is not already present, click the Browse button. The wizard of folder selection appears: click on the folder of your project, in our case the project_sample project and select the subfolder Services and click OK.
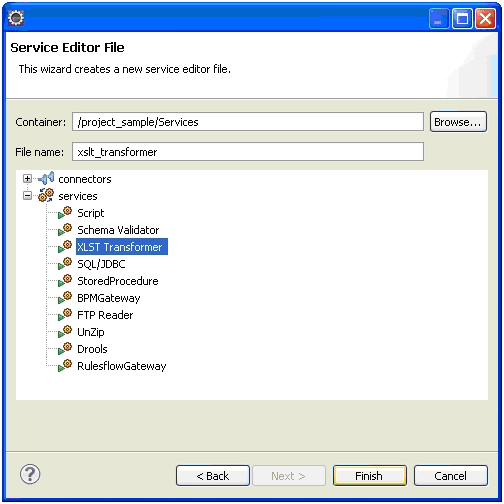
In the next Wizard go to Service and click on it, select XSLT Transformer, and finally set the name of the service in the “File name” field. For this example call it xslt_transformer and then Click Finish.
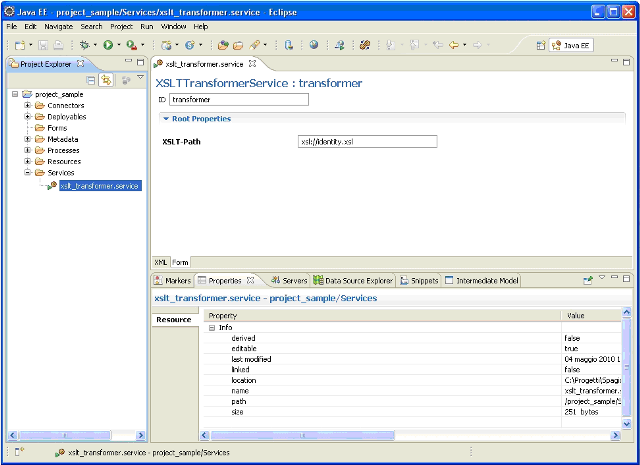
Now a new instance of service is created in the Service folder whose name is xslt_transformer.service. Automatically, the wizard service configuration appears and you can set all the values of the properties of a service, filling the fields in the configuration wizard. All services have a unique identifier that allows us to reuse them; this identifier is briefly named ID. In our case, we have to set an ID for the service and give it an xslt-Path. Set the ID filling the namesake field with “transformer” and set the xsl file as path making the drag and drop of the file identity.xsl we previously put in the Mappings folder, in the field XSLT-Path. In this way, our service will be configured.
To expose the service and allow it to be called from external applications, we have to link it to a connector. So, let's create a new instance of connector. In our example our connector is an HTTP Server. To do this, right click on File New Other and select Spagic New Service.
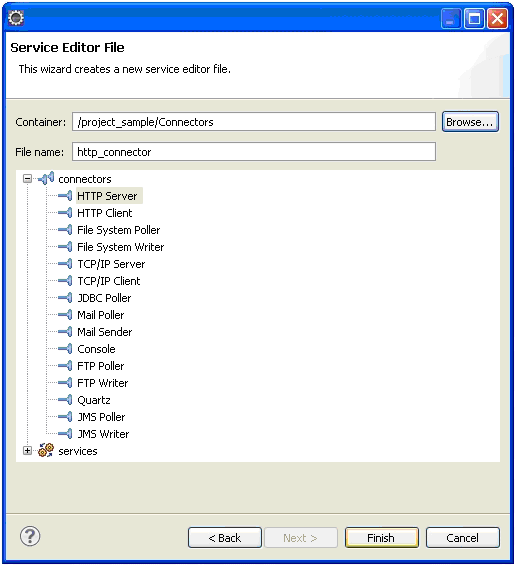
In the wizard set the placement of the connector under the directory WORKSPACE_DIR/project_sample/Connectors. If it is not already present, click on the Browse button and set it manually, in the folder selection window. Then go in the list and click on Connectors, in the list below select the connector HTTP Server. Finally set the name of the connector writing “http_connector ” in the box name and click Finish
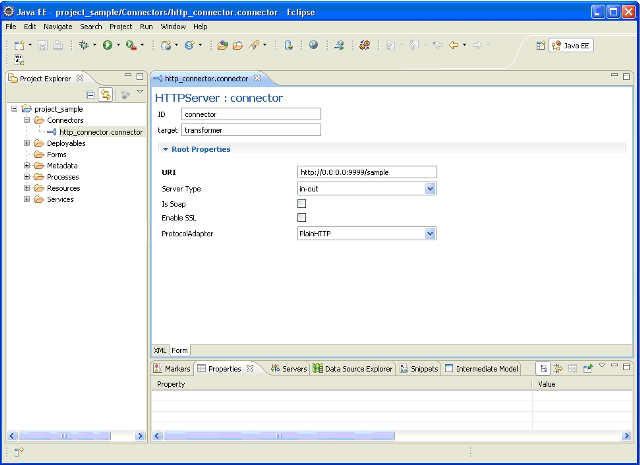
So a new instance of connector is created in the Connector folder whose name is http_connector.connector. Automatically, the wizard connector configuration appears, where you can set all the values of the properties of a connector, filling the fields in the configuration wizard. Set the ID filling the namesake field with “connector” and set the URI file with “http://0.0.0.0:10000/sample” and select in the field Server Type “in-out”. To link the service to the connector, just drag and drop the xslt_transformer service we have previously configured and place it in the target field. The ID of the service will appear in the target field. In this way, our connector will be configured.
Deployment
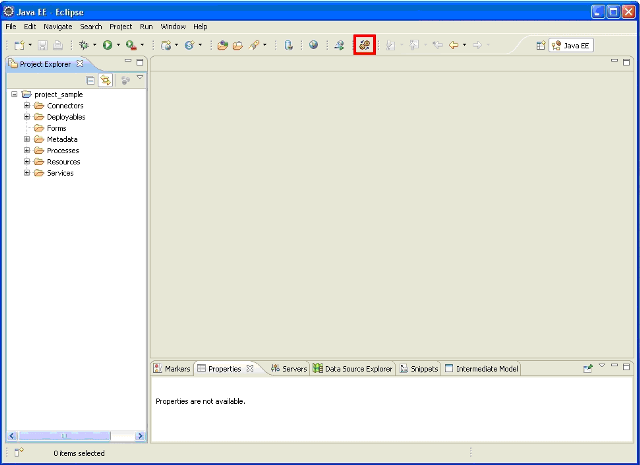
Before to deploy your service you need to start up the service manager (see 3.3-Start the Service Manager). To deploy a service or a process, we have to call the Deployment Wizard and choose the services and processes you need to deploy. Click in the icon of deployment service that is in the main icon bar of Spagic Studio 3.
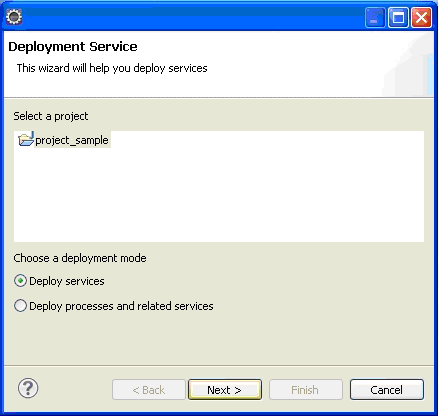
In the wizard, there are all workspace projects. Select the project project_sample and choose “Deploy services”.
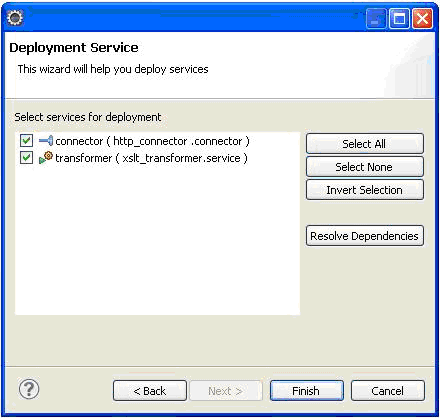
In the next window check the connector of the service you want to deploy. To deploy the services (and the related resources) you can proceed in two ways:
- Manually, selecting all the services you want to deploy.
- Selecting the first connector of the flow of control (in our case the HTTP Server) and click the Resolve Dependencies button. The service or process linked will be automatically checked.
When all the items you want to deploy are selected, click Finish. The services will be published in the Target Directory folder. The Deployment wizard is a tool that copies the resources and the services definition (.connector and .service files) in the Server target directory: it’s useful because, for example, the resources must be copied before the services definition, and this order is automatically managed by the wizard.
Test
After deploying services and connectors we can see all items in the Spagic console. For installation and use of Spagic Console, please refer to the document “Spagic3 Console.pdf”. In Spagic Console, clicking on the icon Process/Services List we have the list of all the processes, services and components deployed on the service manager.Clicking on the tab Services, you can see the service transformer we have deployed, and in the tab Connectors you can see the connector of the service deployed.

