Notice: this Wiki will be going read only early in 2024 and edits will no longer be possible. Please see: https://gitlab.eclipse.org/eclipsefdn/helpdesk/-/wikis/Wiki-shutdown-plan for the plan.
Difference between revisions of "EMF DiffMerge/Default GUI"
| (22 intermediate revisions by the same user not shown) | |||
| Line 1: | Line 1: | ||
| − | == | + | == Overview == |
| − | In addition to | + | In addition to an engine, EMF Diff/Merge also provides simple GUI components for visualizing comparisons, testing comparison methods, and letting end-users merge models manually.<br> |
| − | A default mechanism provides a comparison action (pop-up menu) which allows end-users to open a comparison in an editor. This mechanism can be [http://wiki.eclipse.org/EMF_DiffMerge/Programmatic_Usage#Or:_Extend_default_comparison_action customized] to support different kinds of comparison. Alternatively, a comparison can be displayed in [http://wiki.eclipse.org/EMF_DiffMerge/Programmatic_Usage#Or:_Use_default_GUI other graphical contexts]. | + | A default mechanism provides a [http://wiki.eclipse.org/EMF_DiffMerge/Default_GUI#Default_comparison_action comparison action] (pop-up menu) which allows end-users to open a comparison in an editor. This mechanism can be [http://wiki.eclipse.org/EMF_DiffMerge/Programmatic_Usage#Or:_Extend_default_comparison_action customized] to support different kinds of comparison. Alternatively, a comparison can be displayed in [http://wiki.eclipse.org/EMF_DiffMerge/Programmatic_Usage#Or:_Use_default_GUI other graphical contexts]. |
== Default comparison action == | == Default comparison action == | ||
| − | + | The default comparison action is applicable on workspace files. Select 2 or 3 model files in the Eclipse workspace, right-click, then select ''Compare with'', ''Each Other as models''. Note that the corresponding metamodel(s) must be registered in the platform. | |
| + | |||
| + | [[Image:ComparisonAction.png|center]]<br> | ||
| + | |||
| + | A dialog pops up for configuring the comparison. You may specify what model is on what side and, in the case of a 3-way comparison (3 files selected), which model is the common ancestor of the other 2. By default, matching is by Ecore ID (using the attribute in the metamodel whose ID property is set to true) or else by XML ID if present. The scope includes the content of the file, the content of sub-resource files if the model is fragmented, and the semantic model in the case of GMF diagrams. If you have defined different [http://wiki.eclipse.org/EMF_DiffMerge/Programmatic_Usage#Or:_Extend_default_comparison_action comparison methods] or scopes, you may select which one to use and you may configure it when applicable. | ||
| + | |||
| + | [[Image:SetupDialog.png|center]]<br> | ||
| + | |||
| + | A progress dialog is then being displayed. Computing the differences between models takes time according to the size of the models and the number of differences between them. Click the ''Run in background'' button in order to keep working with Eclipse while the differences are being computed in parallel. | ||
| + | |||
| + | [[Image:Computation.png|center]] | ||
| + | |||
| + | The comparison editor opens as soon as the computation is finished. | ||
| + | |||
| + | [[Image:GUIOverview.png|center]] | ||
| + | |||
| + | == GUI structure == | ||
| + | |||
| + | The default GUI is composed of 3 vertical sections and 2 horizontal sections. | ||
| + | |||
| + | [[Image:GUIOverviewAnno.png|center]] | ||
| + | |||
| + | === Vertical sections === | ||
| + | |||
| + | The middle section represents the contents of the left model while the section on the right-hand side represents the contents of the right model. When hovering on the top of any section, the complete path to the model is displayed as a tooltip if the window is too narrow. Each side is associated to a colour: by default, dark red for the left model and blue for the right model. This colour code is also used in other dialogs of the diff/merge tool in order to prevent any ambiguity. | ||
| + | |||
| + | The section on the left-hand side is the ''Synthesis'' section: it represents the differences between the models. According to the colour code, model elements which are present in the right model but not in the left model are written in blue, while they are written in dark red in the opposite case. Elements which are present in both sides but have differences in their attributes or references (“modified elements”) are labeled in purple. The number of differences they contain (after filtering) is written between parentheses. The 3 sections are synchronized: clicking an element in the ''Synthesis'' section highlights it in the other sections and vice-versa. | ||
| + | |||
| + | === Horizontal sections === | ||
| + | |||
| + | The 2 horizontal sections correspond to 2 levels of detail. The top section focuses on model elements and only reflects that level of granularity. The bottom section is the ''Details'' section: it shows the contents (attributes and references) of the model element which is currently selected in the top section. | ||
| + | |||
| + | For example, if a modified element (in purple) is being clicked in the ''Synthesis'' section, then the ''Details'' section displays all the attributes and references of that element that have differences. The corresponding values are displayed in the middle and right parts of the ''Details'' section according to the model they belong to. These sub-sections are called the ''Value'' sections. For instance, in the snapshot above, element “N2” is selected in the ''Synthesis'' section; the ''Details'' section shows that it has a difference on its name: the name is “N2” in the left model and “N2-Container” in the right model as shown in the ''Value'' sections.<br> | ||
| + | |||
| + | == User actions == | ||
| + | |||
| + | TBD | ||
Latest revision as of 03:43, 31 July 2012
Contents
Overview
In addition to an engine, EMF Diff/Merge also provides simple GUI components for visualizing comparisons, testing comparison methods, and letting end-users merge models manually.
A default mechanism provides a comparison action (pop-up menu) which allows end-users to open a comparison in an editor. This mechanism can be customized to support different kinds of comparison. Alternatively, a comparison can be displayed in other graphical contexts.
Default comparison action
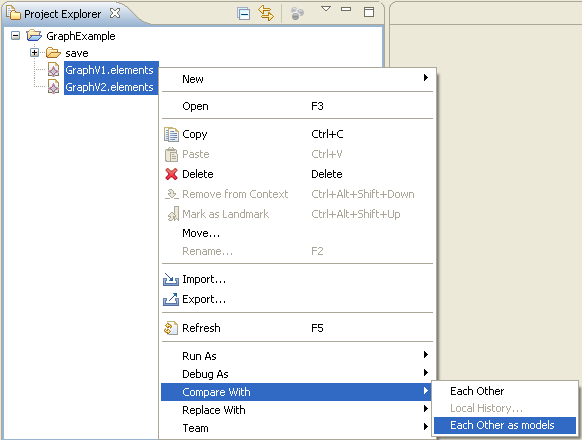
The default comparison action is applicable on workspace files. Select 2 or 3 model files in the Eclipse workspace, right-click, then select Compare with, Each Other as models. Note that the corresponding metamodel(s) must be registered in the platform.
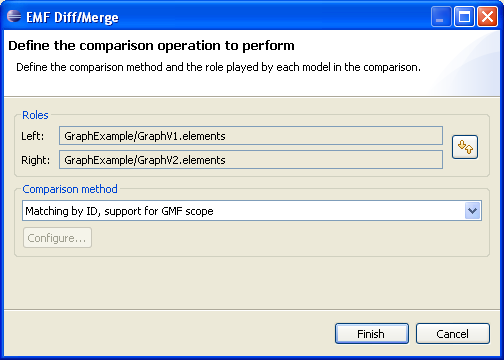
A dialog pops up for configuring the comparison. You may specify what model is on what side and, in the case of a 3-way comparison (3 files selected), which model is the common ancestor of the other 2. By default, matching is by Ecore ID (using the attribute in the metamodel whose ID property is set to true) or else by XML ID if present. The scope includes the content of the file, the content of sub-resource files if the model is fragmented, and the semantic model in the case of GMF diagrams. If you have defined different comparison methods or scopes, you may select which one to use and you may configure it when applicable.
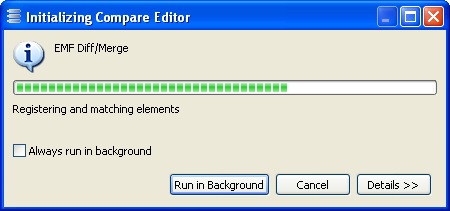
A progress dialog is then being displayed. Computing the differences between models takes time according to the size of the models and the number of differences between them. Click the Run in background button in order to keep working with Eclipse while the differences are being computed in parallel.
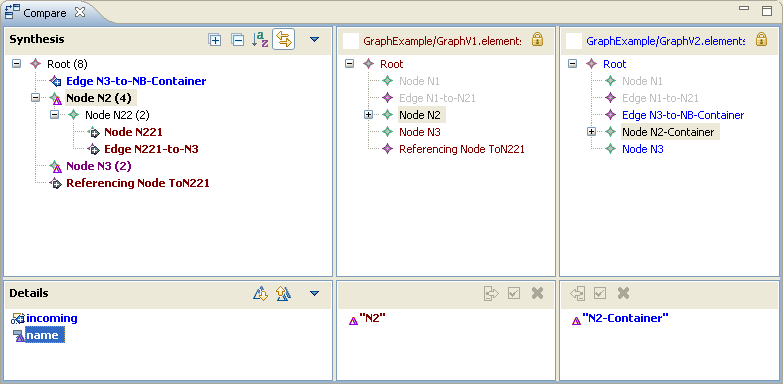
The comparison editor opens as soon as the computation is finished.
GUI structure
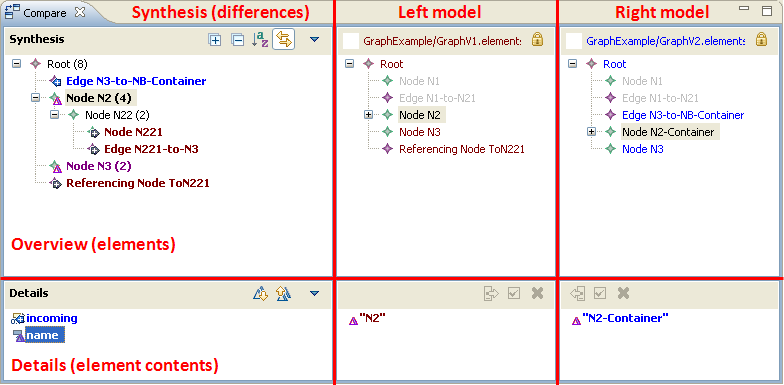
The default GUI is composed of 3 vertical sections and 2 horizontal sections.
Vertical sections
The middle section represents the contents of the left model while the section on the right-hand side represents the contents of the right model. When hovering on the top of any section, the complete path to the model is displayed as a tooltip if the window is too narrow. Each side is associated to a colour: by default, dark red for the left model and blue for the right model. This colour code is also used in other dialogs of the diff/merge tool in order to prevent any ambiguity.
The section on the left-hand side is the Synthesis section: it represents the differences between the models. According to the colour code, model elements which are present in the right model but not in the left model are written in blue, while they are written in dark red in the opposite case. Elements which are present in both sides but have differences in their attributes or references (“modified elements”) are labeled in purple. The number of differences they contain (after filtering) is written between parentheses. The 3 sections are synchronized: clicking an element in the Synthesis section highlights it in the other sections and vice-versa.
Horizontal sections
The 2 horizontal sections correspond to 2 levels of detail. The top section focuses on model elements and only reflects that level of granularity. The bottom section is the Details section: it shows the contents (attributes and references) of the model element which is currently selected in the top section.
For example, if a modified element (in purple) is being clicked in the Synthesis section, then the Details section displays all the attributes and references of that element that have differences. The corresponding values are displayed in the middle and right parts of the Details section according to the model they belong to. These sub-sections are called the Value sections. For instance, in the snapshot above, element “N2” is selected in the Synthesis section; the Details section shows that it has a difference on its name: the name is “N2” in the left model and “N2-Container” in the right model as shown in the Value sections.
User actions
TBD

