Notice: this Wiki will be going read only early in 2024 and edits will no longer be possible. Please see: https://gitlab.eclipse.org/eclipsefdn/helpdesk/-/wikis/Wiki-shutdown-plan for the plan.
Difference between revisions of "EMF/Getting Source NEW"
(→Developing eclipse tools) |
|||
| Line 1: | Line 1: | ||
| − | This document describes how to set up a development environment suitable for working on the EMF, SDO and XSD components. It is '''not intended for people who just want to use these tools''': the target audience are those who want to contribute to | + | This document describes how to set up a development environment suitable for working on the EMF, SDO and XSD components. It is '''not intended for people who just want to use these tools''': the target audience are those who want to contribute to their development by adding features, fixing bugs, etc. |
We assume some familiarity with CVS concepts and some experience working with the Eclipse workbench. | We assume some familiarity with CVS concepts and some experience working with the Eclipse workbench. | ||
| Line 9: | Line 9: | ||
===Workbench instances and workspaces=== | ===Workbench instances and workspaces=== | ||
| − | The Eclipse IDE platform is a highly customizable development | + | The Eclipse IDE platform is a highly customizable and extensible set of development tools. An Eclipse platform installation comprises of a set of plug-ins, each of which contributes some functionality to it. When Eclipse is launched, a ''workbench instance'' is created, making the contributed tools available for use by the developer. Active workbench instances each have a ''workspace'' associated with them. The workspace contains the resources (files, folders, etc.) that comprise the projects that a developer works on. The tools contained in the platform installation from which the workbench instance was launched can be used to work with the projects in the workspace. |
===Developing eclipse tools=== | ===Developing eclipse tools=== | ||
| − | The Eclipse tools platform can be used to develop new tools | + | The Eclipse tools platform can be used to develop new tools for the platform. In such a scenario, a workbench instance is launched and within its associated workspace, new projects are created that contain projects intended to extend the platform by providing new tools. |
| − | To access these new tools being developed, one needs to launch a new workbench instance, in which the newly developed plug-ins from the workspace are included, so that they | + | To access these new tools being developed, one needs to launch a new workbench instance, in which the newly developed plug-ins from the workspace are included, so that they will be made available for use. Therefore, a developer working on extending the Eclipse IDE, will typically work using two workbench instances and two workspaces: |
| − | + | ||
| − | + | * Development workbench instance A with its associated workspace X. | |
| + | |||
| + | Instance A is launched from the location where the Eclipse IDE was installed (e.g. C:\eclipse). Workspace X is the location where the developer stores his projects (e.g. C:\myWorkspace). | ||
| + | |||
| + | * Testing workbench instance B with its associated workspace Y. | ||
===The notorious bug 109137=== | ===The notorious bug 109137=== | ||
Revision as of 06:33, 4 December 2007
This document describes how to set up a development environment suitable for working on the EMF, SDO and XSD components. It is not intended for people who just want to use these tools: the target audience are those who want to contribute to their development by adding features, fixing bugs, etc.
We assume some familiarity with CVS concepts and some experience working with the Eclipse workbench.
Contents
Intricacies of working on EMF components
This section discusses some special considerations that need to be taken into account when working on EMF tools.
Workbench instances and workspaces
The Eclipse IDE platform is a highly customizable and extensible set of development tools. An Eclipse platform installation comprises of a set of plug-ins, each of which contributes some functionality to it. When Eclipse is launched, a workbench instance is created, making the contributed tools available for use by the developer. Active workbench instances each have a workspace associated with them. The workspace contains the resources (files, folders, etc.) that comprise the projects that a developer works on. The tools contained in the platform installation from which the workbench instance was launched can be used to work with the projects in the workspace.
Developing eclipse tools
The Eclipse tools platform can be used to develop new tools for the platform. In such a scenario, a workbench instance is launched and within its associated workspace, new projects are created that contain projects intended to extend the platform by providing new tools.
To access these new tools being developed, one needs to launch a new workbench instance, in which the newly developed plug-ins from the workspace are included, so that they will be made available for use. Therefore, a developer working on extending the Eclipse IDE, will typically work using two workbench instances and two workspaces:
- Development workbench instance A with its associated workspace X.
Instance A is launched from the location where the Eclipse IDE was installed (e.g. C:\eclipse). Workspace X is the location where the developer stores his projects (e.g. C:\myWorkspace).
- Testing workbench instance B with its associated workspace Y.
The notorious bug 109137
Software Environment
In order to develop on the EMF, SDO and XSD projects, you need Eclipse and an appropriate JRE.
When specifying directory paths on your system, remember to compensate for any difference between the environment presented in this article and your development environment.
Setting up the Eclipse Workspace
Configuring the plug-in environment
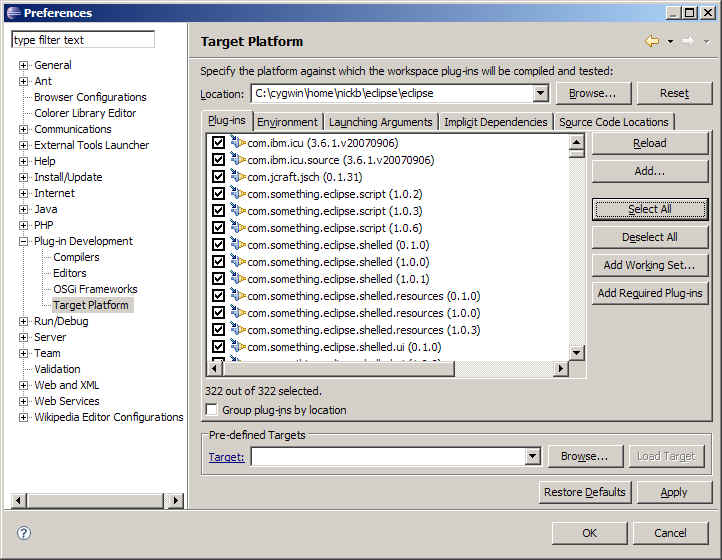
You need to specify where Eclipse should look for required plug-ins if they do not exist in the current workspace. To do this:
- In the Preferences dialog (Window > Preferences), with Plug-In Development expanded, select Target Platform.
- Click Select All so that all the plug-ins are selected.
- Click OK to close the Preferences dialog.
Configuring the the Eclipse CVS preferences
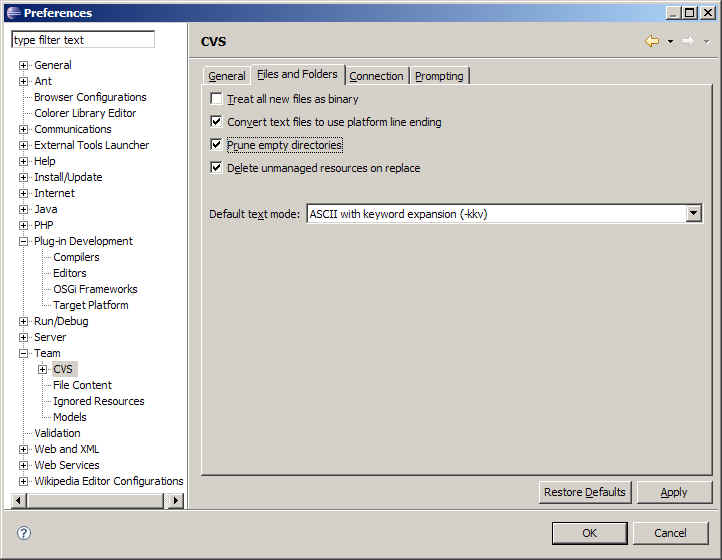
It is highly recommended to prune empty directories when extracting the code from the CVS repository. This is how you can set Eclipse to do that:
- Select Windows > Preferences > Team.
- Open CVS and select the Files and Folders tab, then select Prune empty directories.
- Click OK to close the Preferences dialog.
Understanding the CVS Structure
If you are unfamiliar with CVS concepts, there is a good list of resources on the CVS repository page.
Modules structure
The EMF, SDO and XSD sources are divided into three modules in CVS.
| CVS Repository | Module | Directories | |
| /cvsroot/modeling | org.eclipse.emf/org.eclipse.emf | ||
| plugins | contains the EMF plug-ins | ||
| features | contains the EMF features | ||
| doc | contains the EMF documentation plug-ins and features | ||
| tests | contains the EMF, SDO and XSD automated tests plug-ins and features | ||
| examples | contains the EMF examples | ||
| /cvsroot/modeling | org.eclipse.emf/org.eclipse.emf.ecore.sdo | ||
| plugins | contains the SDO plug-ins | ||
| features | contains the SDO features | ||
| doc | contains the SDO documentation plug-ins and features | ||
| /cvsroot/modeling | org.eclipse.mdt/org.eclipse.xsd | ||
| plugins | contains the XSD plug-ins | ||
| features | contains the XSD features | ||
| doc | contains the XSD documentation plug-ins and features | ||
| examples | contains the XSD examples | ||
EMF and SDO are components of the EMF Project. XSD is a component of the MDT Project.
Build tag and branch naming conventions
For each build, a new CVS tag is created. The name of the CVS tag follows this convention:
build_<build id>
where <build id> is usually the build timestamp in the yyyyMMddhhmmss format (for example, 20040211140643).
The HEAD branch always contains the latest file versions, which are currently under active development. If a fix is required for a particular past build (typically a release), a branch will be created. The branch naming convention is:
branch_<build id>
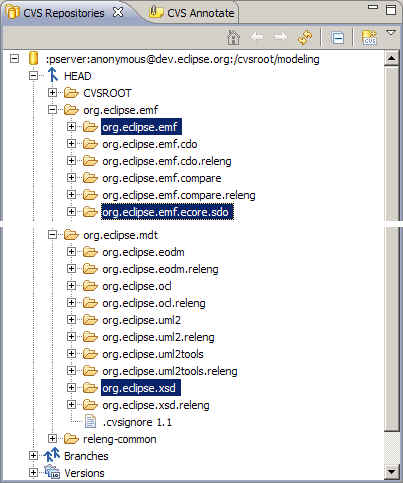
The structure of the CVS repository is shown below:
If for some reason you need to get files from a certain build, look under "Versions" for the tag that identifies that build.
Checking Out Code as an Anonymous User
An anonymous user has access only to check out files from the CVS repository. This user does not have the privileges to check in files.
Configuring the CVS client to check out files
- Open the CVS perspective in the Eclipse Workbench by selecting Windows > Open Perspective > CVS Repository Exploring.
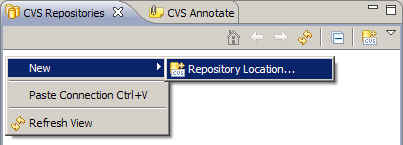
- Right click on the CVS Repositories view as shown below, and select New > Repository Location...
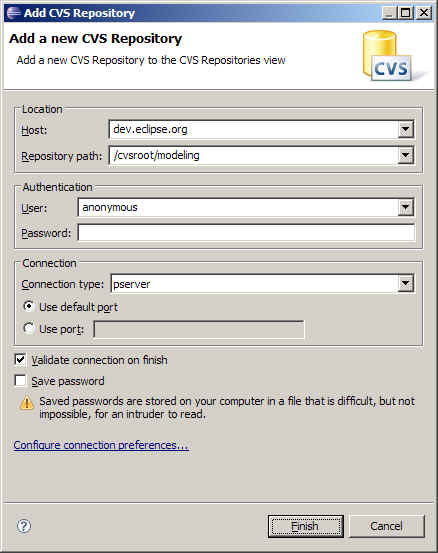
- Enter the information as shown below in the Add CVS Repository dialog and click Finish. This will establish a connection with the /cvsroot/modeling repository located on dev.eclipse.org, using the anonymous user ID. Make sure you set the connection type to pserver and use the default port, as shown.
Checking Out Code
If you followed the instructions in the previous section, you should see a new repository entry in the CVS Repositories view.
To check out code, you have two options. Either check out the projects automatically using a Team Project Set File, or manually.
Using Team Project Set File (.psf)
- Download the PSF file and save it somewhere memorable, like your desktop. You might also want a PSF for SDO or XSD.
- Back in Eclipse, switch to the Java perspective.
- From the File menu or Project Explorer context menu, select Import.
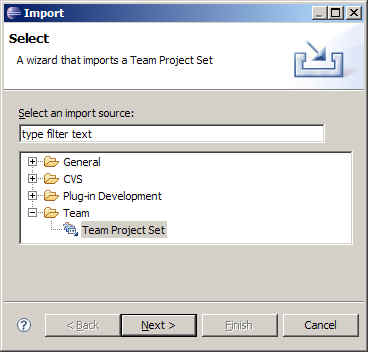
- Choose Team > Team Project Set, then click Next.
- Browse for the .psf file you want to use, downloaded from EMF_Team_Project_Sets.zip. Click Finish.
- Each feature & plugin will then be checked out as a project in the workspace.
Manual Checkout
- Switch to the CVS perspective if not already there.
- Expand the repository node.
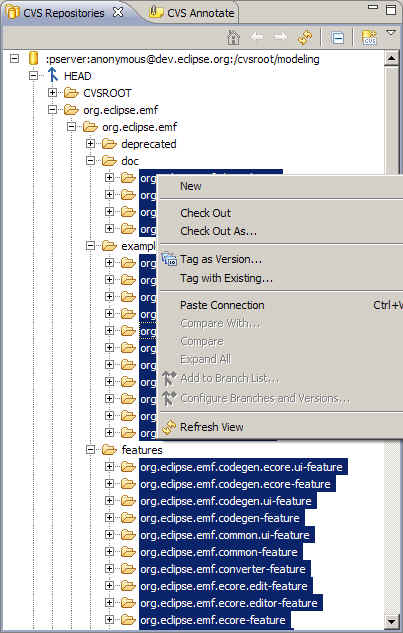
- Expand the HEAD node, as shown below, to view all the modules in the repository.
- Scroll down and expand the
org.eclipse.emf/org.eclipse.emfmodule, as shown below. Select the subdirectories of the features, plugins, docs, tests, and examples directories that you want to retrieve. - Repeat for
org.eclipse.emf/org.eclipse.emf.ecore.sdoandorg.eclipse.mdt/org.eclipse.xsd - Right click and select the Check Out menu option.
- Each selected directory as is checked out as a project in the workspace. Once the operation is complete, you can switch to the Java perspective to work with the projects.
Resolving Dependency Problems
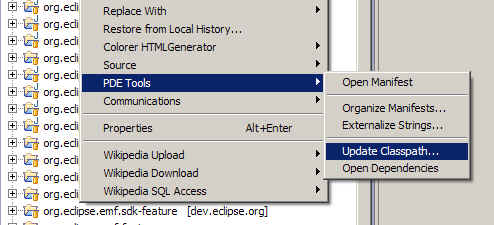
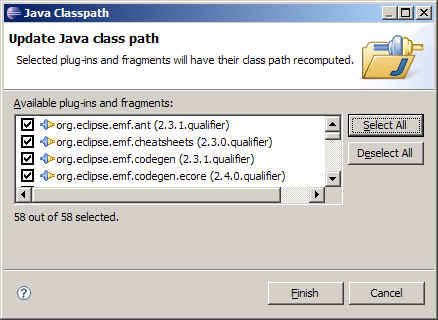
You may find that the projects have compilation errors after you check them out. To resolve these, update the classpath. Right click on the project and select the PDE Tools > Update Classpath... menu option as shown below. The Java Classpath dialog appears.
Ensure that any projects with dependency problems are checked in the list of available plug-ins and fragments, and then click Finish.
Synchronizing your Local Sandbox with the HEAD Branch
- As described above, the HEAD branch contains the latest verision of the code. To synchronize your local changes with the HEAD, right click on the resource that you want to synchronize, and then select:
Team > Synchronize with Repository
- This opens the Synchronize view. For more on using this view, see CVS Workspace Synchronization.
- You can merge in the changes from the HEAD manually or automatically. To merge automatically, right click on the resource you want to merge. Select:
Team > Update
- If there are conflicts that cannot be resolved automatically, CVS will insert special markup in the file to indicate that those lines could not be merged. You will need to resolve the conflicts manually. See also Resolving conflicts
More Info
- For more information on CVS, see:

