Notice: this Wiki will be going read only early in 2024 and edits will no longer be possible. Please see: https://gitlab.eclipse.org/eclipsefdn/helpdesk/-/wikis/Wiki-shutdown-plan for the plan.
Difference between revisions of "EGit/User Guide"
m (→Inspecting the Commit Graph) |
(→All Branches) |
||
| Line 1,228: | Line 1,228: | ||
[[Image:Egit-0.9-history-view-allbranches.png]] | [[Image:Egit-0.9-history-view-allbranches.png]] | ||
| − | This toggle activates the "All Branches" mode. By default, only those commits are shown in the commit log that can be reached from the currently checked out commit, i.e. the Commit Graph ends with the currently checked out commit and newer commits are not shown. If this button is down, all commits will be shown in the commit log. | + | This toggle activates the "All Branches" mode. By default, only those commits are shown in the commit log that can be reached from the currently checked out commit, i.e. the Commit Graph ends with the currently checked out commit and newer commits are not shown. If this button is down, all commits will be shown in the commit log. This is illustrated in the following picture from our example. The branch "beforeSplit" is currently checked out; by activating the toggle, the newer branches will become visible: |
| + | |||
| + | [[Image:Egit-0.9-history-view-allbranchesToggle.png]] | ||
==== View Menu actions ==== | ==== View Menu actions ==== | ||
Revision as of 07:18, 9 September 2010
Contents
- 1 Getting Started
- 2 Concepts
- 3 Tasks
- 3.1 Creating Repositories
- 3.2 Starting from existing Git Repositories
- 3.3 Working with remote Repositories
- 3.4 Inspecting the state of the Repository
- 3.5 Committing Changes
- 3.6 Reverting Changes
- 3.7 Branching
- 3.8 Merging
- 3.9 Tagging
- 3.10 Patches
- 3.11 Managing Repositories
- 3.11.1 Adding Repositories to the Git Repositories View
- 3.11.2 Structure of the Git Repositories View
- 3.11.3 Functions of the Git Repositories View
- 3.11.4 Refresh
- 3.11.5 Link with Selection
- 3.11.6 Link with Editor
- 3.11.7 Hierarchical Branch Layout
- 3.11.8 Bare Repositories
- 3.11.9 Removing Repositories from the Git Repositories View
- 4 Reference
- 4.1 Perspective, Views and Menus
- 4.1.1 Git Perspective
- 4.1.2 Git Repositories View
- 4.1.3 History View
- 4.1.3.1 Overview
- 4.1.3.2 Opening the History View
- 4.1.3.3 Organization of the History View
- 4.1.3.4 Using the History View
- 4.1.3.5 Toolbar actions
- 4.1.3.6 View Menu actions
- 4.1.3.7 Context Menu actions
- 4.1.3.7.1 Compare with working tree
- 4.1.3.7.2 Compare with each other
- 4.1.3.7.3 Open
- 4.1.3.7.4 Checkout
- 4.1.3.7.5 Create Branch...
- 4.1.3.7.6 Create Tag...
- 4.1.3.7.7 Create Patch...
- 4.1.3.7.8 Reset > Soft/Mixed/Hard
- 4.1.3.7.9 Quickdiff > Reset Quickdiff Basline to HEAD
- 4.1.3.7.10 Quickdiff > Reset Quickdiff Basline to first parent of HEAD
- 4.1.3.7.11 Quickdiff > Set as Baseline =
- 4.1.3.7.12 Copy
- 4.1.3.7.13 Show Revision Comment
- 4.1.3.7.14 Show Revision Details
- 4.1.3.7.15 Wrap Comments
- 4.1.3.7.16 Fill Paragraphs
- 4.1.4 Project Context Menu
- 4.1.5 Resource Context Menu
- 4.1.6 Menu Actions
- 4.2 URIs
- 4.3 Git References
- 4.4 Refspecs
- 4.5 Remotes
- 4.6 Ignore
- 4.1 Perspective, Views and Menus
Getting Started
Overview
If you're new to Git or distributed version control systems generally, then you might want to read Git for Eclipse Users first. If you need more details and background read the Git Community Book.
Basic Tutorial: Adding a project to version control
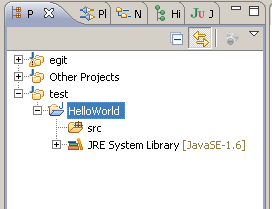
Create a new Java project "HelloWorld"
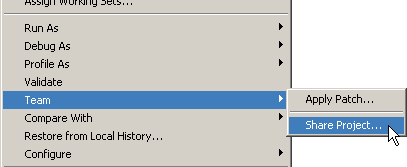
Select File > Team > Share Project
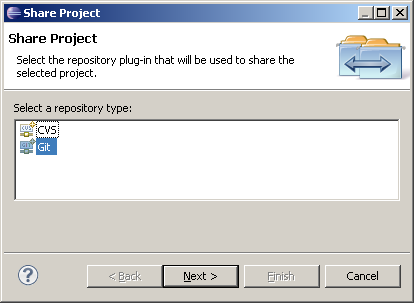
Select repository type Git and click Next
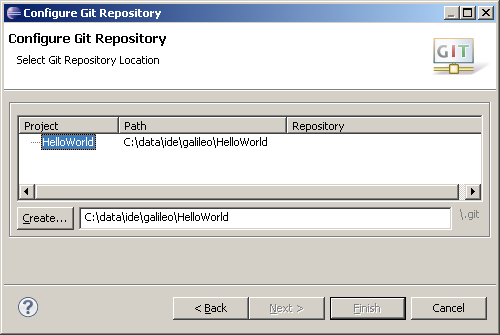
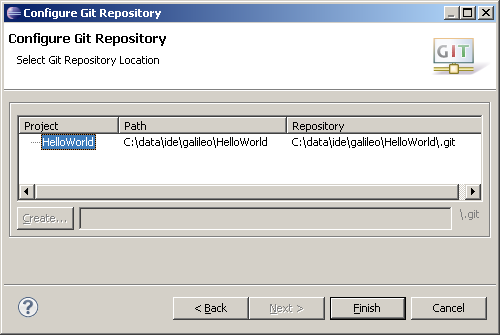
To configure the Git repository select the new Eclipse project HelloWorld
Click Create to initialize a new Git repository for the HelloWorld project. If your project already resides in the working tree of an exisiting Git repository the repository is chosen automatically.
Click Finish to close the wizard.
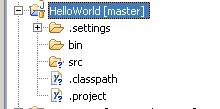
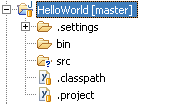
The decorator text "[master]" behind the project shows that this project is tracked in a repository on the master branch and the question mark decorators show that the ".classpath" and ".project" files are not yet under version control
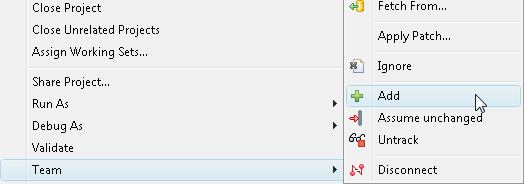
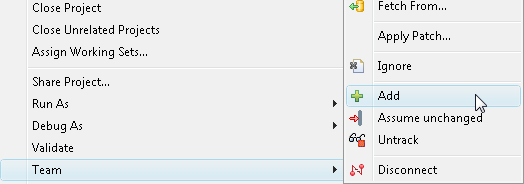
Select Team > Add on the project node
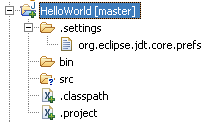
The plus decorators show that now the ".classpath" and ".project" files are added to version control
Create a file .gitignore in the project folder with the following content:
bin
This excludes the bin folder from Git's list of tracked files. Add .gitignore to version control.
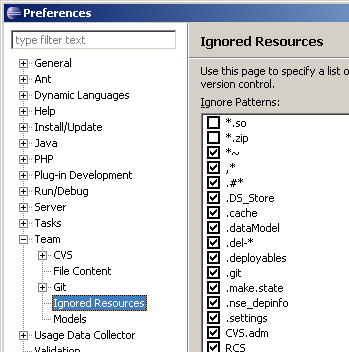
The file under ".settings" is not added to version control since it is by default on the list of ignored resources which can be changed in
Preferences > Team > Ignored Resources
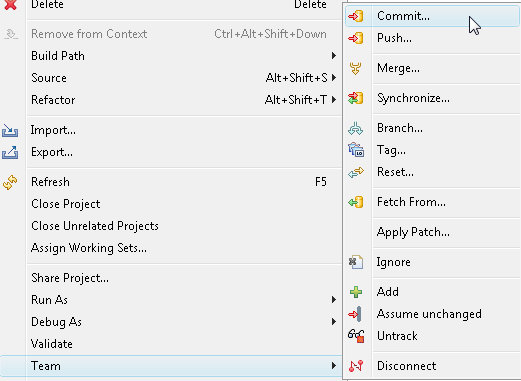
Click Team > Commit in the project context menu
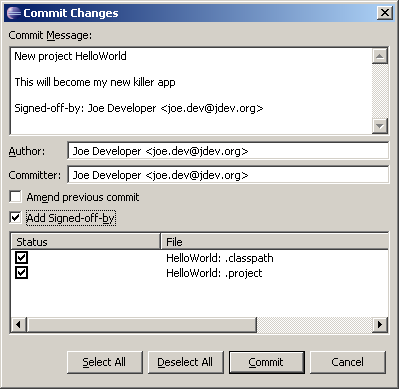
Enter a commit message explaining your change, the first line (separated by an empty line) will become the short log for this commit. By default the author and committer are taken from the .gitconfig file in your home directory. You may check the checkbox "Add Signed-off-by" to add a Signed-off-by tag. If you are committing the change of another author you may alter the author field to give the name and email address of the author. Click "Commit" to commit your first change.
Note that the decorators of the committed files changed.
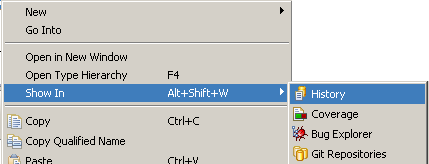
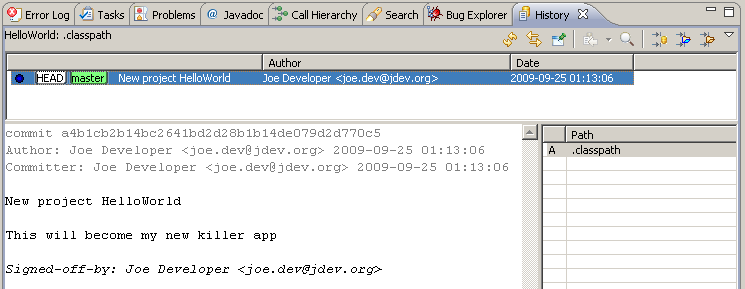
Select Show In > History from the context menu to inspect the history of a resource
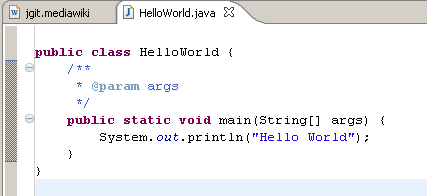
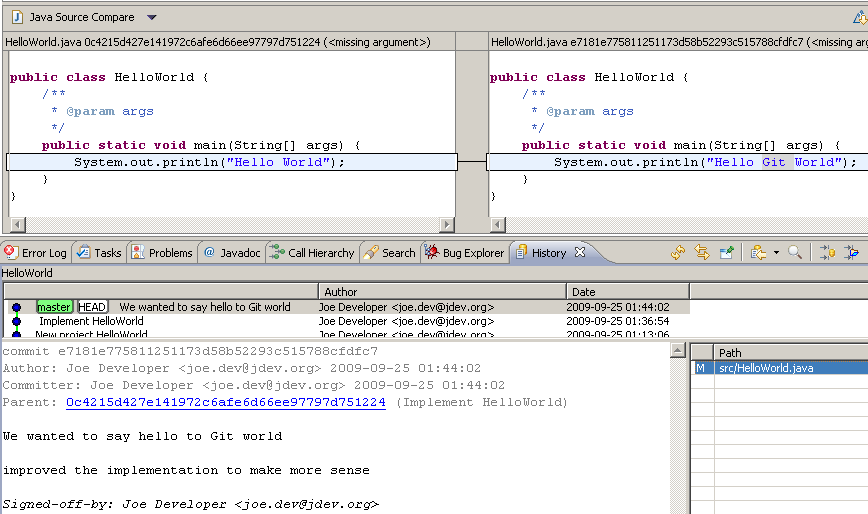
Create a new Java class HelloWorld and implement it, then add it to version control and commit your change. Improve your implementation and commit the improved class, the resource history should now show 2 commits for this class.
Double click "src/HelloWorld.java" in the Resource History View to open your last committed change in the Eclipse compare view
Github Tutorial
Create Local Repository
- follow EGit/User Guide/Getting Started to create a new local repository (with your content instead of the demo project)
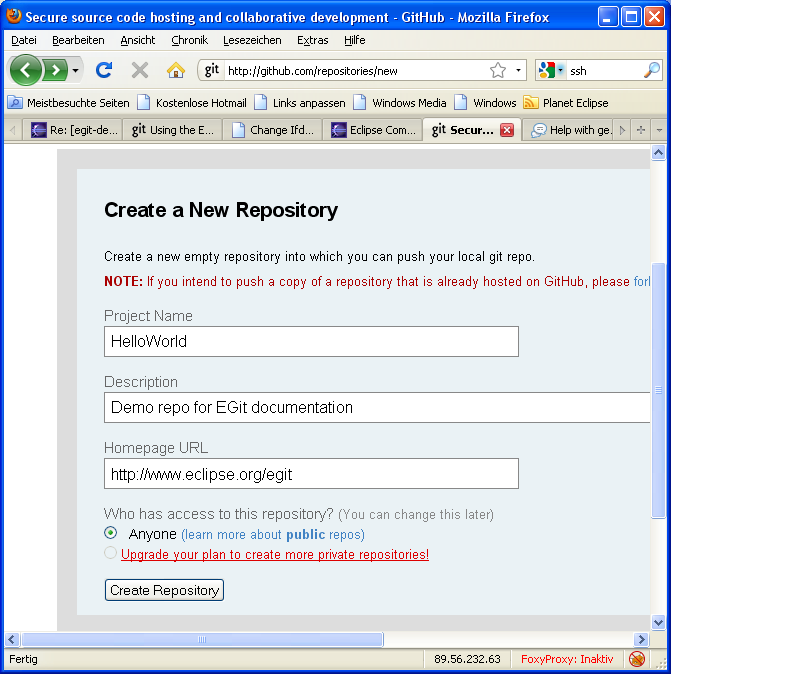
Create Repository at GitHub
- create a new repository at GitHub
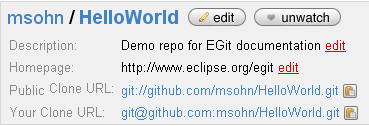
- you get a fresh clone URL for this new repository
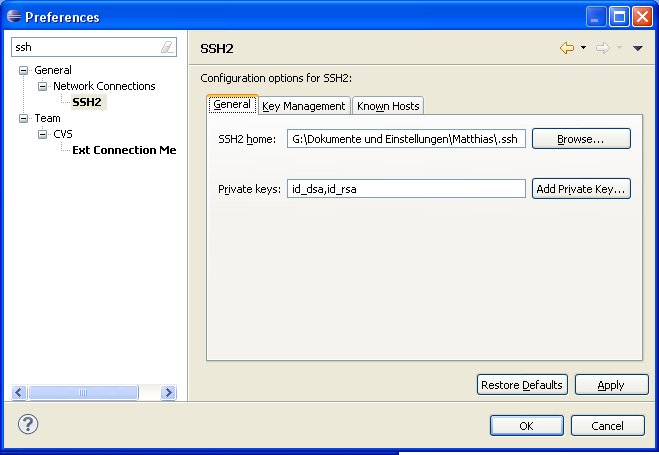
Eclipse SSH Configuration
- Click Window > Preferences and ensure that your SSH2 home is configured correctly (usually this is ~/.ssh) and contains your SSH2 keys (upload your public key to your GitHub account settings)
- if you don't have SSH keys yet you may generate them on the second tab Key Management of this dialog, use a good pass phrase to protect your private key, for more details see "working with key passphrases"
Push Upstream
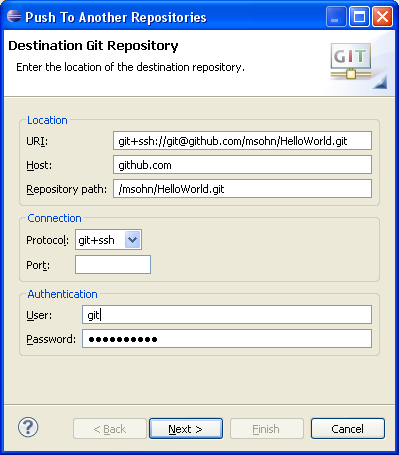
- Select your new Eclipse project and click Team > Push....
- Enter Your GitHub Clone URL and your GitHub password (with the free github accounts do not enter a password but leave this field blank), leave the user as git.
- Click Next and on first connection accept GitHub's host key.
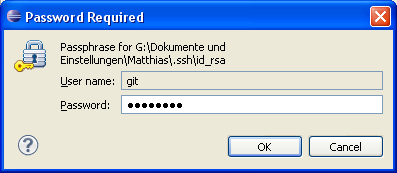
- Enter your SSH key's passphrase.
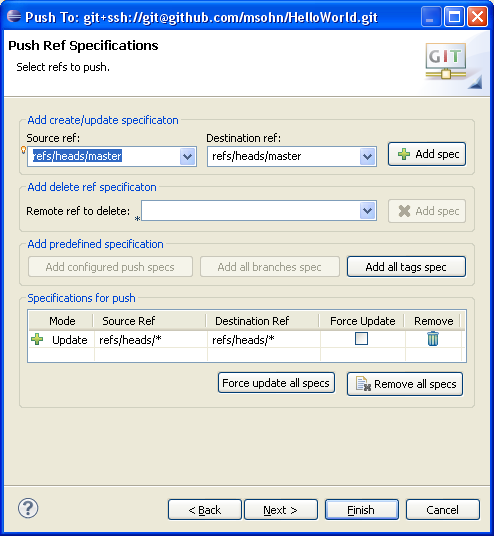
- Click Add all branches spec to map your local branch names 1:1 to the same branch names in the destination repository.
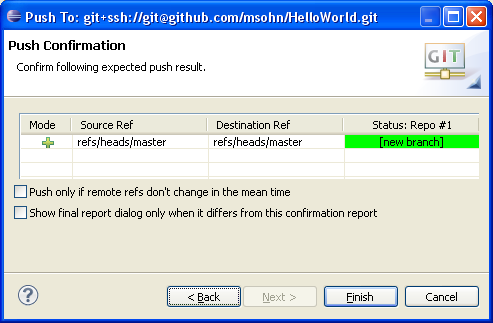
- Click Next. The push confirmation dialog will show a preview of the changes that will be pushed to the destination repository.
- Click Finish to confirm that you want to push these changes.
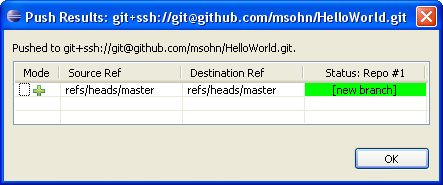
- The next dialog reports the result of the push operation.
- Point your browser at your GitHub repository to see that your new repository content has arrived
Concepts
Repository, Working Tree, Index
TODO
Lifecycle of a Change in Local Repository
TODO
Propagation of Changes between Repositories
TODO
Tasks
Creating Repositories
Creating a new empty Git Repository
You can create a project first and share it afterwards. The Share Project Wizard supports creation of Git repositories (see Adding a project to version control).
You can also create a new empty Git Repository from the Git Repositories View (see Creating a Repository).
Creating a Git Repository for multiple Projects
You may first create all projects under a common directory and then create a common repository for all projects in one go:
- create the Eclipse projects e.g. a, b, c under a common directory e.g. /repos/examples/
- select all projects a, b, c - from context menu click Team > Share Project > Git
- press Next
- select all projects a, b, c
- the wizard automatically moves up the default repository location to the parent folder /repos/examples/ since multiple projects have been selected
- click Create Repository and click Finish
Starting from existing Git Repositories
In order to work with the contents of a Git Repository in the Eclipse workbench, the files and folders contained in this repository must be imported in the form of projects. In principle, this import step can be done using the generic "New Project" or "Import..." wizards, since the working directory of a Git Repository is just a normal directory in the local file system. However, the newly created projects would still have to be shared manually with Git. The "Import Projects from Git" wizards integrates project import and sharing and also offers some extra convenience.
Starting the import wizard
The wizard is started using
Import > Git > Projects from Git
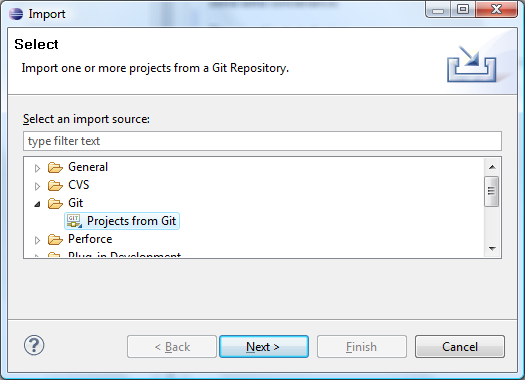
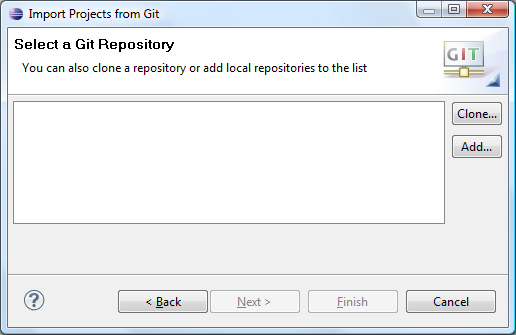
If you started in a clean workspace, the first page will display an empty list:
Before you can continue, you need to add one or several Git Repositories to the list.
If you have already Repositories in the list, the following step is optional.
Cloning or adding Repositories
There are two ways to add Git Repositories to the list:
- Clone a remote Repository
- Add an existing Repository from your local file system
Cloning a Repository
The first option is used if you start with a remote repository. The clone operation will copy that Repository to your local file system. The Clone wizard is started using the Clone... button next to the Repository list. The Clone wizard is described in more detail elsewhere. Upon successful completion of the clone wizard, the newly cloned Repository should appear in the list automatically.
Adding a Repository
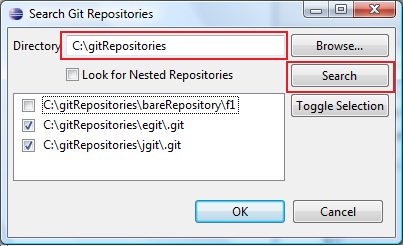
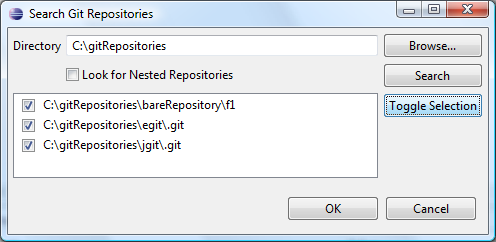
The second option is useful if you already have a repository in your local file system, for example because you have cloned it earlier, you created it from scratch or you copied it from somewhere else. Clicking on the Add... button next to the Repository list, a dialog is displayed which allows to enter a directory in the local file system. Press Search to trigger a scan for Git repositories contained in this directory. If Git repositories are found, they will be shown in a list and you can select repositories to add:
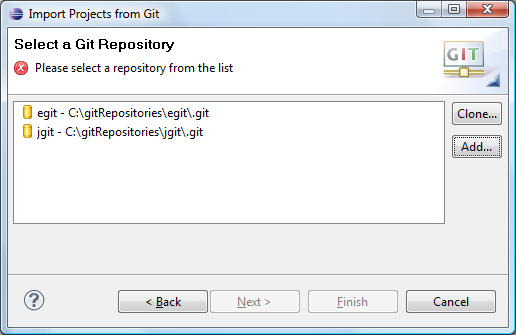
After successful completion, the repository list should contain some repositories:
Selecting a Repository from the List
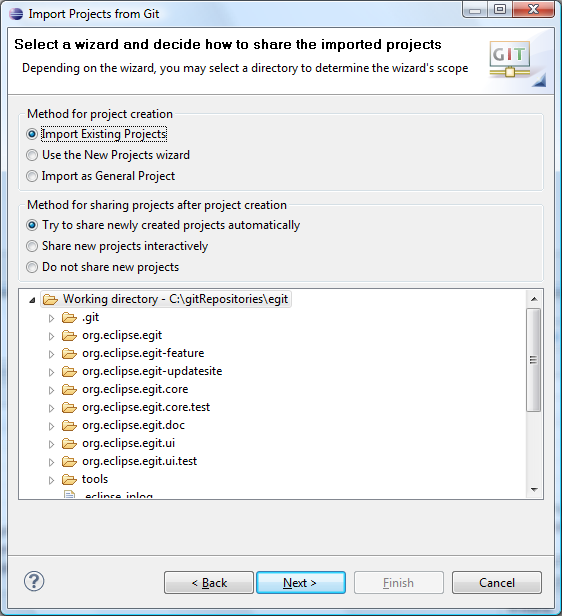
You can now select a Repository and click Next. On the following wizard page, you will have to decide:
- How to do the import
- How to share the imported projects:
- (Optional): limit the scope of the wizard
Method for importing Projects
Import Existing Projects
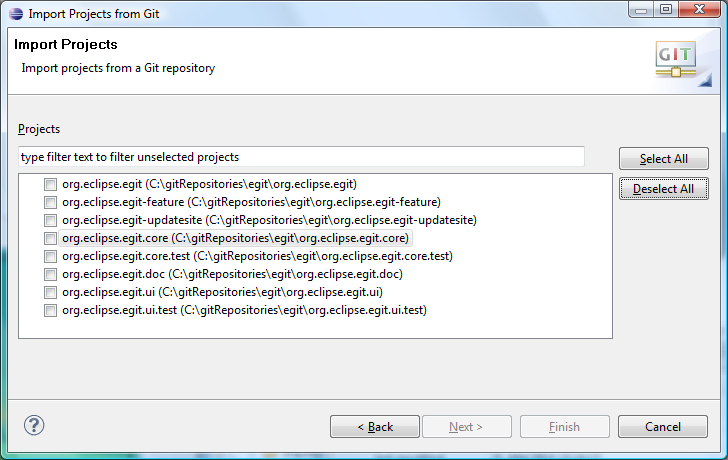
If this radio button is selected, the wizard will scan the local file system for .project files and display the projects found for being imported. This is the most comfortable solution and should be used if .project files are checked into the Repository.
Limiting the Scope for Project Import
In this case, the directory tree at the bottom is active. You can limit the search for .project files by selecting a folder in this tree, otherwise the complete working directory of the Repository will be scanned. On the next page, a list of the found projects (if any) will be shown. This is very similar to the generic Import Existing Projects wizard, but has some additional filtering capabilities:
Use the New Projects Wizard
When this option is chosen, this wizard branches to the generic "New Project" wizard. After completion of the "New Project" wizard, this wizard will resume and help you with sharing the newly created projects (if any) created using the "New Project" wizard.
In this case, the directory tree at the bottom is inactive, as the selection is not relevant for the "New Project" wizard.
Import as General Project
This option can be helpful when there are neither .project files available nor a suitable "New Project" wizard applies to the content of the Git Repository. If chosen, the wizard will generate a .project file and point the project to a folder of the Repository's working directory. The result is a "General Project".
By default, the newly generated project will point to the working directory of the Repository. By selecting some folder from the directory tree at the bottom, you can have the project generated for that folder.
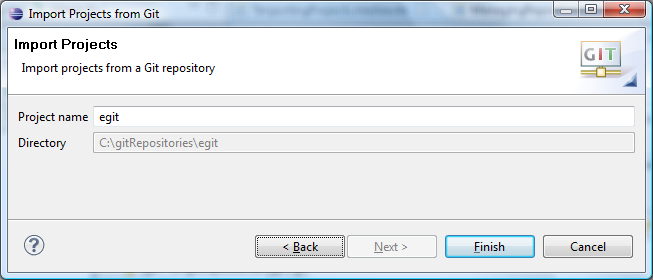
When clicking Next you will see a simple dialog suggesting a name and a directory for the new project:
The name will be suggested to be the same as the name of the directory.
Method for Sharing Imported Projects
The newly created projects (if any) must be shared with the correct Git Repository in order to become part of the Git Team Provider. The following options for doing this share are provided:
This is the recommended option: the wizard will automatically detect newly created projects and find the corresponding Repository automatically. No user interaction is required. If automatic sharing fails, the projects will simply remain unshared. You can share them any time manually.
This might be useful for very special circumstances where the automatic detection fails. Note that this will block the UI until project import is completed.
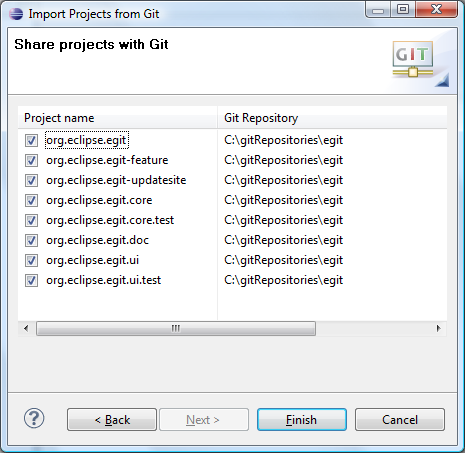
A page will be shown with the newly created projects and the corresponding Repositories. Using the check boxes, you can decide which projects to share:
This may be helpful if you want to share projects manually for some reason.
Working with remote Repositories
Cloning Remote Repositories
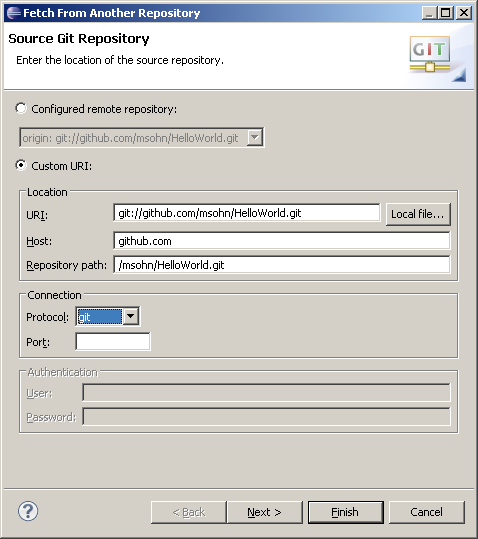
Using the Git Clone Wizard you may clone remote repositories using different transport protocols.
The wizard can be started from the "Import Projects from Git" wizard using
Import... > Git > Projects from Git > Next > Clone...
or from the "Git Repositories View" (described elsewhere) using the Clone a Git Repository toolbar button.
Repository Selection
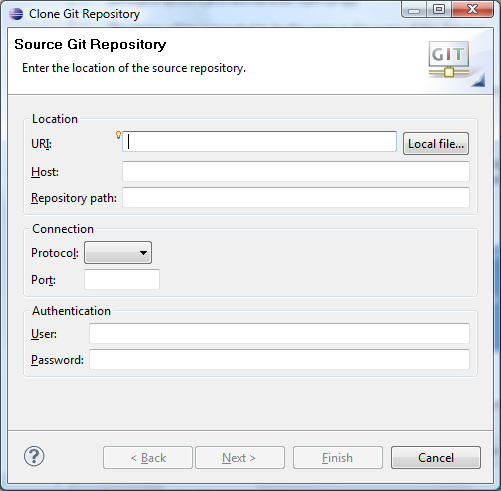
On the first page of the wizard enter the location of the remote repository:
- URI - The complete URI of the remote repository or the path on the file system. This field is automatically synchronized with the other fields.
Note that you can use the Local file... button to browse for a local directory and that the URI field offers content assist by offering previously used values - Host - The name of the remote host or empty if cloning from the file system.
- Repository Path - Path to the remote repository or on the file system.
- Protocol - One of the protocols described below.
- Port - Port number.
- User - The user name used for authentication.
- Password The password used for authentication.
The following protocols are supported:
- git - The most efficient built-in git protocol (default port 9418). This protocol doesn't provide authentication. Typically used for anonymous read access to the repository.
- git+ssh - Git over secure shell (SSH) protocol. Typically used for authenticated write access to the repository.
- sftp - SSH File Transfer Protocol
- http - Hypertext Transfer Protocol can be tunneled through firewalls.
- https - Hypertext Transfer Protocol Secure can be tunneled through firewalls.
- ftp - File Transfer Protocol
- file - File system access to the repository.
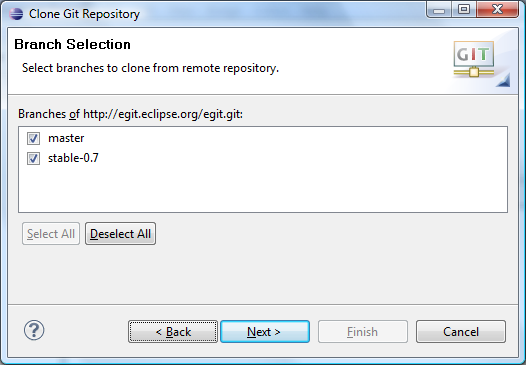
Branch Selection
On the next page choose which branch should be cloned from the remote repository:
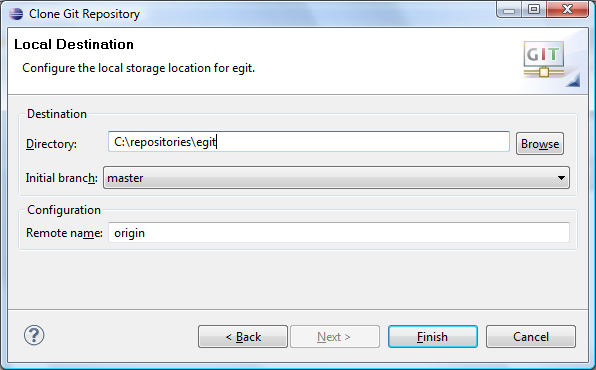
Local Destination
On the next page define where you want to store the repository on the local file system and define some initial settings.
- Directory - The directory which will contain the Git repository. It will be created by the wizard if it does not yet exist.
- Initial branch - Choose here which local branch will be created and initially checked out.
- Remote name - Define a name for the remote repository. The default is "origin".
Pushing to other Repositories
Direct Push
The easiest way for pushing is to use Direct Push Support on a Push Specification of a Remote.
Push Wizard
The other way is using the Push Wizard
Team > Push...
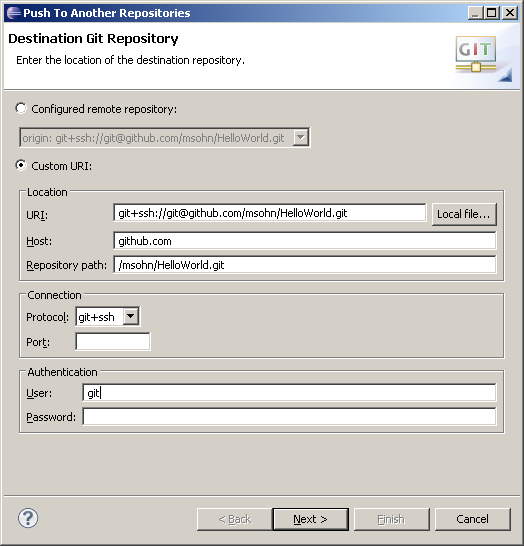
Push URI
- If you already configured a Push Specification in the Repositories View you may also select it here using the drop-down list under Configured remote repositories.
- Otherwise click Custom URI and enter the URI of the upstream repository you want to push to.
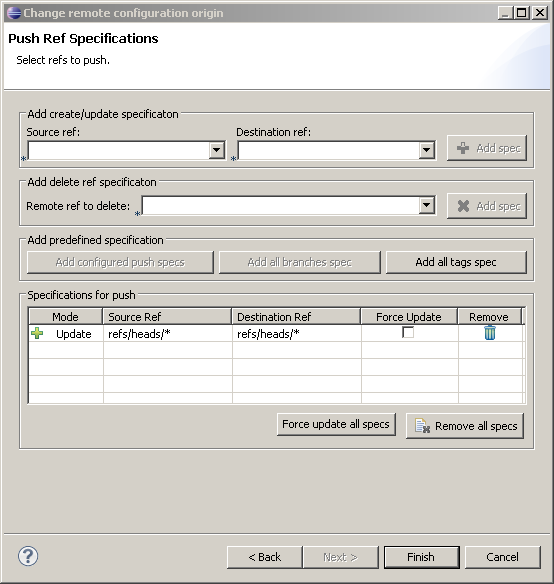
Push Ref Specifications
Click Next
Click Add all branches spec
This is a convenient way to declare that you want to map your local branch names to the same branch names on the upstream repository you want to push changes to.
Click Add all tags spec to map local tags 1:1 to tags in the repository you want to push to.
If you want to map local branches to those in the upstream repository in a different way you may define more detailed mapping specifications in the following way
- enter source and destination ref or select already existing branches from the drop-down lists
- click Add spec
This will transfer the newly defined mapping to the list Specifications for push
Other common push specs:
- You may e.g. map refs/heads/* to refs/heads/joe/* if you want to name the branches you push to according to your nickname joe. This is useful if multiple users want to publish their local branches on personal branches in a jointly used public repository.
- Another usual mapping is to map the source ref HEAD to the destination refs/heads/master. This means you want to map your current HEAD (which might currently point e.g. to any local topic branch) to the upstream master branch.
Delete Ref Specifications
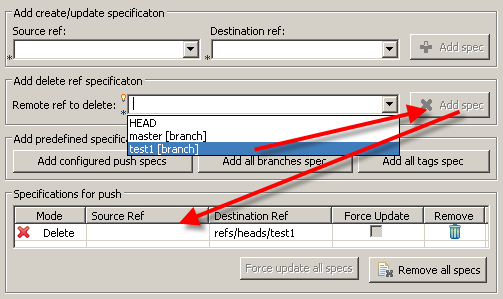
To delete a ref in the destination repository select the ref to be deleted from the drop-down list Remote ref to delete and click Add spec. This will create a corresponding entry in the Specifications for push list. Alternatively you may type in the specification for the refs to be deleted, this may also use wildcards. Pushing Delete Ref Specifications will delete the matching Refs in the destination repository.
Conflicting Push Ref Specifications
If you add multiple conflicting Push Ref Specifications they will be marked in red, solve this by removing or editing the conflicting specs. It is also possible to edit the specs in-place in the list Specifications for push
Push Confirmation
Click Next
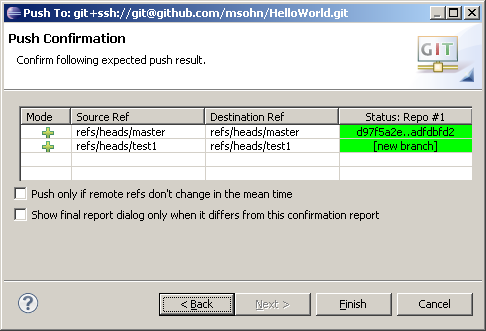
This will open the Push Confirmation dialog showing a preview which changes will be pushed to the destination repository. If this does not match your expectation click Back and correct your push specs accordingly.
- For ref updates the range of commits to be pushed will be shown in the format <SHA1-from>..<SHA1-to> e.g. d97f5a2e..adfdbfd2 means all commits between d97f5a2e and adfdbfd2 will be pushed.
- For refs which do not yet exist in the destination repository [new branch] or [new tag] is displayed.
- For refs which will be delete [deleted] is shown.
- Select the Push only if remote refs don't change in the mean time check box if you want to be sure that what you see in this preview is also what you get when pushing these changes out.
- Select the Show final report dialog only when it differs from this confirmation report check box if you only want to get a report after executing the push if the result differs from this preview.
Push Result Report
Click Finish
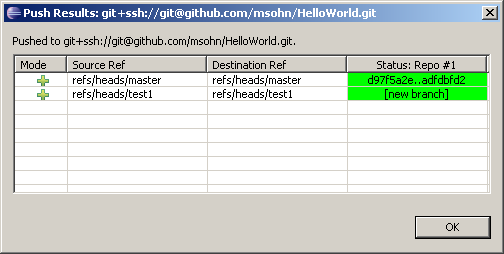
Depending on the options you have chosen a push result report dialog is shown
Click Ok to close the dialog.
Fetching from other Repositories
Direct Fetch
The easiest way for fetching is to use Direct Fetch Support on a Fetch Specification of a Remote.
Fetch Wizard
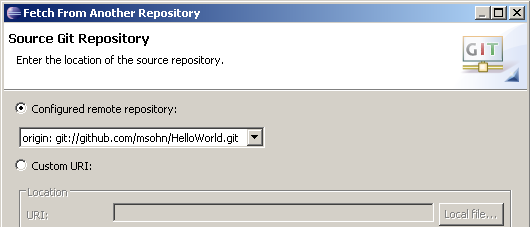
The other way is using the Fetch Wizard
Team > Fetch...
- If you already configured a Fetch Specification in the Repositories View you may also select it here using the drop-down list under Configured remote repositories.
- Otherwise click Custom URI and enter the URI of the upstream repository you want to fetch changes from.
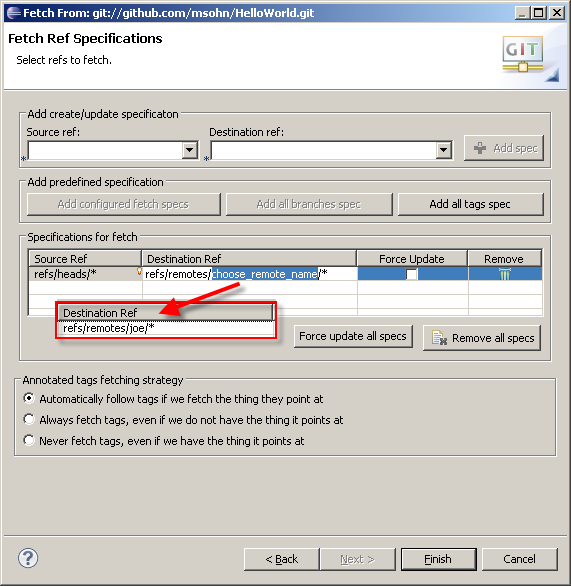
Fetch Ref Specifications
Click Next
Click Add all branches spec
This is a convenient way to declare that you want to map the branch names in the upstream repository you want to fetch changes from 1:1 to the same local branch names.
- Click in the edit field Destination Ref and replace the path segment choose_remote_name with a symbolic name for the upstream repository you are going to fetch from.
- The default remote name for the repository your repository has been cloned from is origin. The master of this remote maps by default from refs/heads/master to refs/remotes/origin/master.
- If you e.g. want to additionally track branches from Joe's repository in your local repository you would map the branch in his repository refs/heads/* to the following tracking branches refs/remotes/joe/*.
- Deselect Force Update if you want to allow fast-forward updates only, select this option if you also want to allow non-fast-forward changes.
- Click Force Update all Refs to set the force update option on all specs
- Click Remove all specs to remove all specs from the list Specifications for fetch
- Click Add all tags spec to map tags tags in the repository you want to fetch from 1:1 to local tags.
If you want to map branches or tags in the upstream repository to local branches in a different way you may define more detailed mapping specifications in the following way
- enter source (ref in source repository) and destination ref (tracking branch or tag in local repository) or select already existing branches from the drop-down lists
- click Add spec
This will transfer the newly defined mapping to the list Specifications for fetch
Fetch Result Report
Click Finish
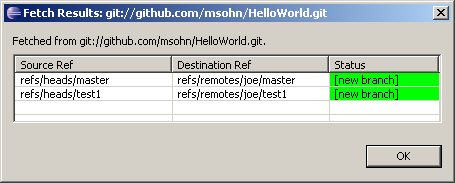
A fetch result dialog is shown.
- For ref updates the range of commits which have been fetched will be shown in the format <SHA1-from>..<SHA1-to> e.g. d97f5a2e..adfdbfd2 means all commits between d97f5a2e and adfdbfd2 have been fetched.
- For refs which didn't exist before in the local repository [new branch] or [new tag] is displayed.
- For refs which have been deleted [deleted] is shown.
Pulling New Changes from Upstream Repositories
This is not yet fully available.
In cases where fast-forward merges are sufficient (full merge is not yet implemented) you may run pull in EGit in the following way:
- Fetch changes from upstream repository
- Checkout the branch you want to pull the upstream changes into
- Merge the branch or tag you want to integrate into your current branch
Available alternatives currently include:
- run git pull from outside eclipse (but beware on Windows)
- if you did no local change or want to discard your local changes, use Team > Reset...
Inspecting the state of the Repository
Label Decorations
Label decorations show Git specific information on resources under Git version control. They appear in all views showing model objects, like Package Explorer, Project Explorer, Navigator, Hierarchy View.
The Git label decorations can be switched on globally in the Preference Menu (Window > Preferences) under General > Appearance > Label Decorations.
More detailed settings can be done in the Preferences under Team > Git > Label Decorations.
There are two different types of label decorations: text decorations and icon decorations.
Text Decorations
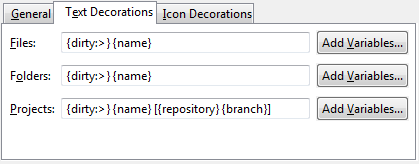
Text decorations appear on the left or right side of the text label. They can be configured on the Preferences dialog under Team > Git > Label Decorations on the tab Text Decorations. For example, the default for a dirty resource is a > on the left side of its name.
These are the default settings:
For files and folders there are the variables "name", "dirty" and "staged". "Dirty" and "staged" are flags; if they are true, the text after the colon is displayed.
For projects there are the additional variables "repository" and "branch". The "repository" variable displays the name of the repository.
The "branch" variable displays the name of the currently checked out branch. If no branch is checked out, the decoration shows the shortened name of the commit (first seven characters followed by ellipsis). If tags and/or remote branches are pointing to this commit, a "best guess" heuristic is applied to also show this information: tags take precedence over remote branches, if several tags apply, the newest one is displayed; if there are several remote branches or tags have no modification date, then alphabetic sorting is applied and the last one is shown. Example: the checked out commit e49f576... refers to tag v.0.7.1 of repository egit:
Icon Decorations
Icon decorations appear on the lower right corner of the icon displayed in front of the label. They can be configured on the Preferences dialog under Team > Git > Label Decorations on the tab Icon Decorations.
These are the default decorations:
- dirty (folder) - At least one file below the folder is dirty; that means that it has changes in the working tree that are neither in the index nor in the repository.
- tracked - The resource is known to the Git repository and hence under version control.
- untracked - The resource is not known to the Git repository and will not be version controlled until it is explicitly added.
- ignored - The resource is ignored by the Git team provider. The preference settings under Team > Ignored Resources, "derived" flag and settings from .gitignore files are taken into account.
- dirty - The resource has changes in the working tree that are neither in the index nor in the repository.
- staged - The resource has changes which have been added to the index. Note that adding changes to the index is currently possible only in the commit dialog via the context menu of a resource.
- partially-staged - The resource has changes which are added to the index and additional changes in the working tree that neither reached the index nor have been committed to the repository.
- added - The resource has not yet reached any commit in the repository but has been freshly added to the Git repository in order to be tracked in future.
- removed - The resource is staged for removal from the Git repository.
- conflict - A merge conflict exists for the file.
- assume-valid - The resource has the "assume unchanged" flag. This means that Git stops checking the working tree files for possible modifications, so you need to manually unset the bit to tell Git when you change the working tree file. Also see Assume unchanged action.
Commit Dialog
A summary of the status of all modified tracked files is displayed on the commit dialog. By double clicking a file the changes to be committed will be displayed in a compare dialog. As EGit currently always commits the content of the working tree (corresponding to git commit -a on the command line) the compare dialog will compare the working tree with the last commit.
Comparing Content
In daily work you will often want to see the changes between your last commit, the index, and the current working tree.
Currently a compare dialog can only be opened for a single selected file.
Compare working tree with last commit
The difference between a file in the current working directory and in the last commit in the current branch can be viewed from the context menu "Compare With" -> "HEAD revision". This feature is also available in the Commit dialog. Double clicking on an entry in the Commit dialog opens a compare dialog.
Comparing Working Tree with Index
The difference between a file in the current working directory and in the index can be viewed from the context menu Compare With > Git Index.
Comparing Working Tree with Any Commit
- Select a file in the package explorer
- from the context menu select Show in > History or Compare With > History...
- in the commit graph select a commit
- from the context menu select Compare with working tree
- this will open a compare dialog showing the changes between the selected commit and the current working tree
Comparing Two Commits with Each Other
- Select a file in the package explorer
- from the context menu select Show in > History or Compare With > History...
- in the commit graph select two commits
- from the context menu select Compare with each other
- this will open a compare dialog showing the changes between the two selected commits
Comparing Index with HEAD or Any Other Commit
This feature is not implemented yet.
Quickdiff
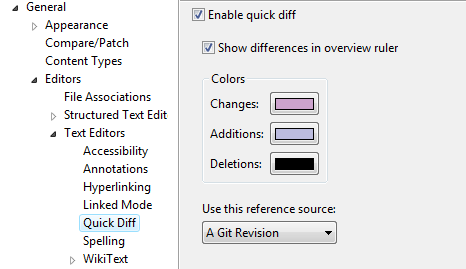
Instead of using a compare editor you can enable quick diff support and see the changes within the text editor.
This feature can be enabled via the General > Editors > Text Editors > Quick Diff preference page:
The difference annotation will then be displayed on the left hand side of the editor:
If you move your mouse over the annotation you see the content of the version you are comparing to:
Per default, the comparison is against the HEAD. You can determine the version you are comparing to, the so-called quickdiff baseline, from the context menu of a commit in the history view (Show in > History). There are three menu entries:
- Quick Diff -> Reset baseline to first parent of HEAD - Compare against the first commit before HEAD.
- Quick Diff -> Reset baseline to HEAD - Compare against HEAD.
- Quick Diff -> Set as baseline - Compare against the selected commit
View Diff for a Commit
To display the diff for a given commit
- from context menu in package explorer select Team > Show in Resource History
- select the commit you want to inspect
- the history view will display the diff in the lower left pane
- selecting a file in the lower right pane will scroll to the corresponding file section of the diff
Committing Changes
Modifications to a project which is version-controlled with Git are persistently recorded in the history through commits. In Git you modify your project until you have reached a state you are satisfied with and then you commit all these changes together to the repository in one single commit.
Modifying the content
If you have a project which is already shared with Git then doing the actual modifications is easy: just modify or delete files either within Eclipse or even directly on the file-system. There is no need to "check-out" files or to tell Git in advance about these operations. Only when adding new files you should be cautious: new files which should be version-controlled have to be explicitly put under Git version control using the file's Add menu action or immediately before a commit in the Commit dialog you may display untracked files by checking the Show untracked Files checkbox and select them for inclusion in the commit.
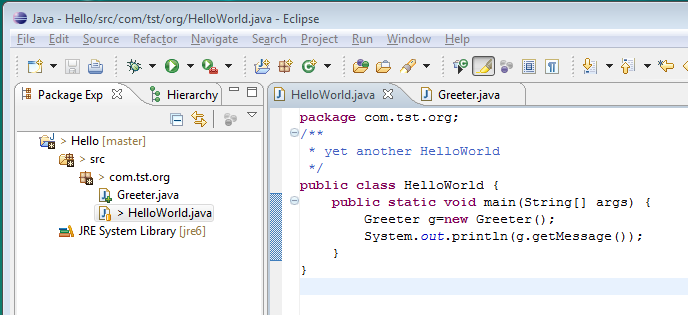
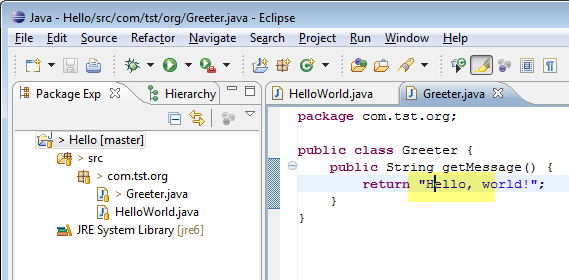
You can see for example in the Package Explorer View which files have been added (file icon marked with "+") and which files have been modified (file marked with ">" in front of the filename). For details see Label Decorations.
Here is an example of one added and one modified file in the Package Explorer:
Committing
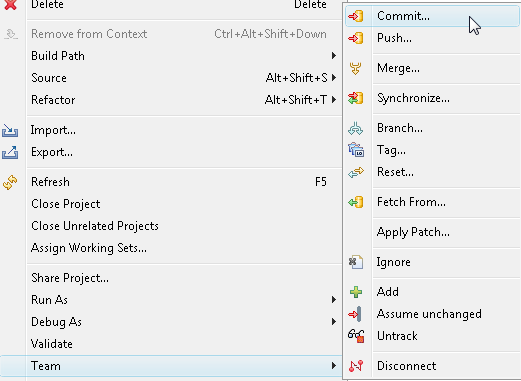
When you are satisfied with the state of the project you may commit your changes. To do that select Team > Commit... from the context menu of a project or a file in the project.
It does not play a role whether you select this action on a certain file or on the whole project. The reason for this is that Git tracks all changes made to the whole repository capturing the modifications of each and every version-controlled file in that repository not regarding if these files reside in the same Eclipse project or not.
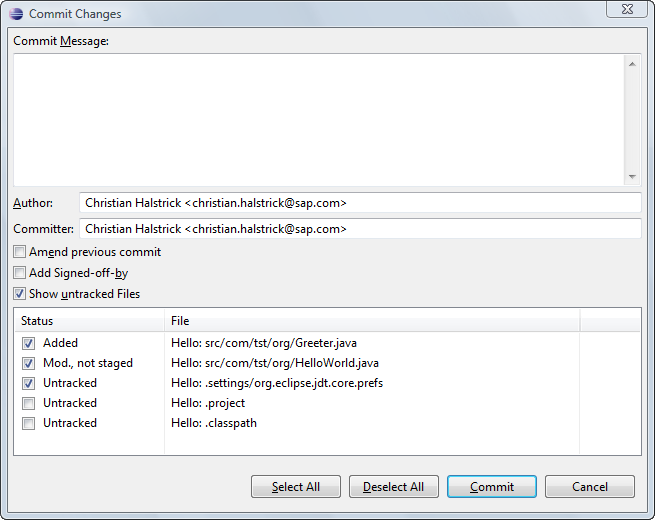
Once you have triggered the commit the following dialog will pop-up.
Commit Message
In this dialog you specifiy the commit message describing the change.
It is good practice to start the message with a short first line summarizing the change followed by a blank line and then the message body. In order to ensure that also git command line tools can format these messages nicely the lines shouldn't be formatted too wide.
At the end a number of footer tags may follow :
Bug: 3176
Reported-by: Joe Developer <joe@dev.org>
Signed-off-by: William Shakespeare <will.from@the.past>
The semantics of these tags are project or tool specific, e.g. Gerrit Code Review uses the Change-Id: footer to correlate the different patchsets of a change evolving during the review process towards the finally accepted patch. The Signed-off-by: footer is used by many projects to create a formal track record of declarations that the signing authors contributed the changes under the project's license and IP rules. This way the IP provenance of a project's evolving code base can be captured on a technical level.
Additionally this dialog controls which of the changes will be included in the commit. If you clear the checkbox in front of a file, the changes to this file will not be included in the commit. The local file in your eclipse workspace will still contain the modifications giving you the chance to commit these changes with a subsequent commit. This feature is often used to separate modifications done to a set of files into different commits.
One example: Imagine since the last commit you have fixed a bug in A.java and you have added a new method to B.java. These two modifications are logically independent from each other hence you may want to commit them in two independant commits. In this case you initate the commit, deselect B.java from the set of committed files and specify a commit message describing only the bugfix in A.java. After a succesfull first commit you just call commit again and the upcoming dialog will present you the remaining changes in B.java. Now you specify a commit message describing the addition of the method and finish the second commit.
New files you added to the project which have not been explicitly added to version control (see "Modifying the content") will be listed in the commit dialog if you select the checkbox "Show untracked Files". If you select the checkbox in front of these files in the list they will be added to the repository and committed once you press the commit button. Files which are excluded by the team ignore list or a .gitignore file or which are derived (e.g. the bin folder in java projects) will not be shown here. If you have no other changes in your repository than such untracked files the checkbox Show untracked Files is selected by default.
Amending Commits
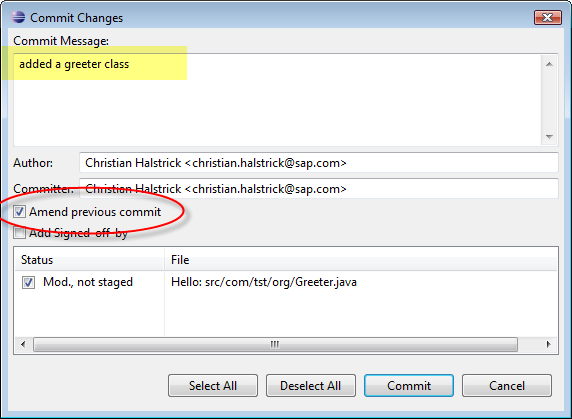
When you commit you may specify that the current commit should "amend" the previous commit in the current branch. Your commit will then replace the previous commit. This feature is often use to correct wrong commits before they are published to other repositories.
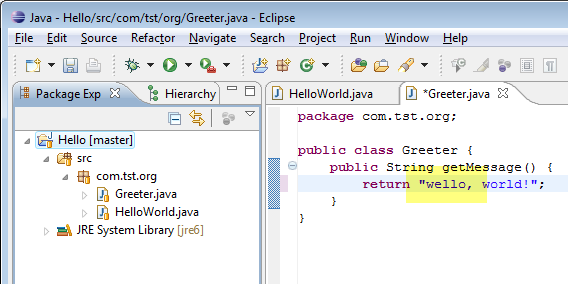
Example: Imagine you have committed a change to a file containing a typo
After you committed you detect the typo. In order to correct this typo and the corresponding commit you just fix the typo in the source file
Afterwards you trigger the commit and select the option Amend previous commit.
The commit message of your previous commit (the one which you want to replace) is filled into the "Commit Message" field. This gives you the chance not only to correct errors in the content of the version-controlled files but to also correct errors (e.g. typos) in the commit message describing your change.
As an alternative to amending you could just commit the corrected version as a subsequent commit. But the first commit containing the typo is of no use to anybody else and in order not to clutter the history of your project with unneeded commits you may decide to use the amend feature.
Be aware that amending commits which are already published to other repositories may cause trouble. Once you have pushed a commit to a remote repository or your local repository was cloned by somebody else you should be very careful whith amending commits. In this case publishing a second commit which corrects the first one is probably a better solution.
Signing off commits
Git gives you the chance to "sign off" commits. This adds a Signed-off-by: <Your Name and Email-Adress> footer to the commit message. The purpose of this signed-off-by information is not defined by Git but by the team using Git. Some teams use this information to record who has reviewed a certain commit. Other teams use the signed-off information to record that a commiter agreed to certain standards/rules. E.g. you may have to sign-off your own commits to state that you have read and understood the license-specific rules of your project.
Reverting Changes
Reverting changes in the working tree
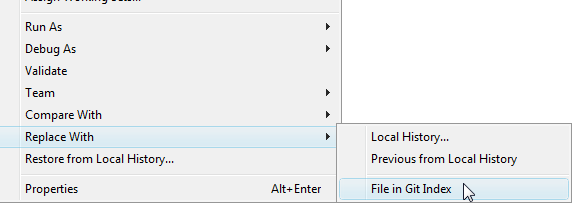
Replace with File in Git Index
Changes which are not yet committed and not yet staged can be reverted for a set of selected files. Select the file(s) in the Package Explorer or an analogous view and select
Replace with HEAD
This feature is currently not available on single file level. You can use Reset to with the option hard to set the whole working tree of your repository to the state of the HEAD commit (See "Resetting your current HEAD" below). By this you revert all changes in the working tree and the index. You can't do it on a selected set of files yet.
Resetting your current HEAD
Git offers the possibility to reset the HEAD of the current branch to any other commit. It optionally resets the index and the working tree to match that commit. Note that this action affects all files and folders in the whole repository.
You have the option to do a hard reset, a mixed reset and a soft reset.
- soft - the HEAD points now to the new commit, the index and the working tree are unchanged
- mixed - the HEAD points now to the new commit, the index is updated, the working tree is unchanged
- hard - the HEAD points now to the new commit, the index and the working tree are updated
Reset to specific branch or tag
Select Team -> Reset... on a project. This opens a dialog where you can select a branch or a tag.
Reset to a specific commit
Select a commit in the History view and open the context menu. Here you find the entries Hard reset, Mixed reset and Soft reset.
Revert all local and staged changes
This can be done as a special case of reset. If you reset to the current HEAD (normally the last commit on your branch) with the option hard you overwrite the working tree and the index with the content of the HEAD. You can do this in three ways:
- Select Team > Reset... on a project. In the dialog select HEAD or your current branch and switch the radio button to hard.
- Right click and select Reset... on any branch or tag in the Repositories view. This opens a dialog which lets you decide on the reset type. Choose hard here.
- Open the context menu on the HEAD commit in the history view and select Hard Reset.
Branching
Branching in the Repositories View
The Repositories View supports the following branching actions:
Branching Dialog
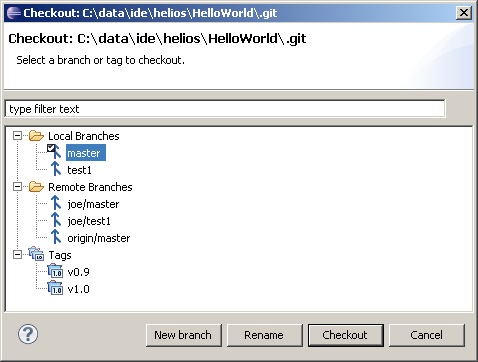
To open the branching dialog click
Team > Branch...
Creating a New Local Branch
- Select the branch your new branch should be based on
- Click New Branch
- Enter the branch name and click OK
Renaming an Existing Branch
- Select the branch you want to rename
- Click Rename
- Enter the new branch name and click OK
Checking out a Branch
- Select the branch you want to check out
- Click Checkout
Branching in the History View
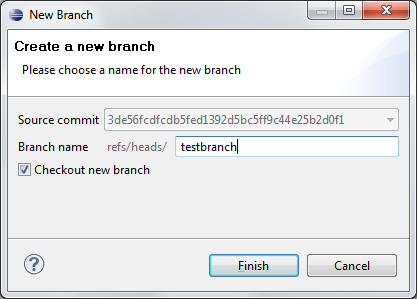
In history view a new branch can be created based on a given commit: select a commit in the history view and execute Create Branch... on the context menu. A dialog for branch creation appears:
Merging
A merge incorporates changes from named commits (since the time their histories diverged from the current branch) into the current branch.
Merging a branch or a tag into the current branch
You have two places where you can trigger the merge:
- from the team menu
- from the Git Repositories View
In the Package Explorer or Navigator, open the context menu on a project node. Select Team > Merge...
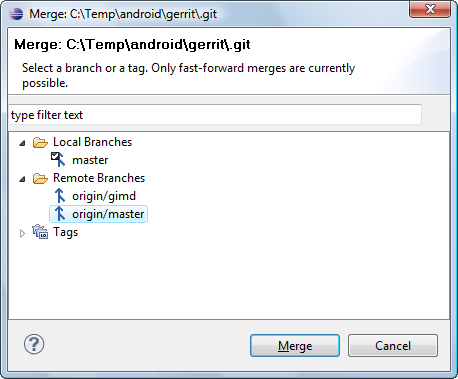
Now the merge dialog opens:
On the dialog, select a branch or a tag you want to merge with your current branch.
Starting merge from the Git Repositories View
You can trigger a merge from any branch and tag node and from the repository node if you have checked out a local branch. See Merging a Branch or a Tag for further details.
Possible merge results
After pressing the Merge button, the following scenarios can occur:
- Already up to date: Your current branch points to a commit that has the selected branch or tag as predecessor. In this case nothing is changed.
- Fast-forward: Your current branch points to a commit that is a predecessor of the selected branch or tag. In this case your branch is moved and points to the selected branch or tag; this new HEAD is checked out to the working tree. Fast-forward is very common when working with remote repositories: When a remote tracking branch is updated, the merge with the corresponding branch generally is a fast-forward. You can perform a pull by fetching the remote branch (e.g. origin/master) and merging it into the corresponding local branch (e.g. master).
- Real merge: When neither of the conditions above apply egit triggers a merge of the commits. There are two possible outcomes: If no conflicts occur the current branch will point to a newly created merge commit; if conflicts occur the conflicting files will be marked with label decorators (see Resolving a merge conflict for further actions in case of merge conflicts).
Merge Result dialog
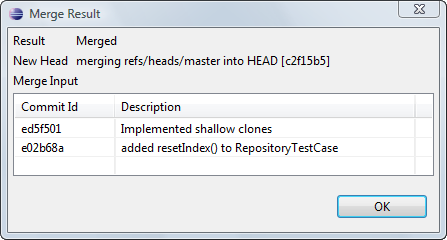
The result of a merge is summarized in a dialog:
On the first line you see the result of the merge. The possible results are "Already-up-to-date", "Fast-forward", "Merged", "Conflicting" or "Failed". A possible reason for "Failed" may be that there are conflicting changes in the working directory.
On the second line you see the new HEAD commit in case of a successful merge (Already-up-to-date, Fast-forward or Merged).
In the table you see the commits which were merged.
Resolving a merge conflict
A merge can result in conflicts which require user action. This is the case when the content of files cannot be merged automatically. These conflicts are marked with a label decoration in the navigation tree. The merge conflicts in the content of files are presented with textual conflict markers (see http://www.kernel.org/pub/software/scm/git/docs/git-merge.html#_how_conflicts_are_presented for more details).
To resolve a conflict you have to do the following steps:
- Navigate to the conflicting resource
- Edit the content of the conflicting resource
- Tell EGit that the conflict is resolved with Team > Add
- Commit the conflict resolution with Team > Commit
Finding conflicting files
A repository which contains conflicting files has the textual label decorator "|Conflicts" attached to the repository name. Conflicting resources and folders containing such conflicting resources get a conflict label decoration.
Editing conflicting files
In the file content, the area where a pair of conflicting changes happened is marked with markers <<<<<<<, =======, and >>>>>>>. The part before the ======= is typically your side, and the part afterwards is typically their side (see http://www.kernel.org/pub/software/scm/git/docs/git-merge.html#_how_conflicts_are_presented for more details).
Open the file in an editor, edit the content and save the editor.
Note that this step is not mandatory. EGit does not check the content to decide if a conflict is resolved. The next step is the relevant one.
Adding conflict resolution to the git index
Once you are finished with editing a file select Team > Add to add the conflict resolution to the git index. You can do it on a folder or the whole project to resolve all conflicts at once.
When you have resolved all conflicts the textual repository label decoration changes to "Merged". There are no conflict markers anymore.
Committing a merge
When the repository is in state "Merged" (as is indicated with the textual label decorator "|Conflicts" attached to the repository name) the merge can finally be committed.
Select Team > Commit... anywhere in the navigation tree. The commit dialog opens with a slightly different look compared to a normal commit:
- The Commit message area is prefilled with a standard merge commit message.
- It is not possible to amend a previous commit.
- It is not possible to add untracked files.
- it is not possible to uncheck the checkboxes. This guarantees that all resolved conflicts are committed.
After pressing the "Commit" Button the merge is completed.
Aborting merge
If a merge resulted in conflicts you can abort the merge with a hard reset to the current branch. This can be done in state "Conflicts" and in state "Merged", i.e. before and after you have resolved the conflicts.
The hard reset can be done from the team menu, the Git Repositories View and the History View. See [[#Revert_all_local_and_staged_changes|Revert all local and staged changes] for more details.
Tagging
Creating a Tag
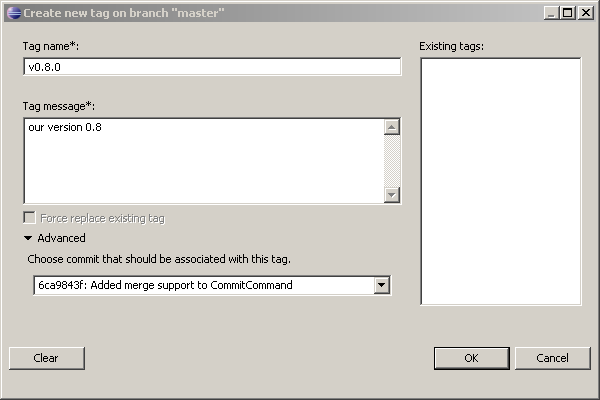
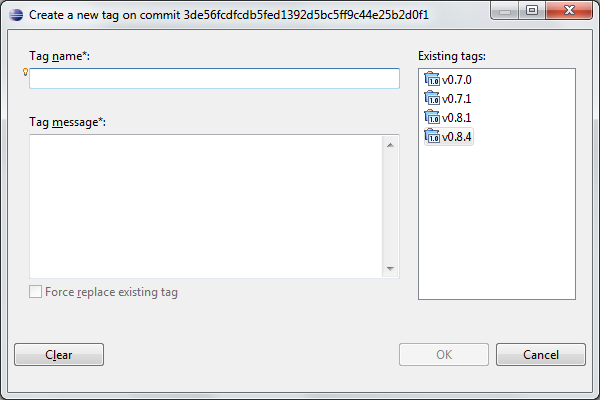
- Select Team > Tag... from the project context menu.
- Enter the tag name
- Enter the tag message
- Optionally select the commit you want to tag (default is HEAD)
- Click OK to create the annotated tag
Tags can also be created in the history view: select a commit and execute Create Tag... in the context menu. The tag will be created on the selected commit:
Replacing an Existing Tag
What to do if you tagged the wrong commit or ended up with some sort of typo ?
- If you didn't yet push this out just replace the tag and you are done.
- If it's already published you shouldn't replace the tag but use a new name since otherwise you have to tell everybody who got the old tag to replace it manually with your updated one. This is because, Git does not (and it should not) change tags behind users back. So if somebody already got the old tag, doing a git pull on your tree shouldn't just make them overwrite the old one.}}
So if your old tag wasn't yet pushed you may correct it in the following way :
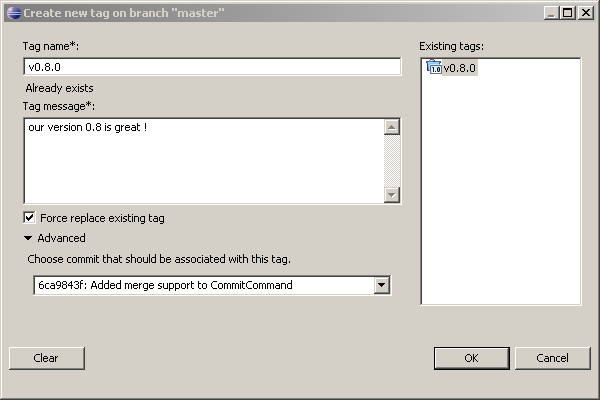
- Select Team > Tag... from the project context menu.
- Select the tag you want to replace from the list of existing tags
- or start typing any part of the tag you look for into the Tag Name field, this will filter the list of existing tags to those tags which contain the string you are typing, then select the tag you want to replace
- Mark the checkbox Force replace existing tag
- Change the tag and press OK
Light-weight and Signed Tags
Light-weight and signed tags are not yet supported by EGit, use command line git tag or git tag -s as a workaround
Patches
Creating Patches
"A patch is a piece of software designed to fix problems with, or update a computer program or its supporting data" (wikipedia). A patch file contains a description of changes of a set of resources which can be automatically applied to another eclipse workspace or git repository.
The patch formats used by eclipse (Team > Apply Patch) and by git (git apply or git am on the command line) are different. It is possible to create both types of a patch in EGit.
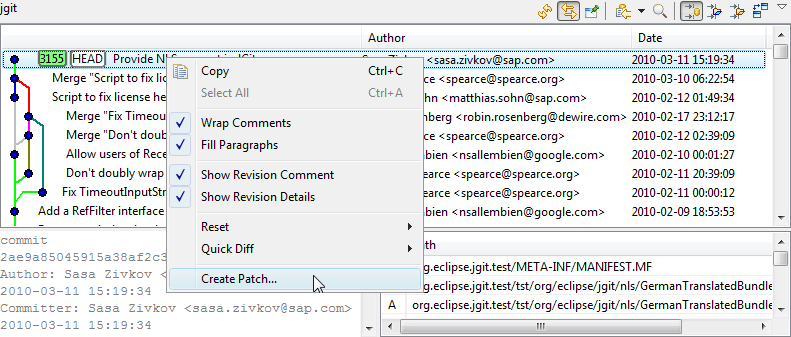
Create a Patch from a Commit
This is the most common use case for a distributed versioning system. A developer commits a change on a local feature or bugfix branch and wants to export this change into a patch file.
It can be done from the history view:
The patch file will contain the difference between the commit and its parent in the history view. Note that the filter of the history view applies also for patch creation.
Patch Wizard
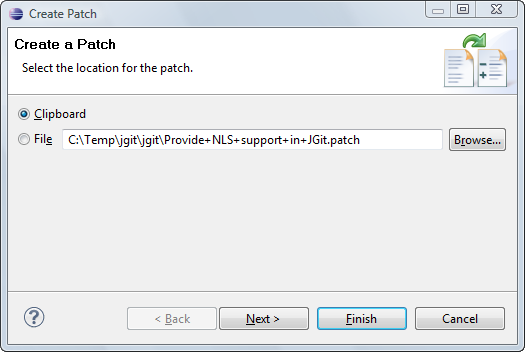
The Wizard consists of two pages. Page one lets you select the location of the patch:
The name of the patch file is created from the first line of the commit message.
On the second page you can change the patch format.
Currently there is one check box: Export in git patch format.
- If you do not check it (this is the default) the patch can be applied with the eclipse Apply Patch... wizard. The paths are relative to the eclipse projects and do not contain prefixes (like git format-patch --no-prefix on the git command line).
- If you check it the patch will look like the result of git format-patch --no-stat on the git command line.
Applying Patches
Currently it s not possible to apply patches in git format. It is possible to apply patches using the standard eclipse format using Team > Apply Patch....
Managing Repositories
The "Git Repositories View" is the primary UI element to facilitate working with multiple Repositories simultaneously (i.e. within one Eclipse Workspace).
This view can be opened using the menu path
Windows > Show View > Other... > Git > Git Repositories
It is also part of the "Git Repository Exploring" perspective available using menu path
Window > Open Perspective > Other... > Git Repository Exploring
If you already have projects in your workspace which are shared with a Git Repository, you can use
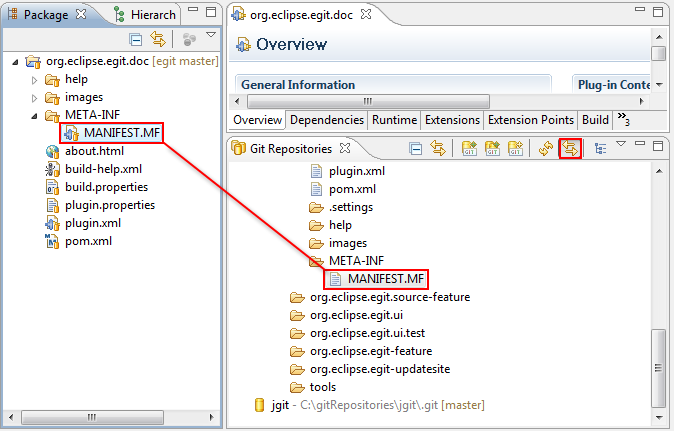
Show In... > Git Repositories or Team > Show in Repositories View
on any resource to open the view.
Adding Repositories to the Git Repositories View
Initially, the Git Repositories View is empty. In order to add Repositories to it, there are several options:
- Adding a Repository from the Local File System manually
- Cloning a Repository and having the cloned Repository added to the view automatically
- Creating a Repository on the Local File System
- Adding a Repository by pasting a Git Repository path to the view
Adding a Repository manually
You can add a Repository from your local file system to the Git Repositories View without cloning it. This can be helpful if you are setting up a new Eclipse workspace and want to re-use your Git Repositories. Use the Add an existing Git Repository button from the view's toolbar:
A dialog will appear prompting you for a directory of your local file system. After selecting the correct directory, you can hit the Search button to see a list of Git Repositories in this directory. You can then select some or all found Repositories and add them to the view using OK:
Cloning a Repository
In order to clone a Repository, refer to Cloning remote Repositories. After a successful clone operation, the newly cloned Repository should appear in the Git Repositories View automatically.
You can also use the Clone a Git Repository button from the view's toolbar to start the Clone wizard:
Please refer to Cloning remote Repositories about how to use the wizard.
Creating a Repository
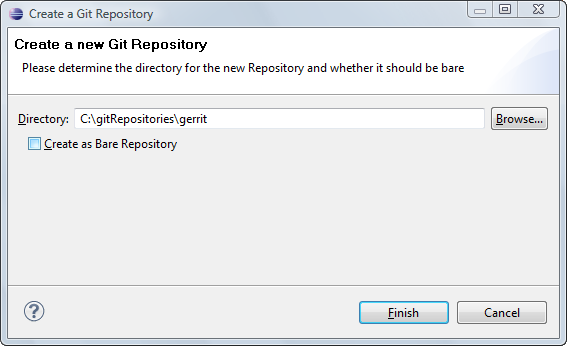
You can create a new, empty repository on the local file system. This is useful if you later on want to create one or more new projects below this repository. Another usecase is to create a new bare repository where you can push to. Use the Create a new Git Repository button from the view's toolbar:
A dialog will appear which lets you choose a directory:
If you select the checkbox Create as Bare Repository the new repository will not have a working directory. You then can only add content by pushing changes from another repository.
Adding a Repository using copy and paste
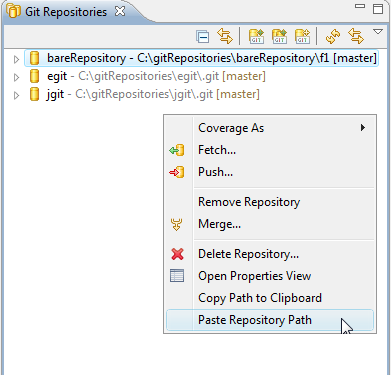
As a shortcut,it is also possible to just paste the local file system path of a Git Repository from the clipboard to this view. In order to do so, copy the path of a Git Repository (the full path of the repository's .git folder) to the clipboard, then open the context menu on the view panel:
or simply perform Edit > Paste from the main menu (or the corresponding keyboard shortcut). If the clipboard content is not suitable, an error popup will be displayed, otherwise the added Repository should appear automatically.
After the view has been populated with some Repositories, it should look like this:
Structure of the Git Repositories View
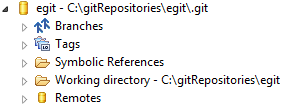
The following screenshot shows the topmost two levels of the Git Repositories View:
The root node represents the Repository itself. The node text indicates the name of the Repository and its location in the local file system. The "Branches" and "Tags" nodes allow browsing and manipulation of tags and branches. The "Symbolic References" node lists other references which are not branches or tags, most notably the "HEAD" symbolic reference.
The "Working directory" node displays the location and structure of the working directory on the local file system (only in case of a development, or non-bare Repository, for bare Repositories, this node is always a leaf).
Finally, the "Remotes" node allows browsing and manipulating the remote configurations used for Fetch and Push.
Functions of the Git Repositories View
Project Import
In order to work with the contents of a Git Repository, its files and folders must be imported into the Eclipse workspace in the form of projects. While the Git Clone wizard allows to do such imports directly after cloning, the Git Repositories View allows to trigger project imports independently of the clone operation.
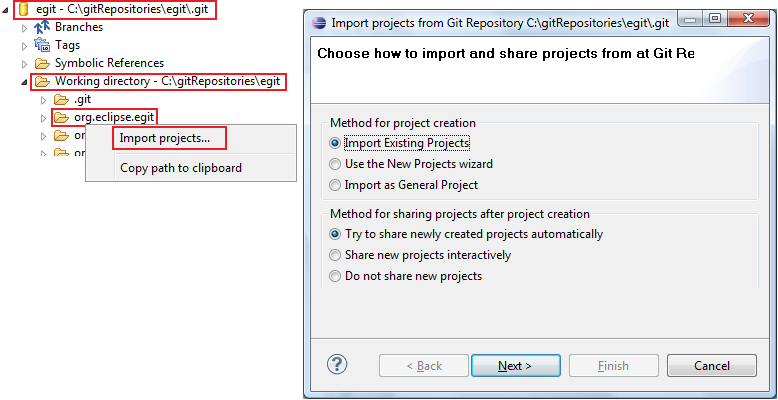
The "Import Projects..." context menu is available on the "Repository" node as well as on any "Folder" node within the "Working Directory" node and the "Working Directory" node itself:
The rationale for offering the Import Projects... action on several nodes is that some of the wizards used for importing projects can take the file system directory into account, for example the Import Existing Projects wizard. If the import is started from the "Repository" or the "Working Directory" node, the working directory of the repository is set as context, otherwise the directory corresponding to the currently selected "Folder" node.
The details of project import are discussed in Use the New Projects Wizard.
Branch and Tag Support
The "Branches" node allows to create, browse, checkout and delete local and remote branches. The "Tags" node allows for browsing and checking out of tags. Both the "Branches" node and the "Tags" node allow for merging the branch or tag into the currently checked out branch and also for synchronizing with the currently checked out branch.
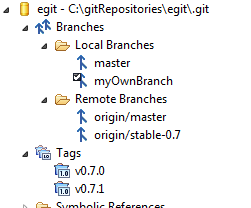
For better readability, branches are organized in two sub-nodes for local and remote branches, respectively, and only the shortened names are displayed, e.g. instead of "refs/heads/master" you would find an entry "master" under the "Local Branches" node, instead of "refs/remotes/origin/master" the shortened name "origin/master" is displayed under the "Remote Branches" node. Similarly, tag names are shortened by omitting the "refs/tags/" prefix:
Check-out of Branches and Tags
Branches and tags can be checked out by either double-clicking on the respective node or by selecting the corresponding context menu entry.
Creation and Deletion of Branches
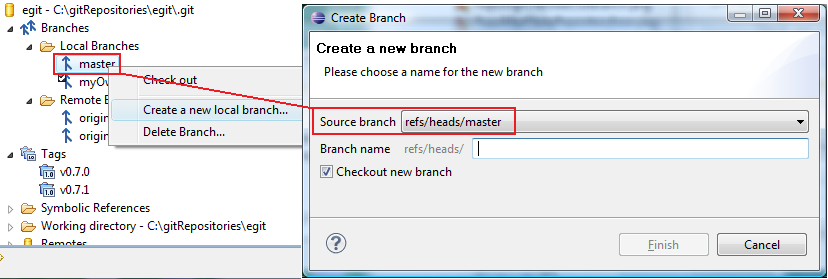
Local branches can be created using a simple wizard. After selecting the corresponding context menu entry (available on the "Branches", the "Local Branches", and on any "Branch" and "Tag" node), you are asked to enter a source branch and a name for the new branch. Depending on whether you have called the wizard from a "Branch" or "Tag" node or not, the source branch drop-down will be pre-selected with either the selected branch, the selected tag or the currently checked-out branch:
You can change the source branch using the drop-down. By default, the newly created branch will be checked out after creation. Deselect the corresponding checkbox on the wizard if you don't want this to happen.
Branch deletion is done using the corresponding context menu entry.
Merging a Branch or a Tag
You can trigger a merge from any branch and tag node and from the repository node if you have checked out a local branch. See Merging for further details of the merging features.
- When you select any branch node other than the currently checked out branch or any tag node, use Merge to directly trigger a merge into the currently checked out branch.
- When you select the repository node or the currently checked out branch, use Merge... to open the merge dialog. The merge dialog is described at Merging a branch or a tag into the current branch.
Synchronizing with a Branch or a Tag
You can perform a comparison of the changes in your HEAD with the changes done in any other branch or tag. Right click and select Synchronize... on any branch or tag. Then the eclipse synchronize view opens which contains a representation of the changes that are contained in your HEAD but not on the other branch or tag (outgoing change) or vice versa (incoming change). Please refer to the documentation of the synchronize feature for further details.
Determining the Checked-out Branch
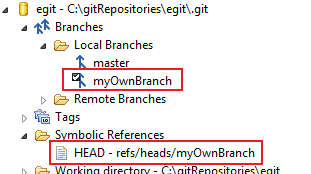
There are two ways to determine which branch or tag is currently checked out: the checked out branch/tag node is decorated with a little check mark and the "HEAD" entry under the "Symbolic References" node shows the (full) name of the checked out branch:
Resetting to a Branch or a Tag
Right click and select Reset... on any branch or tag. This opens a dialog which lets you decide on the reset type. See Resetting you current HEAD for further details.
"Detached" HEAD
If HEAD is "detached", i.e. is not pointing to the tip of a local branch but to a commit or tag, then none or several "checked-out" markers may appear in the tree, since any number of remote branch or tags may point to the currently checked out commit. The state you are in while your HEAD is detached is not recorded by any branch (which is natural --- you are not on any branch).
Browsing the Working Directory
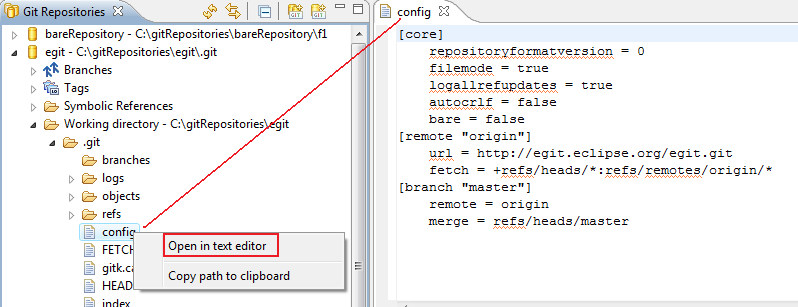
The "Working Directory" node visualizes the local file system structure of the Git Repository. It is also possible to open a text editor on the files:
Also, on all file and folder nodes as well as on the "Repository" node, an option is offered to copy the (file-system specific) path to the clipboard. This is sometimes useful when the path is needed, for example to open a directory using a file browser or to copy and paste Repositories between view instances (see above about how to add Repositories to the view). The Copy to Clipboard action is also available using Edit > Copy (or the corresponding keyboard shortcut).
Repository Configuration
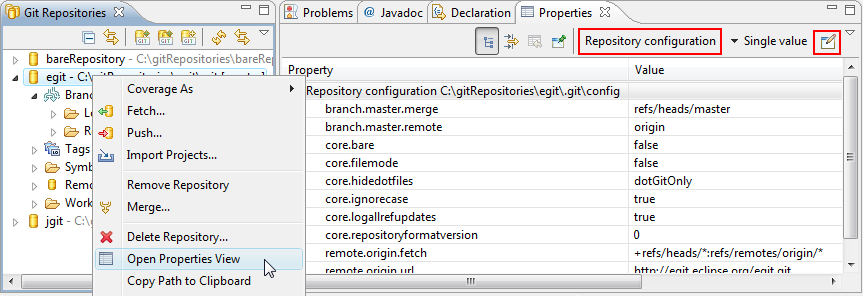
Integration with the generic "Properties" view in Eclipse allows to view and edit the Git Configuration (global and repository-specific configuration). If the "Properties" view is open, it is updated automatically when a "Repository" node is selected. For convenience, an Open Properties view action is provided in the context menu:
With a drop down box (left red box in the screen shot) you can switch between the display of the Repository Configutarion, the Global Configuration and a view which aggregates both. If the view displays the Repository Configutarion or the Global Configuration you can open an editor dialog with the Edit button (right red box in the screen shot). The editor dialog has the same functionality as the preference page Team > Git > Configuration.
Remote Repositories
The "Remotes" node allows for browsing and editing Remote configurations. Each Remote configuration has a name and either a Push Specification, a Fetch Specification, or both. If a "Remote Configuration" node or any of its children is selected, the Properties view will show a summary of the Remote configuration. In this example: there is a Remote configuration named "origin" which only has a Fetch Specification, but no Push Specification:
Menu actions are provided to add, configure, and remove Remote configurations and Fetch and Push Specifications.
Direct Fetch and Push Support
It is possible to execute fetch and push directly (i.e. without a wizard) on the respective "Fetch" and "Push" nodes:
Note that the fetch or push operation will be executed immediately in an asynchronous job; on completion you will get a confirmation pop-up displaying the fetch result.
The "Fetch" node contains a so called fetch specification and the "Push" node contains a so called push specification.
A default fetch specification is created when the repository is cloned. You can edit the fetch specification with the menu entry Configure Fetch.... This opens a wizard. On the first page you can edit the Fetch URI. Ob the second page you can determine the fetch ref specifications, see Fetch Ref Specifications.
You can create or edit a push specification with the menu entry Configure Push.... This opens a wizard. On the first page you can edit the Push URIs. If a fetch is specified the fetch URI is automatically included into the push specification and no additional Push URI is needed. On the second page you can determine the push ref specifications, see Push Ref Specifications.
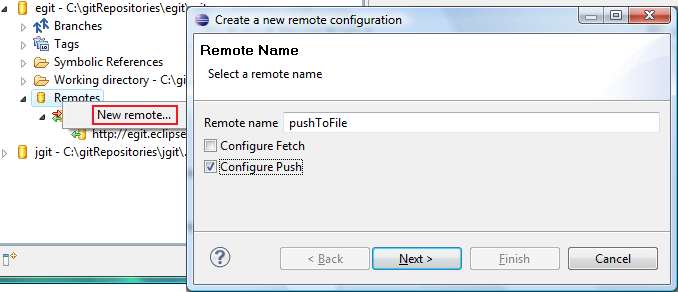
Adding a Remote Configuration
This is done using a context menu action on the "Remotes" node. A wizard is started asking for the name of the new configuration and whether to configure Fetch, Push, or both:
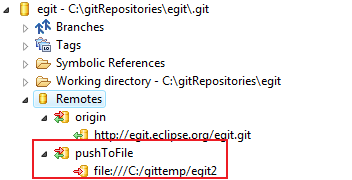
The details of Remote configuration are explained elsewhere. Upon completion, the new Remote configuration will be visible:
Changing Remote Configurations
It is also possible to add, remove, or change Fetch/Push Specifications for an existing Remote configuration using the context menu.
Refresh
The view is auto-refreshed periodically. The Refresh button in the toolbar allows to trigger an immediate refresh:
Link with Selection
If the Link with selection toggle is enabled, the file or folder corresponding to the current workbench selection will be displayed automatically:
Link with Editor
If the Link with editor toggle is enabled, the file or folder corresponding to the currently active editor will be displayed automatically:
Hierarchical Branch Layout
If the Hierarchical Branch Layout toggle is enabled, branches will be shown in a hierarchical layout using slash (/) as hierarchy separator:
This can be helpful for organizing large numbers of branches.
Bare Repositories
"Bare" Git Repositories (as opposed to "development" or "standard" Repositories) have no working directory by definition, so all actions related to the working directory (check-out, project import, browsing the working directory) are not available for such Repositories. The "Bare-ness" of a Repository is visualized on the "Working Directory" node, which is always a leaf:
Removing Repositories from the Git Repositories View
This is offered as a menu action on the "Repository" node. Note that this does not delete the Repository, but just removes the node from the view. If there are projects in the workspace which are located in the working directory of the Repository, the user will be prompted to confirm deletion of these projects from the Eclipse workspace.
Reference
Perspective, Views and Menus
Git Perspective
Window > Open Perspective > Git Repository Exploring opens the Git Repository Exploring perspective
Git Repositories View
Window > Open View > Git > Git Repositories opens the Git Repositories view which is explained in detail here.
History View
Overview
The History View for Resources under Git version control is a commit-centric view of the resources in a given Repository. It can be used to perform the following tasks:
- Inspecting the change history of a given File under Git version control (viewing and comparing the versions of such a File in the Repository)
- Search for a certain commit using different search criteria
- Check-out of a certain commit
- Creation of branches and tags based on a certain commit
- Creation of patches based on the changes in a certain commit
- Resetting the complete Repository to a certain commit
- Setting and resetting of the quickdiff baseline to a certain commit
Opening the History View
The History view can be opened by
- Right-clicking Show In > History View on any resource under Git version control in the explorer (not available in all Perspectives)
- Right-clicking Team > Show in History on any resource under Git version control in the explorer
- Clicking Window > Show View > Other..., then Team > History
Once the view is open, you can activate the Link with Selection button to keep the input of the view in sync with the selection in the explorer automatically.
Organization of the History View
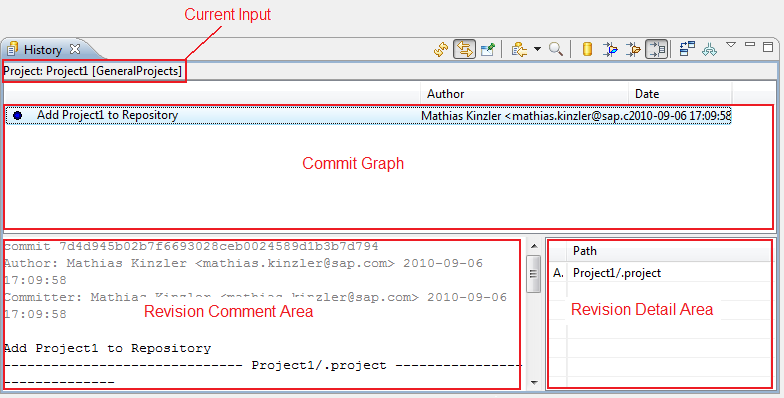
The History view is organized in several panes:
The upper pane is the Commit Graph displaying the commit log (or commit history) in reverse chronological order (newest commit on top). Below the commit graph, there are by default two panes: on the left side, the Revision Comment area, which shows the commit message and a textual Diff of the file or files in the commit, and on the right side, the Revision Detail area, which shows a table of the files that were changed by the commit.
The first column of this table describes the nature of the change for each file:
- ADD the file was added by the commit
- MODIFY the file was modified by the commit
- DELETE the file was deleted by the commit
The content of the lower panes depends on the selection in the upper pane and is updated automatically when this selection changes.
Both lower panes can be switched on and and off separately by right-clicking anywhere in the upper pane and selecting Show Revision Comment and Show Revision Details, respectively.
Above the Commit Graph, the current input is visualized. The input is always a workspace resource, either a project, a folder, or a file. After the type of the input, the path is shown, followed by the name of the Repository containing the resource in square brackets.
Using the History View
Inspecting the Commit Graph
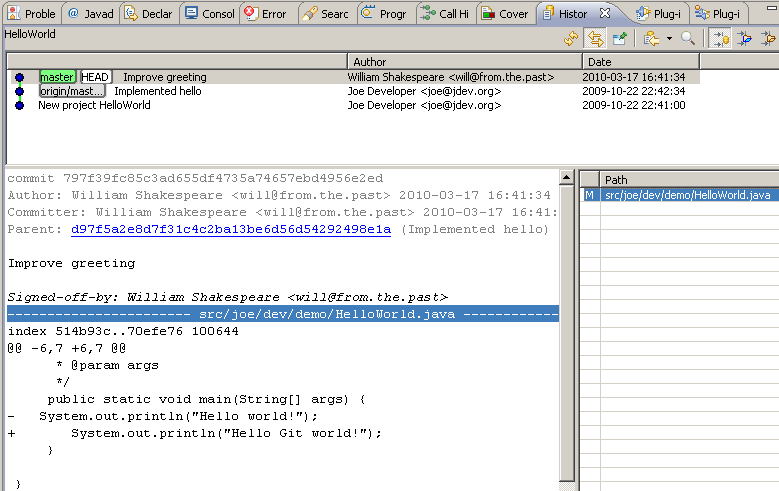
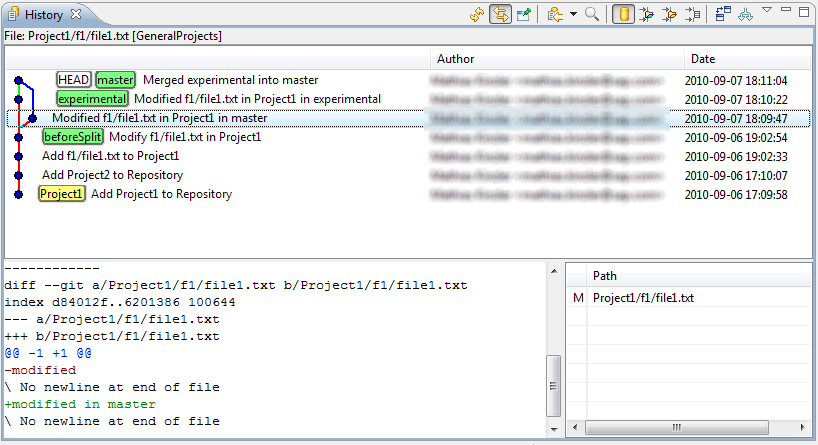
The Commit Graph area is the main part of the History View. By default, it shows the currently checked out commit and all its ancestors, i.e. the first entry in the list is the checked out commit. The following picture is used to explain some of the features of the History View:
Each line in the Commit Graph corresponds to a commit. Branches, tags and HEAD are visualized as follows:
- The tips of local branches are shown as green rectangles
- The tips of remote branches are shown as grey rectangles
- The local HEAD is shown as a white rectangle
- Tags are shown as yellow rectangles
(our example doesn't have remote branches).
The line on the left side is the actual commit graph, which shows the parent-child relation of the commits in the list (each commit has at least one parent, except for the very first commit in a Repository). There can be forks, which correspond to a branch operation, and joins, which correspond to a merge operation. In our example, there was a branch "experimental" created after the commit with branch "beforeSplit", and the same file was changed both in the "master" and in the "experimental" branch. The last commit is a merge commit where the content of the "experimental" branch was merged with the "master" branch.
The exact change can be inspected by marking a commit and looking at the Revision Comment area. When scrolling down in the Revision Comment area, a textual diff for the changes will be visible, in our example it says that the content of Project1/f1/file1.txt was changed from "modified" to "modified in master". When selecting the next commit (which corresponds to the "experimental" branch), a similar diff would be displayed, saying that the content of that file was changed from "modified" to "modified in experimental". The newest commit is the result of merging "experimental" into "master". Accordingly, the new commit has two ancestors and the "master" and "experimental" lines are joined again.
Displaying and Comparing versions of a File
If the current input is already a file, right-clicking Open on a commit will open an editor with the file content corresponding to the currently selected commit. If the file does not exist in the selected commit, an error message will be displayed. Clicking Compare with working tree will open a compare editor comparing the file content of the currently selected commit with the file content in the workspace.
The Open and Compare with working tree actions can also be executed by double-clicking on a commit: if the "Compare Mode" toolbar button (see below) is down, Compare with working tree will be executed, otherwise Open.
It is possible to compare the file contents of two commits by selecting the two commits and right-clicking on Compare with Each Other.
Furthermore, it is possible to select any number of commits and right-click Open to see all versions of the file corresponding to the selected commits (one editor will be opened per version).
If the current input is not a file, then there won't be menu actions for Open and Compare. However, it is possible to double-click on an entry the Revision Detail area. If compare mode is active, a compare editor will be openend showing the changes for the file being double-clicked in the currently selected commit (i.e. a diff of the file content in the currently selected commit against the file content of this commit's ancestor). If compare mode is not active, an editor with the file content corresponding to the currently selected commit is shown.
Note that the current implementation does not detect multiple selection in the Commit Graph area correctly, so using the Revision Comment and Revision Detail areas may be confusing if more than one commit is selected in the Commit Graph area.
Toolbar actions
The first four buttons in the History View's toolbar are the standard buttons for Refresh, Link with Selection, Pinning and Navigation History.
Find
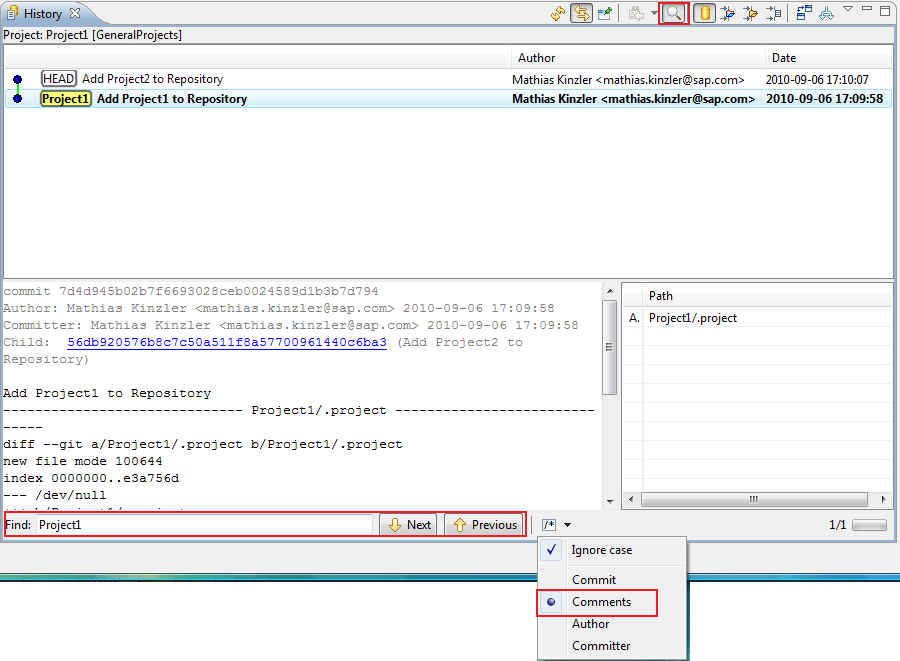
If the "Find" toolbar button is down, a search bar is displayed in the lower part of the view which allows to search for commits in the commit log. Depending on the setting in the drop-down list in the search bar the commit's title, comment, author or committer are searched.
The found search hits are high-lighted in bold and the "Next" and "Previous" buttons allow to jump to the next or previous commit matching the search criteria:
Filter settings
The next four toggle buttons in the the view toolbar control how the displayed commits are filtered with respect to the current input:
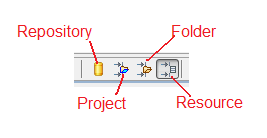
The buttons are working as radio buttons, i.e. one of the four buttons must always be down.
- If the "Repository" button is down, the commit log is not filtered and shows all commits reachable from the currently checked out branch (or all commits, see below about the "All Branches" action)
- If the "Project" button is down, the commit log is filtered to show all commits which affected any of the resources in the project containing the current input
- If the "Folder" toggle is down, the commit log is filtered to show all commits which affected any of the resources in the parent folder of the current input
- If the "Resource" button is down, the commit log is filtered to show only commits which affected the current input
Note that not all combinations of filter setting and current input are meaningful; for example, if the current input is a project, the "Project" option is in fact the same as the "Resource" option.
Compare Mode
The next button is again a toggle, activating "Compare Mode". If it is down, certain double-click actions (see above) will open a compare editor instead of a normal editor.
All Branches
This toggle activates the "All Branches" mode. By default, only those commits are shown in the commit log that can be reached from the currently checked out commit, i.e. the Commit Graph ends with the currently checked out commit and newer commits are not shown. If this button is down, all commits will be shown in the commit log. This is illustrated in the following picture from our example. The branch "beforeSplit" is currently checked out; by activating the toggle, the newer branches will become visible:
View Menu actions
Configuring the View
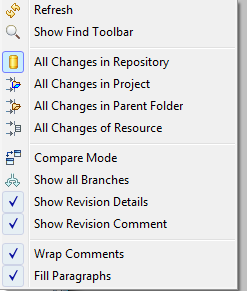
Most of the toolbar actions are available in the View Menu, too. In addition, the following four toggles are available:
"Show Revision Details" toggles the Revision Detail area and "Show Revision Comment" the Revision Comment area. The "Wrap Comments" and "Fill paragraphs" actions are only available if "Show Revision Comment" is active and govern the formatting within the Revision Comment area. <p> The first two actions are also available by right-clicking anywhere in the Commit Graph area, and the last two actions are also available by right-clicking anywhere in the Revision Comment area.
Context Menu actions
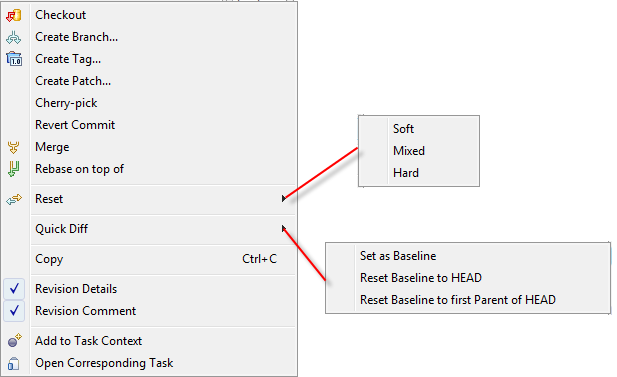
The context menu in the Commit Graph area is slightly different, depending on whether the current is a File or a Folder/Project, respectively. The following menu entries are always available:
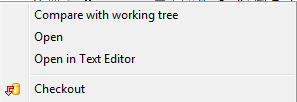
If the current input is a File, there are some other actions available; if exactly one commit is selected, there are two additional options:
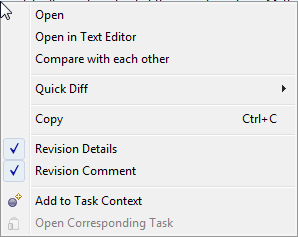
and if exactly two commits are selected, the menu will appear like this:
If more than two commits are selected, only the "Open" action and the "Quickdiff" menu will be available.
Compare with working tree
This action is only available if the current input is a file and a single commit is selected. It will open a compare editor comparing the file content of the selected commit with the file content in the working tree.
Compare with each other
This action is only available if the current input is a file and exactly two commits are selected. It will open a compare editor comparing the file content of the selected commits with each other.
Open
This action is only available if the current input is a file. It will open an editor for each selected commit displaying the content of the file for the given commit.
Checkout
This checks out the currently selected commit. If a branch exists for this commit, the branch is checked out, if more than one branch exists for this commit, a dialog will be shown asking which branch should be checked out. If no branches exist for the commit, the commit will be checked out and HEAD will become detached.
Create Branch...
Creates a branch on the currently selected commit. A dialog will be shown asking for a branch name and whether the newly created branch should be checked out.
Create Tag...
Creates a tag on the currently selected commit. A dialog will be shown asking for a tag name and a tag message.
Create Patch...
This action is not available on the very first commit of a Repository. It will create a patch containing the changes of the currently selected commit compared to that commit's predecessor. A dialog will be shown asking whether the patch should be created as file or in the clipboard and whether to use the Git patch format of the generic patch format.
Reset > Soft/Mixed/Hard
This action resets the Repository containing the current input to the currently selected commit. Depending on the choice of the sub-menu, a soft, mixed, or hard reset will be performed.
Quickdiff > Reset Quickdiff Basline to HEAD
Quickdiff > Reset Quickdiff Basline to first parent of HEAD
These two actions set the quickdiff basline for the repository to HEAD or to the parent of HEAD. These actions are always available, even if more than one commit is selected.
Quickdiff > Set as Baseline =
This action is only available if a single commit is selected; it will st the quickdiff baseline for the repository to the selected commit.
Copy
Copies the IDs of the currently selected commit or commits into the clipboard.
Show Revision Comment
Toggles the visibility of the Revision Comment area.
Show Revision Details
Toggles the visibility of the Revision Details area.
Wrap Comments
Only available when right-clicking on the Revision Comment area. If active, the comments will be auto-wrapped to fill the display area, otherwise the wrapping of the commit message will be used.
Fill Paragraphs
Only available when right-clicking on the Revision Comment area. If active, the commit message will be displayed without unnecessary line breaks.
Project Context Menu
On project nodes in navigation views (Navigator, Package Explorer etc.) the following Git actions are available for projects shared with the Git team provider:
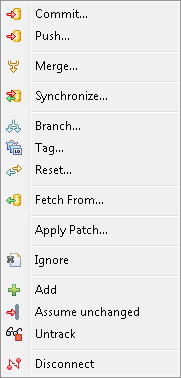
Resource Context Menu
On resource nodes (files and folders) in navigation views the following Git actions are available for projects shared with the Git team provider:
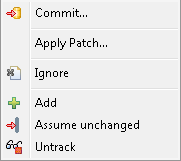
Menu Actions
- Commit...
- Push...
- Fetch...
- Branch...
- Merge...
- Tag...
- Reset...
- Apply Patch...
- Ignore: action to add files to .gitignore.
- Add:
- Adds changes present in the working tree to the git index, also known as staging changes.
- Puts newly created resources under git version control (Git does not automatically start tracking resources).
- Resolves conflicts.
- Assume unchanged: Resources can be flagged "assume unchanged". This means that Git stops checking the working tree files for possible modifications, so you need to manually unset the bit to tell Git when you change the working tree file. This setting can be switched on with the menu action Team > Assume unchanged (or on the command line with git update-index --assume-unchanged). Currently it can only be switched back on the command line with git update-index --no-assume-unchanged.
- Untrack: Removes resources from git version control. If you want to delete the resource from the working tree click also Delete in the resource's context menu.
- Disconnect: Disconnects the attached git team provider from this project.
URIs
TODO
Git References
Git References are also known shortly as Refs.
They comprise
- branches
- remote-tracking branches
- tags
They all are named with a path using '/' as path separator and are starting with "refs".
- Local branches start with "refs/heads/"
- Remote tracking branches start with "refs/remotes/"
- Tags start with "refs/tags/"
Ref names can be abbreviated as long as the abbreviated form is unique.
E.g.
- "master" is short for "refs/heads/master"
- "origin/master" is short for "refs/remotes/origin/master"
- "v1.0.1" is short for "refs/tags/v1.0.1"
For a complete list for Ref names and the order of precedence if multiple references have the same shorthand form see the section "Specifying Revisions" section of git rev-parse.
Refspecs
TODO
Remotes
TODO

