Notice: this Wiki will be going read only early in 2024 and edits will no longer be possible. Please see: https://gitlab.eclipse.org/eclipsefdn/helpdesk/-/wikis/Wiki-shutdown-plan for the plan.
EDT:Writing a Rich UI application
The next sections outline a way to develop a Rich UI application. The IDE helps you to do the tasks quickly.
For background information, see Web technology for EGL Rich UI.
Contents
Create a Handler type of stereotype RUIHandler
Consider a grid layout on the design surface:
Here is the related code:
package client;

import org.eclipse.edt.rui.widgets.GridLayout;

handler MyHandler type RUIhandler{

   // sets one or more widgets at the root of the widget tree.
   initialUI =[ui],

   // specifies the function that runs initially and without user interaction.
   onConstructionFunction = start,

   // identifies the CSS file that helps you to design the page.
   cssFile = "css/MyProject.css",

   // sets the title that is displayed at the top of your browser or browser tab.
   title = "MyHandler"}

   ui GridLayout{columns = 3, rows = 4, cellPadding = 4, children =[]};

   function start()
   end
end
When you request a Rich UI handler in the IDE, the Rich UI editor includes a grid layout of 3 columns and 4 rows.
Declare and display a set of widgets
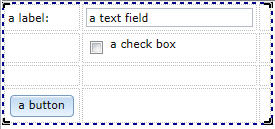
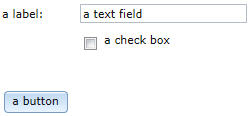
The grid layout now has four widgets in the first two columns:
The third column is present, but empty.
Here is the preview and related code:
package client;

import org.eclipse.edt.rui.widgets.Button;
import org.eclipse.edt.rui.widgets.CheckBox;
import org.eclipse.edt.rui.widgets.GridLayout;
import org.eclipse.edt.rui.widgets.GridLayoutData;
import org.eclipse.edt.rui.widgets.GridLayoutLib;
import org.eclipse.edt.rui.widgets.TextField;
import org.eclipse.edt.rui.widgets.TextLabel;
import eglx.ui.rui.RUIHandler;

handler MyHandler type RUIhandler{
   initialUI =[ui], onConstructionFunction = start,
   cssFile = "css/MyProject.css", title = "MyHandler"}

   ui GridLayout{columns = 3, rows = 4, cellPadding = 4,
   children =[myLabel, myTextField, myCheckBox, myButton]};

   myLabel TextLabel{ layoutData = new GridLayoutData{ row = 1, column=1},
     text = "a label: " };

   myTextField TextField{ layoutData = new GridLayoutData{ row = 1, column = 2},
                          text = "a text field"};

   myCheckBox CheckBox{ layoutData = new GridLayoutData{ row = 2, column = 2 },
                          text="a check box" };

   myButton Button{ layoutData = new GridLayoutData{ row = 4, column = 1 },
                    text="a button" };

   function start()
   end
end
Customize the display
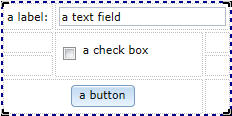
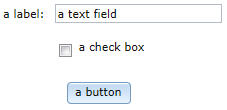
Widgets can span columns or rows:
Here is the preview and related code:
package client;

import org.eclipse.edt.rui.widgets.Button;
import org.eclipse.edt.rui.widgets.CheckBox;
import org.eclipse.edt.rui.widgets.GridLayout;
import org.eclipse.edt.rui.widgets.GridLayoutData;
import org.eclipse.edt.rui.widgets.GridLayoutLib;
import org.eclipse.edt.rui.widgets.TextField;
import org.eclipse.edt.rui.widgets.TextLabel;
import eglx.ui.rui.RUIHandler;

handler MyHandler type RUIhandler{
   initialUI =[ui], onConstructionFunction = start,
   cssFile = "css/MyProject.css", title = "MyHandler"}

   ui GridLayout{columns = 3, rows = 4, cellPadding = 4,
   children =[myLabel, myTextField, myCheckBox, myButton]};

   myLabel TextLabel{ layoutData = new GridLayoutData{ row = 1, column=1},
     text = "a label: " };

   myTextField TextField{ layoutData = new GridLayoutData{ row = 1, column = 2,
      horizontalSpan = 2 }, text = "a text field"};

   myCheckBox CheckBox{ layoutData = new GridLayoutData{ row = 2, column = 2,
      verticalSpan = 2 }, text="a check box" };

   myButton Button{ layoutData = new GridLayoutData{ row = 4, column = 1,
                    horizontalSpan = 2,
                    horizontalAlignment = GridLayoutLib.Align_Center },
                    text="a button" };


   function start()
   end
end
Assign and code event handlers
To assign an event handler:
- Decide on an event such as OnChange or OnClick.
- Add a name to the list of event handlers that respond to the event.
- Code the event handler.
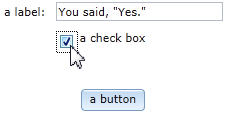
Here is the preview:
Here is the changed declaration of myCheckBox:
myCheckBox CheckBox{layoutData = new GridLayoutData{row = 2, column = 2},
                    text = "a check box",
                    onChange ::= checkBox_response};
If you use the Rich UI editor to change the myCheckBox declaration, you can press Ctrl-1 to add the following stub:
function checkBox_response(e Event in)

end
Here is the updated application:
package client;

import org.eclipse.edt.rui.widgets.Button;
import org.eclipse.edt.rui.widgets.CheckBox;
import org.eclipse.edt.rui.widgets.GridLayout;
import org.eclipse.edt.rui.widgets.GridLayoutData;
import org.eclipse.edt.rui.widgets.GridLayoutLib;
import org.eclipse.edt.rui.widgets.TextField;
import org.eclipse.edt.rui.widgets.TextLabel;
import eglx.ui.rui.Event;
import eglx.ui.rui.RUIHandler;

handler MyHandler type RUIhandler{
   initialUI =[ui],
   onConstructionFunction = start,
   cssFile = "css/MyProject.css",
   title = "MyHandler"}

    checkedCount int = 0;

    ui GridLayout{columns = 3, rows = 4, cellPadding = 4, children =[myLabel,
                    myTextField, myCheckBox]};

    myLabel TextLabel{layoutData = new GridLayoutData{row = 1, column = 1}, text = "a label: "};

    myTextField TextField{layoutData = new GridLayoutData{row = 1, column = 2},
                          text = "a text field"};

    myCheckBox CheckBox{layoutData = new GridLayoutData{row = 2, column = 2},
                        text = "a check box", onChange ::= checkBox_response};

    myButton Button{ layoutData = new GridLayoutData{ row = 4, column = 1,
                     horizontalSpan = 2,
                     horizontalAlignment = GridLayoutLib.Align_Center },
                     text="a button" };

    function start()
    end

    function checkBox_response(e event)
        myMessage string;
        if (myCheckBox.selected == true)
           myMessage = "You said, \"Yes.\"";
        else
       	   myMessage = "You said, \"No.\"";
        end
        myTextField.text = myMessage;
    end
end
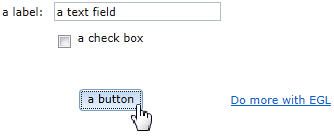
When you are attaching an event handler to a button, you typically use the OnClick event.
Here is a preview and the related code, which shows how to add a new widget to the display:
package client;

import org.eclipse.edt.rui.widgets.Button;
import org.eclipse.edt.rui.widgets.CheckBox;
import org.eclipse.edt.rui.widgets.GridLayout;
import org.eclipse.edt.rui.widgets.GridLayoutData;
import org.eclipse.edt.rui.widgets.GridLayoutLib;
import org.eclipse.edt.rui.widgets.HyperLink;
import org.eclipse.edt.rui.widgets.TextField;
import org.eclipse.edt.rui.widgets.TextLabel;
import eglx.ui.rui.Event;
import eglx.ui.rui.RUIHandler;

handler MyHandler type RUIhandler{
   initialUI =[ui],
   onConstructionFunction = start,
   cssFile = "css/MyProject.css",
   title = "MyHandler"}

   ui GridLayout{columns = 3, rows = 4, cellPadding = 4, children =[myLabel,
                    myTextField, myCheckBox, myButton]};

   myLabel TextLabel{layoutData = new GridLayoutData{row = 1, column = 1}, text = "a label: "};

   myTextField TextField{layoutData = new GridLayoutData{row = 1, column = 2},
                    text = "a text field"};

   myCheckBox CheckBox{layoutData = new GridLayoutData{row = 2, column = 2},
                    text = "a check box", onChange ::= checkBox_response};

   myButton Button{ layoutData = new GridLayoutData{ row = 4, column = 1,
                    horizontalSpan = 2,
                    horizontalAlignment = GridLayoutLib.Align_Center },
                    text="a button", onClick ::= button_Response};
   counter int;

   function start()
   end

   function checkBox_response(e event)
      myMessage string;
      if (myCheckBox.selected == true)
         myMessage = "You said, \"Yes.\"";
      else
         myMessage = "You said, \"No.\"";
      end
      myTextField.text = myMessage;
   end

   function button_response(e event)
      ui.appendChildren([myHyperLink]);
   end

   myHyperlink HyperLink
   {
      layoutData = new GridLayoutData{row = 4, column = 3},
      text = "Do more with EGL",
      target = "_blank",
      href = "http://www.eclipse.org/edt/#gettingstarted"
   };
end
The code now includes a variable named counter, for use in the next section.
Write the on-construction function
The on-construction function is typically named start. The function might update the widgets, initialize variables, invoke a service, or schedule a job.
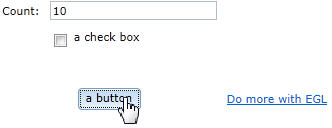
The example function changes a label text, initializes a counter, and schedules a job that increments the counter. The job begins when the on-construction ends. The job ends when the user clicks the button.
Here is the preview and related code:
package client;

import org.eclipse.edt.rui.widgets.Button;
import org.eclipse.edt.rui.widgets.CheckBox;
import org.eclipse.edt.rui.widgets.GridLayout;
import org.eclipse.edt.rui.widgets.GridLayoutData;
import org.eclipse.edt.rui.widgets.GridLayoutLib;
import org.eclipse.edt.rui.widgets.HyperLink;
import org.eclipse.edt.rui.widgets.TextField;
import org.eclipse.edt.rui.widgets.TextLabel;
import eglx.ui.rui.Event;
import eglx.ui.rui.RUIHandler;

handler MyHandler type RUIhandler{
   initialUI =[ui],
   onConstructionFunction = start,
   cssFile = "css/MyProject.css",
   title = "MyHandler"}

   counter int;

   ui GridLayout{columns = 3, rows = 4, cellPadding = 4, children =[myLabel,
                    myTextField, myCheckBox, myButton]};

   myLabel TextLabel{layoutData = new GridLayoutData{row = 1, column = 1}, text = "a label: "};

   myTextField TextField{layoutData = new GridLayoutData{row = 1, column = 2},
                          text = "a text field"};

   myCheckBox CheckBox{layoutData = new GridLayoutData{row = 2, column = 2},
                        text = "a check box", onChange ::= checkBox_response};

   myButton Button{ layoutData = new GridLayoutData{ row = 4, column = 1,
                    horizontalSpan = 2,
                    horizontalAlignment = GridLayoutLib.Align_Center },
                    text="a button", onClick ::= button_Response};

   doThis Job{runFunction = myRunFunction};

   function myRunFunction()
      counter = counter + 1;
      myTextField.text = counter;
   end

   function start()
      counter = 0;
      myLabel.text = "Count:";
      doThis.repeat(1000);
   end

   function checkBox_response(e event)
      myMessage string;
      if (myCheckBox.selected == true)
         myMessage = "You said, \"Yes.\"";
      else
         myMessage = "You said, \"No.\"";
      end
      myTextField.text = myMessage;
   end

   function button_response(e event)
      doThis.cancel();
      ui.appendChildren([myHyperLink]);
    end

   myHyperlink HyperLink
   {
      layoutData = new GridLayoutData{row = 4, column = 3},
      text = "Do more with EGL",
      target = "_blank",
      href = "http://www.eclipse.org/edt/#gettingstarted"
   };
end

