Notice: this Wiki will be going read only early in 2024 and edits will no longer be possible. Please see: https://gitlab.eclipse.org/eclipsefdn/helpdesk/-/wikis/Wiki-shutdown-plan for the plan.
Difference between revisions of "EDT:Tutorial: RUI With DataBase Lesson 3"
(→Use the EGL SQL retrieve feature to create a Record part) |
(→Lesson 4: Connect to a new Derby database) |
||
| Line 13: | Line 13: | ||
#Install Derby plugins in the Eclipse IDE | #Install Derby plugins in the Eclipse IDE | ||
| − | #Add Derby nature to the '''Service Project''' | + | #Add Derby nature to the '''Service Project''' |
| − | #Start the Derby server | + | #Start the Derby server |
#Create an SQL database connection . | #Create an SQL database connection . | ||
| − | #Create a script in an SQL file to create a table within the database. | + | #Create a script in an SQL file to create a table within the database. |
#Create an EGL record that represents a row in the table | #Create an EGL record that represents a row in the table | ||
== Install Derby Plugins == | == Install Derby Plugins == | ||
| − | #Download the Derby Eclipse plugins into your Eclipse IDE as directed by the Derby site. The plugins for the [http://db.apache.org/derby/releases/release-10.8.2.2.cgi Apache Derby 10.8.2.2 Release] work well. There will be two plugin zip files for the release: | + | #Download the Derby Eclipse plugins into your Eclipse IDE as directed by the Derby site. The plugins for the [http://db.apache.org/derby/releases/release-10.8.2.2.cgi Apache Derby 10.8.2.2 Release] work well. There will be two plugin zip files for the release: |
| − | #*derby_core_plugin - provides the Derby jar files to other plugins in Eclipse. | + | #*derby_core_plugin - provides the Derby jar files to other plugins in Eclipse. |
#*derby_ui_doc_plugin - provides an Apache Derby Nature in Eclipse for easy database application development. | #*derby_ui_doc_plugin - provides an Apache Derby Nature in Eclipse for easy database application development. | ||
| − | #Extract the plugins to the Eclipse home directory. | + | #Extract the plugins to the Eclipse home directory. As a result, the eclipse/plugins directory received these folders: |
| − | #*org.apache.derby.core_10.8.2 | + | #*org.apache.derby.core_10.8.2 |
| − | #*org.apache.derby.plugin.doc_1.1.3 | + | #*org.apache.derby.plugin.doc_1.1.3 |
#*org.apache.derby.ui_1.1.3 | #*org.apache.derby.ui_1.1.3 | ||
| − | == Add Derby Nature To Service Project == | + | == Add Derby Nature To Service Project == |
| − | To add the Derby nature to the '''ServiceProject''': | + | To add the Derby nature to the '''ServiceProject''': |
| − | #Right click on '''ServiceProject''' in the project explorer | + | #Right click on '''ServiceProject''' in the project explorer |
| − | #On the dropdown menu, left click on '''Apache Derby | + | #On the dropdown menu, left click on '''Apache Derby > Add Apache Derby Nature''' |
| − | Once the Derby nature is added, the ''''Apache Derby''' menu will show the following selections:.[[Image:EDT Tutorial edt richui sql02 derby menu.jpg|Apache Derby Menu for projects with Derby nature]] | + | Once the Derby nature is added, the ''''Apache Derby''' menu will show the following selections:.[[Image:EDT Tutorial edt richui sql02 derby menu.jpg|Apache Derby Menu for projects with Derby nature]] |
| − | == Start Derby Server == | + | == Start Derby Server == |
| − | To start the Derby server, | + | To start the Derby server, left click on selection '''Start Derby Network Server''' from the Derby menu. |
| − | You should see messages like this in the '''Console''' view: | + | You should see messages like this in the '''Console''' view: |
| + | <blockquoteWed Nov 23 09:07:39 EST 2011 : Security manager installed using the Basic server security policy.<br> | ||
| + | Make a note of the sever port for future use. | ||
| − | + | == Create Database Connection == | |
| − | + | ||
| − | + | ||
| − | + | ||
| − | Make a note of the | + | #From the file menu, left clink on '''New''' and select the '''Connection > Connection Profile'''. |
| + | #On '''Connection Profile''' window, select '''Derby''' as profile type and enter a name and description for your server.<br>[[Image:EDT Tutorial edt richui sql02 new connection.jpg|Connection profile for Derby server]] | ||
| + | #Left click on '''Next'''. | ||
| + | #On '''Driver and Connection Details''' window, select '''Derby''' as profile type and enter a name and description for your server.[[Image:EDT Tutorial edt richui sql02 new connection details.jpg|Connection profile details for Derby server]] | ||
| + | #Left click on '''Test Connection'''. Make sure you get a successful response. | ||
| + | #Left click on '''Next''' to see a summary of the connection information. | ||
| + | #Make a note of the server URL for future use and left click on '''Finish'''. | ||
| − | == Create | + | == Create Payment Table == |
| − | + | ||
| − | + | ||
| − | + | ||
| − | + | ||
| − | + | ||
| − | + | ||
| − | + | ||
| − | + | ||
| − | + | Create the Payment table to be used in the application using this create SQL statement::<code></code> | |
| − | |||
CREATE TABLE PAYMENT ( | CREATE TABLE PAYMENT ( | ||
PAYMENT_ID INT | PAYMENT_ID INT | ||
| Line 76: | Line 72: | ||
PAYEE_ADDRESS1 CHAR(30), | PAYEE_ADDRESS1 CHAR(30), | ||
PAYEE_ADDRESS2 CHAR(30)); | PAYEE_ADDRESS2 CHAR(30)); | ||
| − | |||
| − | #From the file menu,left clink on '''New''' and select the '''SQL Development | + | |
| − | #On the '''Create SQL File''' window, enter SQL file attributes as shown in the image below.[[Image:EDT Tutorial edt richui sql02 create payment table SQL file.jpg|CreatePaymentTable SQL file attributes]] | + | |
| − | #Left click on '''Finish''' | + | #From the file menu,left clink on '''New''' and select the '''SQL Development > SQL File''' wizard. |
| − | #Copy and paste this SQL statement into the SQL file editor window[[Image:EDT Tutorial edt richui sql02 create payment table SQL file contents.jpg|CreatePaymentTable SQL file contents]] | + | #On the '''Create SQL File''' window, enter SQL file attributes as shown in the image below.[[Image:EDT Tutorial edt richui sql02 create payment table SQL file.jpg|CreatePaymentTable SQL file attributes]] |
| − | #Close and save the SQL file. | + | #Left click on '''Finish''' |
| − | #From the '''Project Explorer''' view, right click on file '''CreatePaymentTable.sql''' in the '''ServiceProject''' and select '''Execute SQL files''' from the menu. | + | #Copy and paste this SQL statement into the SQL file editor window[[Image:EDT Tutorial edt richui sql02 create payment table SQL file contents.jpg|CreatePaymentTable SQL file contents]] |
| + | #Close and save the SQL file. | ||
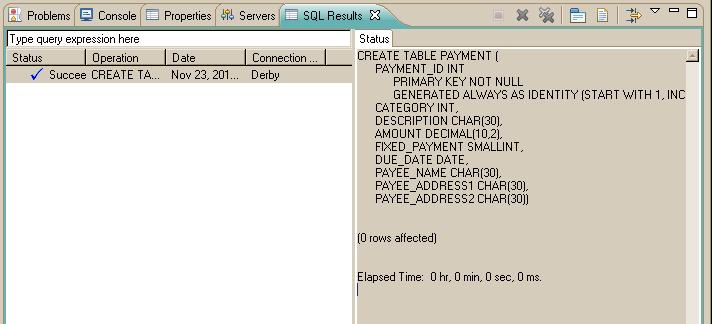
| + | #From the '''Project Explorer''' view, right click on file '''CreatePaymentTable.sql''' in the '''ServiceProject''' and select '''Execute SQL files''' from the menu. Look for results in the '''SQL Results''' view after the file runs.<br>[[Image:EDT Tutorial edt richui sql02 create payment table SQL file results.jpg|CreatePaymentTable SQL file results]] | ||
'''Notes:''' | '''Notes:''' | ||
| + | |||
*The PAYMENT_ID column is an identity column, which means that Derby will place a unique value into that column whenever the user creates a record. Each value is one more than the last. | *The PAYMENT_ID column is an identity column, which means that Derby will place a unique value into that column whenever the user creates a record. Each value is one more than the last. | ||
| − | *The names of Derby tables and columns are always in uppercase regardless of the case of names that are in the CREATE TABLE statement. | + | *The names of Derby tables and columns are always in uppercase regardless of the case of names that are in the CREATE TABLE statement. |
| − | == Use the EGL SQL retrieve feature to create a Record part == | + | == Use the EGL SQL retrieve feature to create a Record part == |
| − | You can automatically retrieve the fields for a Record | + | You can automatically retrieve the fields for a Record part that corresponds to the '''PAYMENT''' table in the '''PaymentDB''' database. The column names are the basis of the field names in the Record part. |
| − | part that corresponds to the '''PAYMENT''' table in the '''PaymentDB''' database. | + | |
| − | The column names are the basis of the field names in the Record part. | + | |
| − | To create the Record part: | + | To create the Record part: |
| − | + | #From the file menu, left clink on '''New''' and select the '''EGL > Record''' wizard. | |
| − | + | #On the '''EGL Record''' window, enter '''Source folder''', '''Package''', and '''Name''' as shown below, select the template '''Records from SQL Database''', and click on '''Next'''<br>[[Image:EDT Tutorial edt richui sql02 paymentRec record.jpg|EGL Record paymentRec]] | |
| − | + | #On the '''Database Tables''' window, select the '''Derby''' database connection and the '''PAYMENT''' table, check '''Qualify tables names with schema''' and '''Save data source configuration to the deployment descriptor''', and click on '''Finish'''.<br>[[Image:EDT Tutorial edt richui sql02 database tables.jpg|EGL database tables selection]] | |
| − | [[Image:EDT Tutorial edt richui sql02 database tables.jpg|EGL database tables selection]] | + | |
| − | + | EGL creates the records directory and the paymentRecords.egl file and then opens the file in the EGL editor. The file contents are: | |
| − | EGL creates the records directory | + | |
| − | and the paymentRecords.egl file and then opens | + | package records ; |
| − | the file in the EGL editor. | + | |
| − | package records ; | + | |
record PAYMENT type Entity{@table{name = "EUNIT.PAYMENT"}} | record PAYMENT type Entity{@table{name = "EUNIT.PAYMENT"}} | ||
PAYMENT_ID int{@id}; | PAYMENT_ID int{@id}; | ||
| Line 118: | Line 112: | ||
end | end | ||
| − | In our application we want to change the record definition to give information to the EGL wizards and generators. | + | In our application we want to change the record definition to give information to the EGL wizards and generators. Therefore replace the record definition above with this definition using copy and paste: |
| − | Therefore replace the record definition above with this definition using copy and paste: | + | |
package records; | package records; | ||
record paymentRec { @Table {name="PAYMENT"} } | record paymentRec { @Table {name="PAYMENT"} } | ||
paymentId int {@Id, @GeneratedValue, @Column { name="PAYMENT_ID" } }; | paymentId int {@Id, @GeneratedValue, @Column { name="PAYMENT_ID" } }; | ||
| − | category int { @Column { name="CATEGORY" } } ; | + | category int { @Column { name="CATEGORY" } } ; |
| − | description string? { @Column { name="DESCRIPTION" } } ; | + | description string? { @Column { name="DESCRIPTION" } } ; |
| − | amount decimal(10,2) { @Column { name="AMOUNT" } } ; | + | amount decimal(10,2) { @Column { name="AMOUNT" } } ; |
| − | fixedPayment boolean { @Column { name="FIXED_PAYMENT" } } ; | + | fixedPayment boolean { @Column { name="FIXED_PAYMENT" } } ; |
| − | dueDate date { @Column { name="DUE_DATE" } } ; | + | dueDate date { @Column { name="DUE_DATE" } } ; |
| − | payeeName string { @Column { name="PAYEE_NAME" } } ; | + | payeeName string { @Column { name="PAYEE_NAME" } } ; |
| − | payeeAddress1 string { @Column { name="PAYEE_ADDRESS1" } } ; | + | payeeAddress1 string { @Column { name="PAYEE_ADDRESS1" } } ; |
| − | payeeAddress2 string { @Column { name="PAYEE_ADDRESS2" } } ; | + | payeeAddress2 string { @Column { name="PAYEE_ADDRESS2" } } ; |
end | end | ||
| + | |||
'''Notes:''' | '''Notes:''' | ||
| − | *Your use of a Record | + | |
| − | mySQLRecord paymentRec ; // variable mySQLRecord is of type paymentRec | + | |
| + | |||
| + | *Your use of a Record type that includes a '''Table''' annotation means that, in the following case, <br>the EDT Java generator will create code that is appropriate for SQL I/O. For example, you might code an I/O statement such as '''add''', as in this example: | ||
| + | |||
| + | mySQLRecord paymentRec ; // variable mySQLRecord is of type paymentRec | ||
add mySQLRecord; // generator creates INSERT SQL statement for add | add mySQLRecord; // generator creates INSERT SQL statement for add | ||
| − | * | + | |
| − | *The type for '''fixedPayment''' has been changed from '''smallInt''' to '''boolean'''. | + | |
| + | *To generate the Java code that is appropriate for the SQL operation, the EDT Java generator uses annotations that are based on the '''Table''', '''ID''', '''GeneratedValue''', and '''Column''' annotation types.<br> | ||
| + | *The type for '''fixedPayment''' has been changed from '''smallInt''' to '''boolean'''. This change will be useful during a later drag-and-drop operation when definining the user interface. The EGL generators know that the database uses smallInt for boolean values.<br> | ||
To complete the record definition, save (Ctrl-S) and close the file containing the record definition. | To complete the record definition, save (Ctrl-S) and close the file containing the record definition. | ||
| Line 148: | Line 149: | ||
*Created an Derby database connection | *Created an Derby database connection | ||
*Created a database named '''sample''' | *Created a database named '''sample''' | ||
| − | *Created a database table named '''PAYMENT''' | + | *Created a database table named '''PAYMENT''' |
*Created a Record part named '''paymentRec''' | *Created a Record part named '''paymentRec''' | ||
| − | In the next lesson, you develop some of the Rich UI application | + | In the next lesson, you develop some of the Rich UI application and view your prototype code in action. |
| − | and view your prototype code in action. | + | |
| − | {| style="float: right" | + | {| style="float: right" class="FCK__ShowTableBorders" |
| + | |- | ||
| [[EDT:Tutorial: RUI With DataBase Lesson 2|< Previous]] | [[EDT:Tutorial: RUI With DataBase Lesson 4|Next >]] | | [[EDT:Tutorial: RUI With DataBase Lesson 2|< Previous]] | [[EDT:Tutorial: RUI With DataBase Lesson 4|Next >]] | ||
|} | |} | ||
| − | + | [[Category:EDT]]</blockquote> | |
| − | [[Category:EDT]] | + | |
Revision as of 17:07, 6 December 2011
Access a database with EGL Rich UI
| < Previous | Next > |
Contents
Lesson 4: Connect to a new Derby database
Use the Derby open source database manager to handle the data store for the application.
This tutorial uses the open source Derby database. In this chapter, you connect to a Derby database and create the table to be accessed. Alternatively, you can connect to a Cloudscape, DB2® UDB, or SQL Server database. In any case, create the table described in this lesson.
Follow these steps to set up the Derby database:
- Install Derby plugins in the Eclipse IDE
- Add Derby nature to the Service Project
- Start the Derby server
- Create an SQL database connection .
- Create a script in an SQL file to create a table within the database.
- Create an EGL record that represents a row in the table
Install Derby Plugins
- Download the Derby Eclipse plugins into your Eclipse IDE as directed by the Derby site. The plugins for the Apache Derby 10.8.2.2 Release work well. There will be two plugin zip files for the release:
- derby_core_plugin - provides the Derby jar files to other plugins in Eclipse.
- derby_ui_doc_plugin - provides an Apache Derby Nature in Eclipse for easy database application development.
- Extract the plugins to the Eclipse home directory. As a result, the eclipse/plugins directory received these folders:
- org.apache.derby.core_10.8.2
- org.apache.derby.plugin.doc_1.1.3
- org.apache.derby.ui_1.1.3
Add Derby Nature To Service Project
To add the Derby nature to the ServiceProject:
- Right click on ServiceProject in the project explorer
- On the dropdown menu, left click on Apache Derby > Add Apache Derby Nature
Once the Derby nature is added, the 'Apache Derby menu will show the following selections:.
Start Derby Server
To start the Derby server, left click on selection Start Derby Network Server from the Derby menu.
You should see messages like this in the Console view:
<blockquoteWed Nov 23 09:07:39 EST 2011 : Security manager installed using the Basic server security policy.
Make a note of the sever port for future use.
Create Database Connection
- From the file menu, left clink on New and select the Connection > Connection Profile.
- On Connection Profile window, select Derby as profile type and enter a name and description for your server.
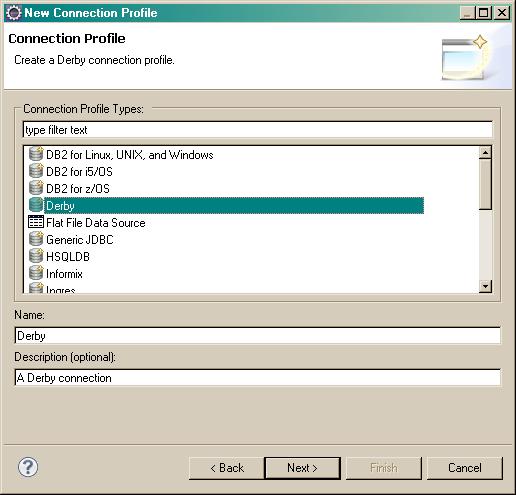
- Left click on Next.
- On Driver and Connection Details window, select Derby as profile type and enter a name and description for your server.
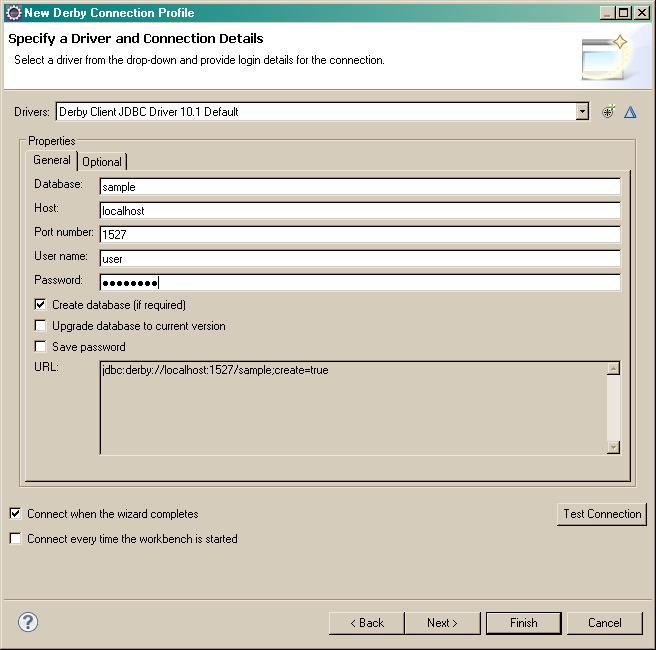
- Left click on Test Connection. Make sure you get a successful response.
- Left click on Next to see a summary of the connection information.
- Make a note of the server URL for future use and left click on Finish.


Create Payment Table
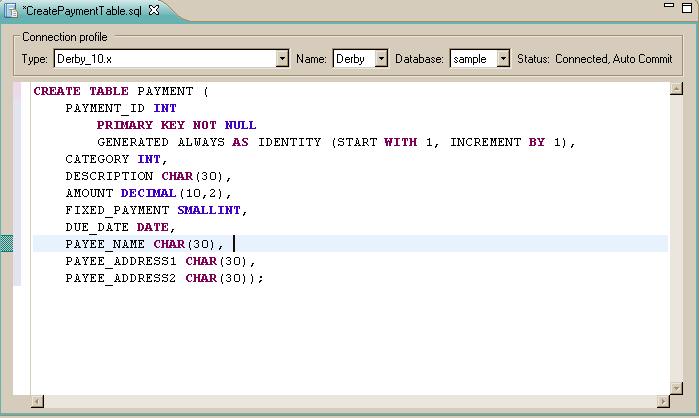
Create the Payment table to be used in the application using this create SQL statement::
 CREATE TABLE PAYMENT (
   PAYMENT_ID INT
      PRIMARY KEY NOT NULL
      GENERATED ALWAYS AS IDENTITY (START WITH 1, INCREMENT BY 1),
   CATEGORY INT,
   DESCRIPTION CHAR(30),
   AMOUNT DECIMAL(10,2),
   FIXED_PAYMENT SMALLINT,
   DUE_DATE DATE,
   PAYEE_NAME CHAR(30),
   PAYEE_ADDRESS1 CHAR(30),
   PAYEE_ADDRESS2 CHAR(30));
- From the file menu,left clink on New and select the SQL Development > SQL File wizard.
- On the Create SQL File window, enter SQL file attributes as shown in the image below.
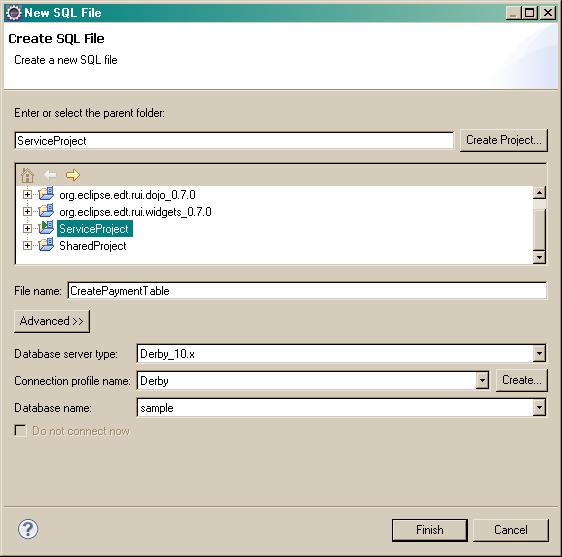
- Left click on Finish
- Copy and paste this SQL statement into the SQL file editor window
- Close and save the SQL file.
- From the Project Explorer view, right click on file CreatePaymentTable.sql in the ServiceProject and select Execute SQL files from the menu. Look for results in the SQL Results view after the file runs.


Notes:
- The PAYMENT_ID column is an identity column, which means that Derby will place a unique value into that column whenever the user creates a record. Each value is one more than the last.
- The names of Derby tables and columns are always in uppercase regardless of the case of names that are in the CREATE TABLE statement.
Use the EGL SQL retrieve feature to create a Record part
You can automatically retrieve the fields for a Record part that corresponds to the PAYMENT table in the PaymentDB database. The column names are the basis of the field names in the Record part.
To create the Record part:
- From the file menu, left clink on New and select the EGL > Record wizard.
- On the EGL Record window, enter Source folder, Package, and Name as shown below, select the template Records from SQL Database, and click on Next

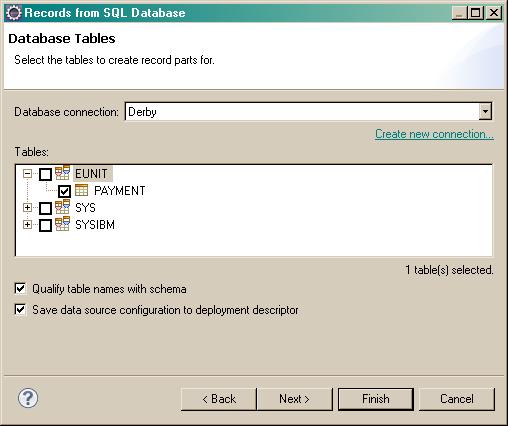
- On the Database Tables window, select the Derby database connection and the PAYMENT table, check Qualify tables names with schema and Save data source configuration to the deployment descriptor, and click on Finish.


EGL creates the records directory and the paymentRecords.egl file and then opens the file in the EGL editor. The file contents are:
  package records ;
  record PAYMENT type Entity{@table{name = "EUNIT.PAYMENT"}}
     PAYMENT_ID int{@id};
     CATEGORY int?;
     DESCRIPTION string?;
     AMOUNT decimal(10, 2)?;
     FIXED_PAYMENT smallInt?;
     DUE_DATE date?;
     PAYEE_NAME string?;
     PAYEE_ADDRESS1 string?;
     PAYEE_ADDRESS2 string?;
  end
In our application we want to change the record definition to give information to the EGL wizards and generators. Therefore replace the record definition above with this definition using copy and paste:
  package records;
  record paymentRec  { @Table {name="PAYMENT"} }
     paymentId int {@Id, @GeneratedValue, @Column { name="PAYMENT_ID" } };
     category int { @Column { name="CATEGORY" } } ;
     description string? { @Column { name="DESCRIPTION" } } ;
     amount decimal(10,2) { @Column { name="AMOUNT" } } ;
     fixedPayment boolean { @Column { name="FIXED_PAYMENT" } } ;
     dueDate date { @Column { name="DUE_DATE" } } ;
     payeeName string { @Column { name="PAYEE_NAME" } } ;
     payeeAddress1 string { @Column { name="PAYEE_ADDRESS1" } } ;
     payeeAddress2 string { @Column { name="PAYEE_ADDRESS2" } } ;
  end
Notes:
- Your use of a Record type that includes a Table annotation means that, in the following case,
the EDT Java generator will create code that is appropriate for SQL I/O. For example, you might code an I/O statement such as add, as in this example:
  mySQLRecord paymentRec ; // variable mySQLRecord is of type paymentRec
  add mySQLRecord; // generator creates INSERT SQL statement for add
- To generate the Java code that is appropriate for the SQL operation, the EDT Java generator uses annotations that are based on the Table, ID, GeneratedValue, and Column annotation types.
- The type for fixedPayment has been changed from smallInt to boolean. This change will be useful during a later drag-and-drop operation when definining the user interface. The EGL generators know that the database uses smallInt for boolean values.
To complete the record definition, save (Ctrl-S) and close the file containing the record definition.
Lesson checkpoint
In this lesson, you completed the following tasks:
- Created an Derby database connection
- Created a database named sample
- Created a database table named PAYMENT
- Created a Record part named paymentRec
In the next lesson, you develop some of the Rich UI application and view your prototype code in action.
| < Previous | Next > |