Notice: this Wiki will be going read only early in 2024 and edits will no longer be possible. Please see: https://gitlab.eclipse.org/eclipsefdn/helpdesk/-/wikis/Wiki-shutdown-plan for the plan.
Difference between revisions of "EDT:Create an EGL project"
(→Create Extension Point) |
(→Create Extension Point) |
||
| Line 103: | Line 103: | ||
<source lang="xml"> | <source lang="xml"> | ||
<extension | <extension | ||
| − | + | point="org.eclipse.edt.ide.ui.projectTemplates"> | |
| − | + | <template | |
| − | + | category="org.eclipse.edt.ide.ui.projects" | |
| − | + | default="false" | |
| − | + | description="My Sample Project Template" | |
| − | + | icon="icons/templates/WebClientTemplate.gif" | |
| − | + | id="org.eclipse.edt.ide.ui.projects.sample" | |
| − | + | name="Sample Project" | |
templateClass="org.eclipse.edt.ide.rui.internal.project.SampleProjectTemplate"> | templateClass="org.eclipse.edt.ide.rui.internal.project.SampleProjectTemplate"> | ||
</template> | </template> | ||
Revision as of 14:11, 29 January 2012
Introduction
In order to start EGL programming, the first thing you need to do is create a new EGL project. In this page, we will introduce:
- EGL project templates.
- How to create each kind of project.
- How to extend EGL project wizard to create your own project type.
Notice: If you're only interested in using the EDT (and do not want to extend the EDT), then you can focus on topics 1 and 2.
EGL Project Templates
There are 4 project templates in EDT.
- Basic project: This project is for developing EGL programs, services, and libraries. It can be configured to generate to multiple target languages.
Typical usages: batch (command line) programs, common libraries and records, web services, data access services and libraries. - Web 2.0 client application project: This project is for developing rich web applications that utilize existing web services. EGL Rich UI code is generated to JavaScript and HTML. Applications are deployed to web application servers, such as Apache Tomcat.
Typical usages: Web client for existing services, mashup applications
Target languages: JavaScript - Web 2.0 client with services application project: This projects is for developing rich web applications and related services accessible from standard web browsers. Service code is generated to Java and EGL Rich UI code is generated to JavaScript and HTML. Applications are deployed to web application servers, such as Apache Tomcat.
Typical usages: End-to-end client/server application
Target languages: Java, JavaScript - Hello world project: This is a simple example application that demonstrates an EGL Rich UI web application calling an EGL service.
In addition to the built-in project templates, developers can extend the New Project wizard to add their own project types. The hello world project serves as an example of RUI and services as well as to demonstrate extensibility.
Create a New EGL Project
Open New Project Wizard
- From the menu bar in the EGL perspective, click File > New > EGL Project. The EGL Project wizard opens.
- Enter the following information:
- Project name: This field is required.
- If you want the project to be created in your Eclipse workspace, leave the Use the default location for the project check box selected.
- Select the template you want to use. A description of the selected template is shown in the right pane. The template selected is remembered so that when you create another new project, the last selected template last is the default.
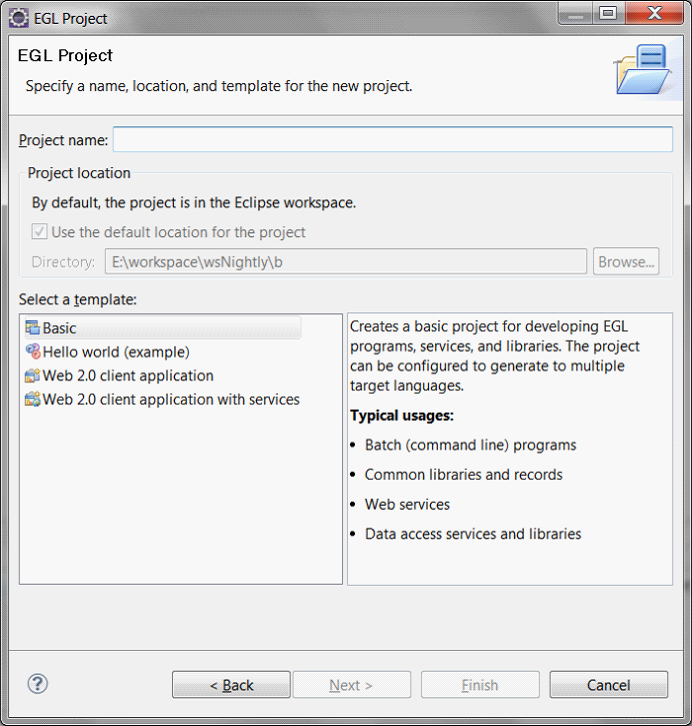
- Click Finish to create the project, or click Next if you want to specify additional settings based on the template you selected. Follow the steps in the next sections depending on the template selected. If you selected the Hello World template, click Finish as there are no settings to specify.

Create a Basic Project
If you selected the Basic template, and click Next...
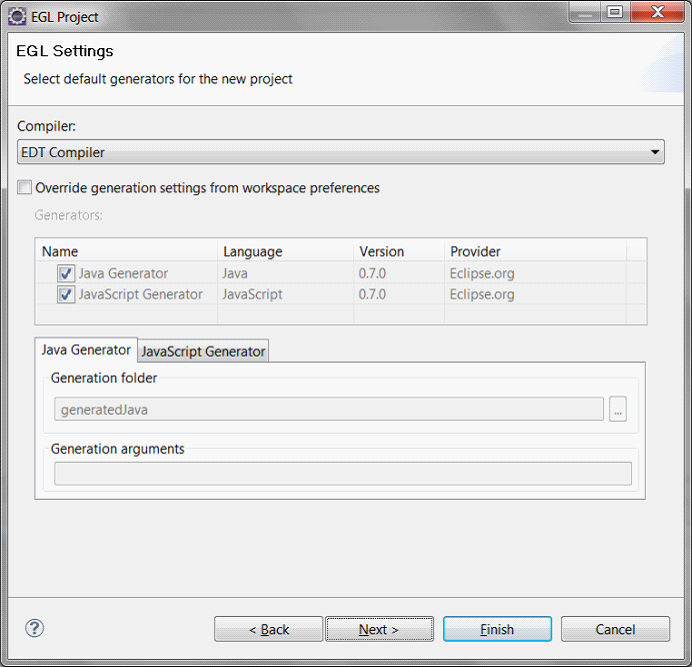
- The EGL Settings page displays. Specify the compiler and generator settings for the new project. See the EDT:Compiler Settings Introduction wiki page for more information. Note that you can change these setting after project created.
- Compiler: You can specify the compiler used in the new project. The default compiler is the EDT compiler. Developers can extend or implement their own compilers to be shown here.
- The default new project generator setting is based on the workspace setting. It is good practice to save the most frequently used generator as a workspace generator preference.
- You can set a project-specific generator by checking the "Override the generation settings from workspace preferences" and selecting a generator.
- You can specify the folder and arguments for the selected generators in the corresponding generator tab.
- Click Next, and the EGL Build Path page displays.
- On the EGL Build Path page, you can specify the EGL projects that the new project depends on. Note that you can change these setting after project created.
- On the Projects tab, select any other projects in your workspace to be added to the build path of the new project.
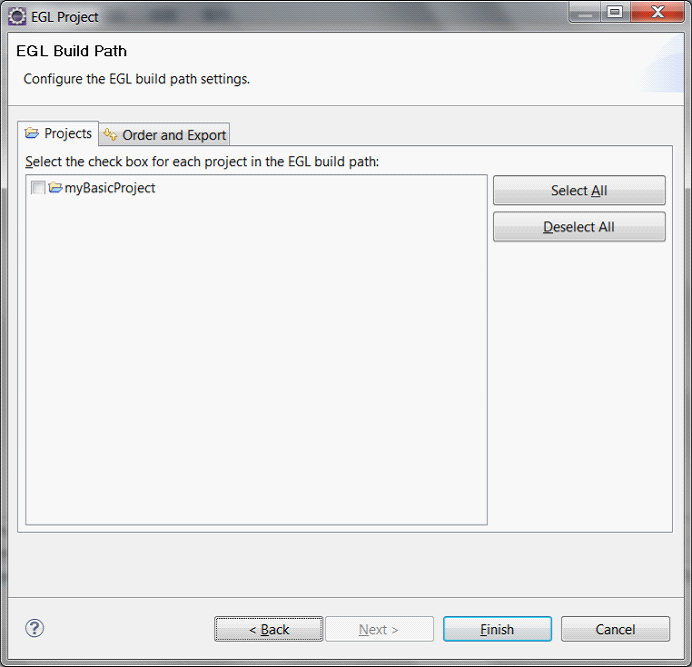
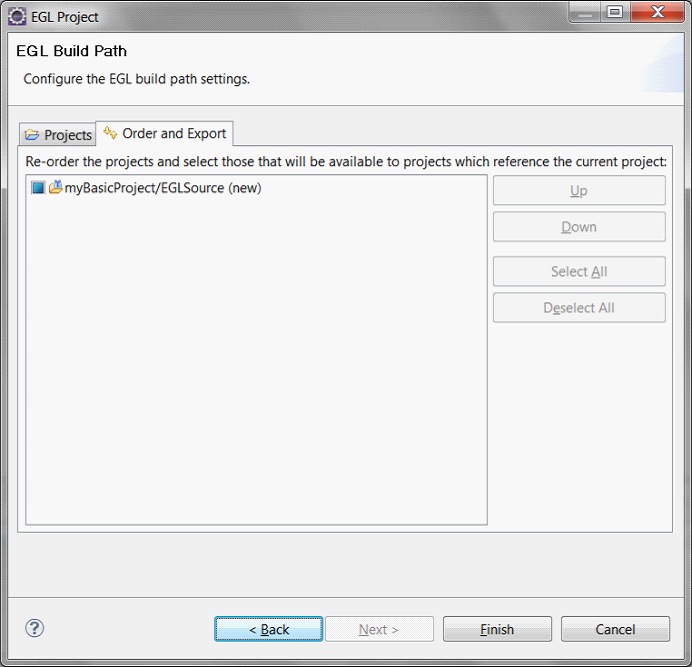
- On the Order and Export tab, optionally reorder the names of the projects that will be available to projects that reference the current project.
- On the Projects tab, select any other projects in your workspace to be added to the build path of the new project.
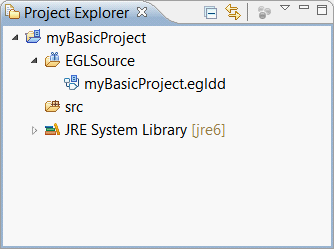
- Click Finish, and the new project is created in the workspace. The project appears in the Project Explorer. An EGLSource folder and a .egldd EGL deployment descriptor) file are created in the project.


Create a Web 2.0 Client Project
If you selected the Web 2.0 client application template, and clicked Next...
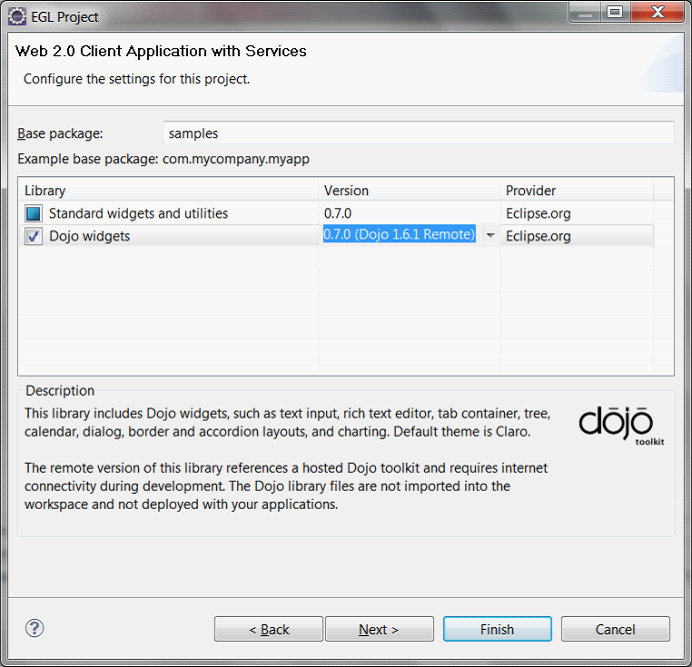
- The Web 2.0 setting page is displayed. Specfiy the following information:
- Base Package (optional). The Web 2.0 project includes a default package "client". If the base package field is specified, the default package name will be #basePackageName#.client. For example, base package name is sample, the created project will have a default package sample.client.
- Widget Library: There are 2 built-in rich UI widget projects, Standard and Dojo, which include dozens of widgets. Developers can also extend the widget projects to list. Select which widget libraries you want to use.
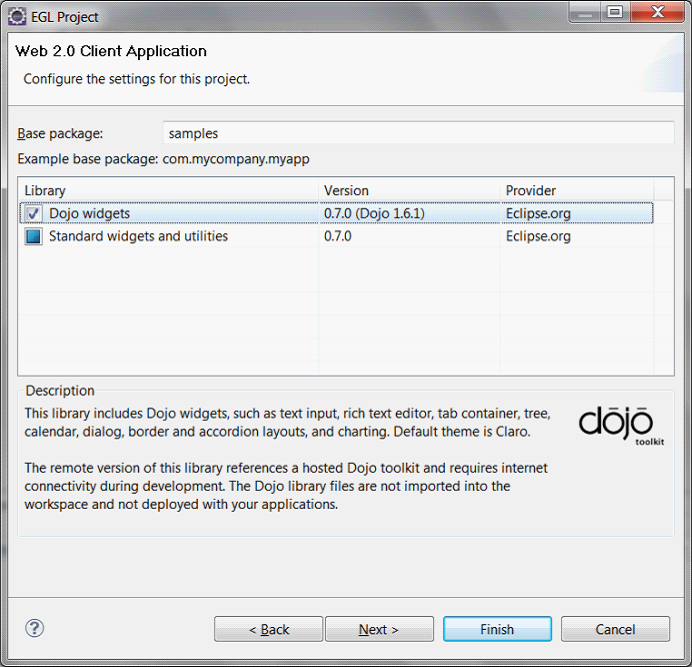
- The standard widgets and utilities is selected by default and can not be deselected.
- A description of the widget project appears when the library is selected.
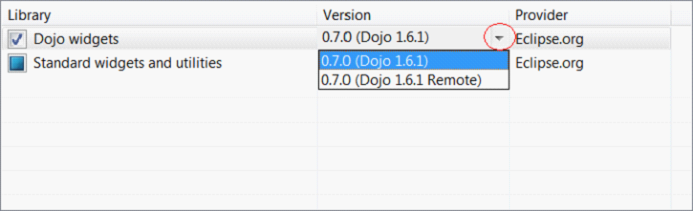
- You can switch versions by click in the version field. For example, Dojo widgets have local version and remote version.
- Click Next, and the EGL Build Path page appears.
- The EGL Build Path page allows you to specify the dependent EGL projects, same as the Basic project.
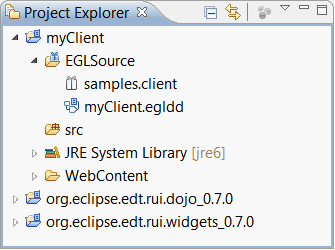
- Click Finish, and several new projects are created in the workspace. The projects include the newly created EGL project and the selected widget projects (EGL widget project and Dojo widget project). The Web 2.0 client project should have EGLSource folder and WebContent folder; A default package sample.client is also created in the EGLSource folder.


Create a Web 2.0 Client with Services Project
If you selected the Web 2.0 client application template, and clicked Next...
- The Web 2.0 setting page appears to select the Base Package and widget libraries. (In the screenshot, the remote Dojo widget project is selected in this case to show how to import that project.)
- The EGL Build Path page allows you to specify the dependent EGL projects, same as the Basic project.
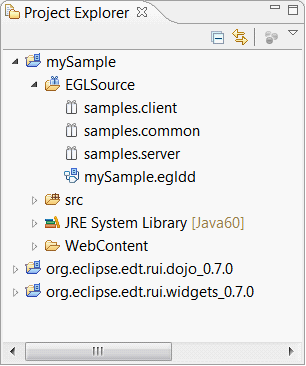
- Click Finish, several new projects are created in the workspace. The projects include the newly created EGL project and the selected widget projects. (See the Dojo remote project in the Project Explorer screenshot below.) The Web 2.0 client with services project should have EGLSource folder and WebContent folder.
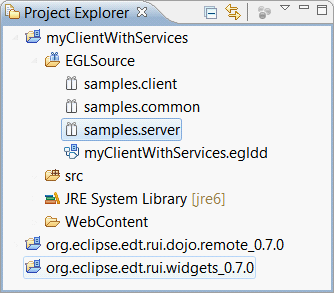
The differences with Web 2.0 client application project includes:- There are 3 default packages: client, common, server.
- the client package is used to contain UI handlers. This package only generates JavaScript.
- the common package can be used to contain common libraries, records etc. This package generates both Java and JavaScript.
- the server package can be used to contain service parts. This package generates both Java and JavaScript.
- There are 3 default packages: client, common, server.


Add New Project Type
EDT is extensible both in the language and the IDE. Developers can implement their own language feature by extending compilers and generaters and the IDE. An example of an extension is the New project wizard and project types. For instance, you may want to create an EGL project template with settings for your own widget library and with 2 default packages starting with your company name. You could also add parameters settings, default handlers that include copyright statements, and more. This section introduces how to extend a new project type by create a simple sample project type.
First of all, you must set up the development environment for EDT. Please refer to EDT:Developer's_Guide_to_Getting_Started_on_EDT for more information.
Create Extension Point
Project templates are implemented as an extension point in org.eclipse.edt.ide.ui<extension-point id="projectTemplates" name="EGL Project Templates" schema="schema/projectTemplates.exsd"/>
- Open org.eclipse.edt.ide.rui plugin project. Open plugin.xml with XML Editor
- Add a new projectTemplates extension point by adding the following line before</plugin>
- category: must be "org.eclipse.edt.ide.ui.projects" for project template
- default: indicates if the project template is the default project type
- description: the description text of the project type, shown in the new project wizard
- icon: the icon of the project template, shown in the new project wizard
- id: must be unique for a project type
- name: the name of the project type, shown in the new project wizard
- templateClass: a Java class which includes the operations when the project is created
- wizardClass: optional field, a Java class which includes the wizard settings pages of the project template. If not specified, the wizard will be the default wizard with the template selection page
<extension
  point="org.eclipse.edt.ide.ui.projectTemplates">
  <template
    category="org.eclipse.edt.ide.ui.projects"
    default="false"
    description="My Sample Project Template"
    icon="icons/templates/WebClientTemplate.gif"
    id="org.eclipse.edt.ide.ui.projects.sample"
    name="Sample Project"
   templateClass="org.eclipse.edt.ide.rui.internal.project.SampleProjectTemplate">
      </template>
</extension>
Create Operations
- Create the new template class. Notice that the package name and class name must comply with the templateClass field of the extension point definition. Set the super class to an existing template to ease the work. org.eclipse.edt.ide.rui.internal.project.WebClientWithServicesProjectTemplate
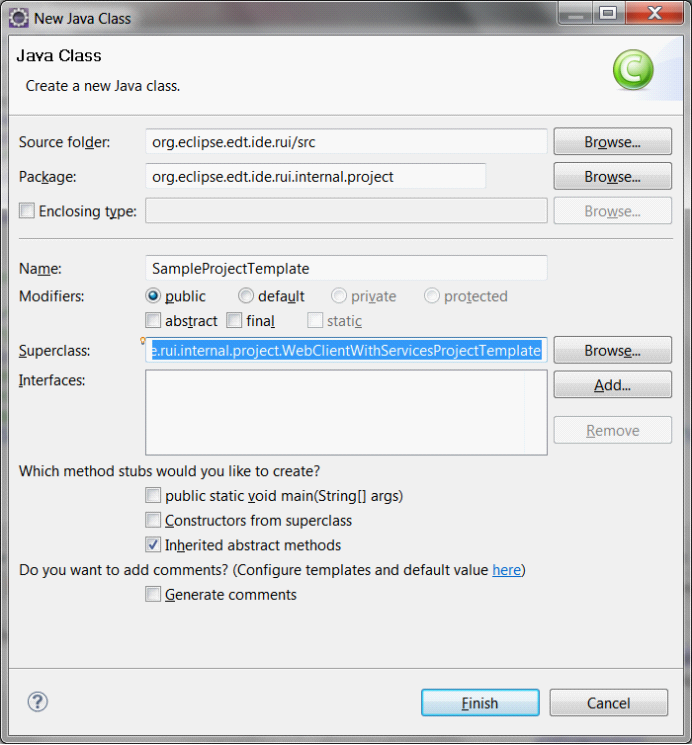
- Implement the class. The completed class file is listed below. Note that EDT only adds a default base package name for the project type.

package org.eclipse.edt.ide.rui.internal.project;

import java.util.List;

import org.eclipse.core.runtime.jobs.ISchedulingRule;
import org.eclipse.edt.ide.ui.wizards.ProjectConfiguration;
import org.eclipse.ui.actions.WorkspaceModifyOperation;

public class SampleProjectTemplate extends WebClientWithServicesProjectTemplate {

	public SampleProjectTemplate() {
		super();
	}

	@Override
	public List<WorkspaceModifyOperation> getOperations(
			ProjectConfiguration eglProjConfiguration, int eglFeatureMask,
			ISchedulingRule rule) {

		eglProjConfiguration.setBasePackageName("samples");

		return super.getOperations(eglProjConfiguration, eglFeatureMask, rule);
	}

}
Use New Project Type
- Run EDT in development mode.
- Open the new EGL project wizard, the new project type is listed in the template list.
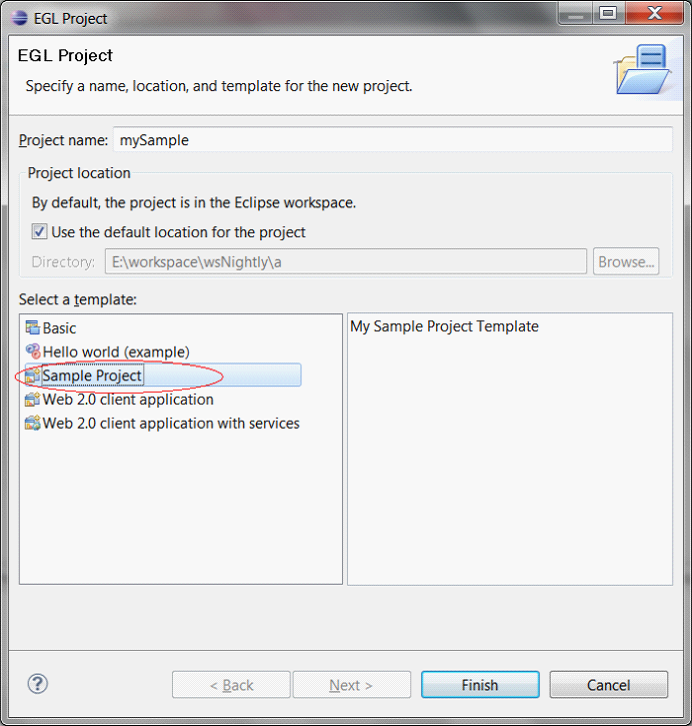
- Click Finish. The new sample project is created. Notice that the base package is samples.