Notice: this Wiki will be going read only early in 2024 and edits will no longer be possible. Please see: https://gitlab.eclipse.org/eclipsefdn/helpdesk/-/wikis/Wiki-shutdown-plan for the plan.
Difference between revisions of "EASE/UnitTest/UI/TestSuiteEditor"
< EASE
| (8 intermediate revisions by the same user not shown) | |||
| Line 7: | Line 7: | ||
* The '''Test Suite Editor''' window allows the user to implement the tests in a configurable way, and to run them, see the figure below for a screenshot example of this window: | * The '''Test Suite Editor''' window allows the user to implement the tests in a configurable way, and to run them, see the figure below for a screenshot example of this window: | ||
| − | [[File:ScreenshotTestSuiteEditor.PNG| | + | [[File:ScreenshotTestSuiteEditor.PNG|700px]] |
* The '''Script Unit Test''' window allows the user to visualize the summary of results after the tests are run, see the figure below for a screenshot example of this window: | * The '''Script Unit Test''' window allows the user to visualize the summary of results after the tests are run, see the figure below for a screenshot example of this window: | ||
| − | [[File:ScreenshotScriptUnitTest.PNG| | + | [[File:ScreenshotScriptUnitTest.PNG|700px]] |
* The '''Test Suite Editor''' is an UI window that contains several pages, and which allows the user to create, to modify and to monitor the tests. | * The '''Test Suite Editor''' is an UI window that contains several pages, and which allows the user to create, to modify and to monitor the tests. | ||
* The EASE Scripting Unit Testing Framework uses the following basic concepts for implementing and running a test instance: | * The EASE Scripting Unit Testing Framework uses the following basic concepts for implementing and running a test instance: | ||
| Line 23: | Line 23: | ||
** <code>Description</code>: containing a description of the test. | ** <code>Description</code>: containing a description of the test. | ||
** <code>Variables</code>: allowing to define input configuration parameters as variables for the test, see the figure below for a screenshot example of this page: | ** <code>Variables</code>: allowing to define input configuration parameters as variables for the test, see the figure below for a screenshot example of this page: | ||
| − | [[File:ScreenshotVariablesEditor.PNG| | + | [[File:ScreenshotVariablesEditor.PNG|700px]] |
| + | ** <code>Variables</code>: allowing to categorize variables in groups, see the figure below for a screenshot example of this page: | ||
| + | [[File:variablesGroupedTree.png|750px]] | ||
** <code>Setup</code>: allowing to setup the test. | ** <code>Setup</code>: allowing to setup the test. | ||
** <code>Source</code>: containing the internal source code of the "Test Suite" instance in XML format. | ** <code>Source</code>: containing the internal source code of the "Test Suite" instance in XML format. | ||
| Line 75: | Line 77: | ||
* Drag and drop is supported for generic entities defined in the <code>Variables</code> editor window. | * Drag and drop is supported for generic entities defined in the <code>Variables</code> editor window. | ||
* Drag and drop is supported for multiple selected entities in the <code>Variables</code> editor window. | * Drag and drop is supported for multiple selected entities in the <code>Variables</code> editor window. | ||
| + | * Any entity in the <code>Variables</code> editor window can be renamed by double clicking the entity itself and inserting the new name. | ||
* For a summary of the <code>Variables</code> editor window see the figure below: | * For a summary of the <code>Variables</code> editor window see the figure below: | ||
| − | [[File: | + | [[File:variablesEditorUpdated.png|550px]] |
== Troubleshooting == | == Troubleshooting == | ||
* If errors occur and they cannot be tracked and solved by the error log messages, they should be reported as Bugzilla issues to the responsible party. | * If errors occur and they cannot be tracked and solved by the error log messages, they should be reported as Bugzilla issues to the responsible party. | ||
Latest revision as of 12:01, 26 September 2016
Contents
Introduction
- This page contains a user guide for users that intend to use the Test Suite Editor and the Script Unit Test components in the EASE Unit Testing Framework.
- It addresses any interested party that wants to make use of the EASE Scripting Unit Testing Framework.
General Concepts
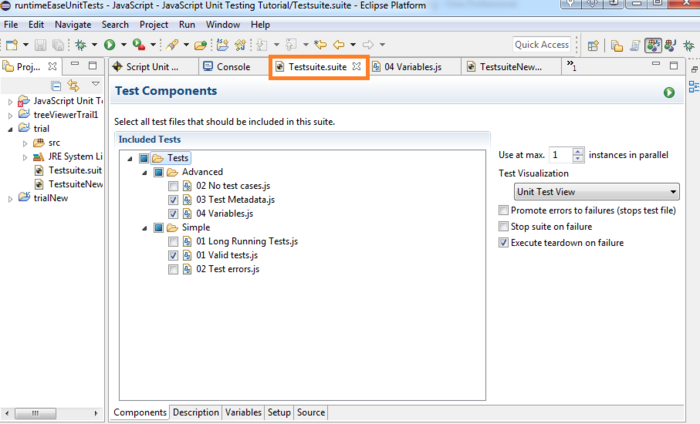
- The Test Suite Editor window allows the user to implement the tests in a configurable way, and to run them, see the figure below for a screenshot example of this window:
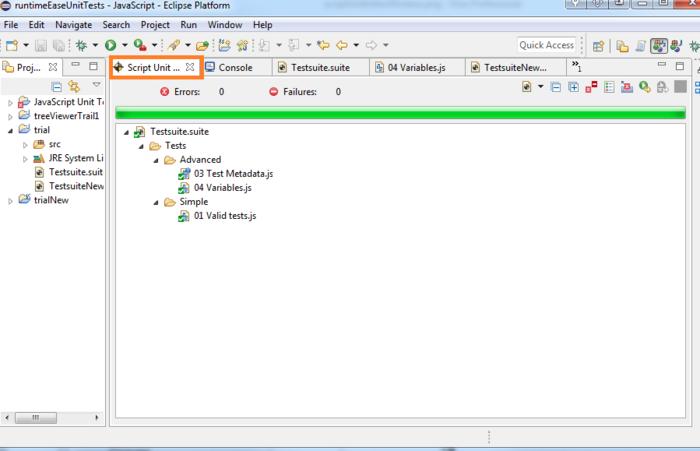
- The Script Unit Test window allows the user to visualize the summary of results after the tests are run, see the figure below for a screenshot example of this window:
- The Test Suite Editor is an UI window that contains several pages, and which allows the user to create, to modify and to monitor the tests.
- The EASE Scripting Unit Testing Framework uses the following basic concepts for implementing and running a test instance:
- A test is composed of several test cases.
- Each test (also called test suite) is defined by a (Script) Test Suite instance.
- Each test case (also called test) is defined by a JavaScript Source File.
- So, each (Script) Test Suite instance contains one or more JavaScript Source File instances.
- And consequently, for writing the test cases, the JavaScript syntax is used.
- Each (Script) Test Suite instance can be modified and monitored by using the Test Suite Editor window.
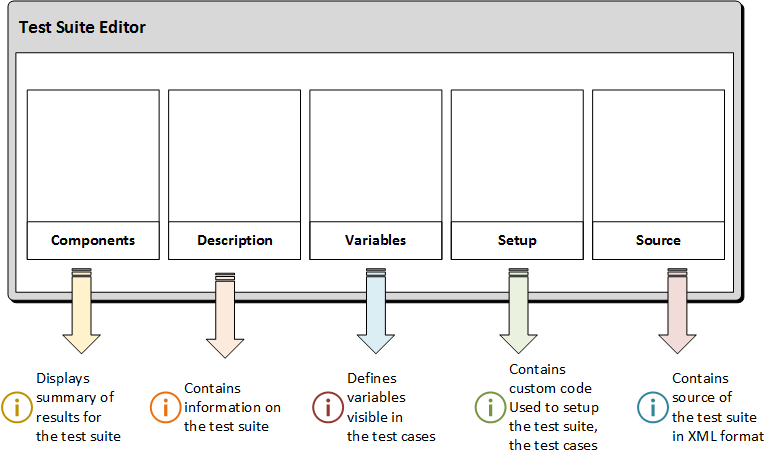
- The Test Suite Editor window contains the following main pages:
-
Components: allowing to select the tests that are to be run. -
Description: containing a description of the test. -
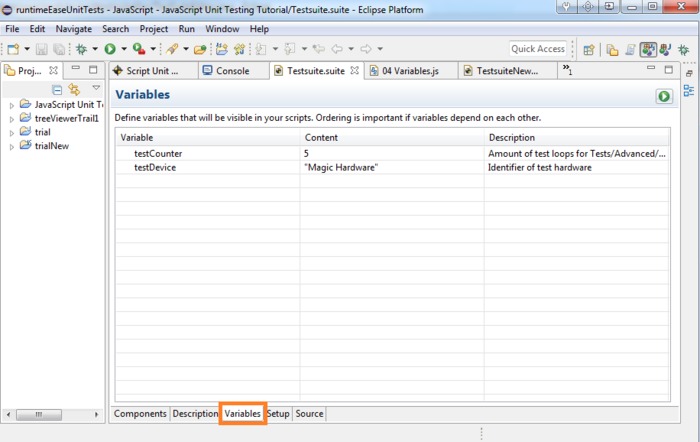
Variables: allowing to define input configuration parameters as variables for the test, see the figure below for a screenshot example of this page:
-
-
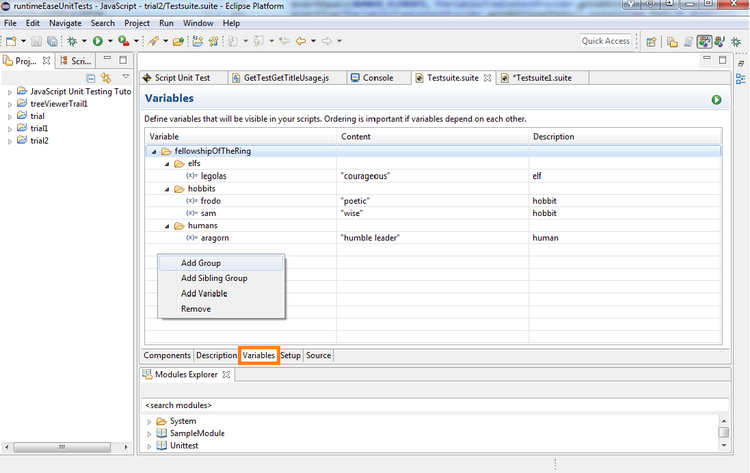
Variables: allowing to categorize variables in groups, see the figure below for a screenshot example of this page:
-
-
Setup: allowing to setup the test. -
Source: containing the internal source code of the "Test Suite" instance in XML format.
-
Prerequisites
- You will need to install at least EASE v0.2.0 to be able to use this feature.
Getting Started
- Create a java project.
- Add a script test suite to your project.
- Add a java script source file to your project to define your test case (this step can be repeated every time a new test case is added to the test).
- Following the previous step, the corresponding
TestSuiteeditor window will be created.- Examples of some basic events to perform in the
TestSuiteeditor window are:- Open the java script source file corresponding to the test case and alter it as required.
- Click
Variablesto define the configuration parameters for the test. - Click
Setupto setup the test. - Click
Componentsto select the test cases that are to be run and clickRunto actually run them.
- Open the
Script Unit Testwindow to visualize the summary of results after the selected tests were run.
- Examples of some basic events to perform in the
Detailed Concepts
- For a summary of the detailed concepts concerning the Test Suite Editor and the Script Unit Test components, see the figure below:
Script Unit Test Window
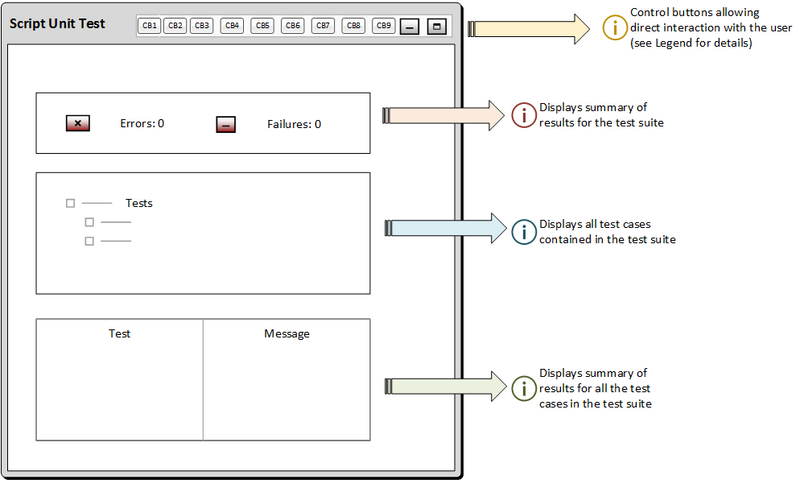
- Script Unit Test window allows the user to monitor the results and the summary of the tests defined for a test suite.
- Script Unit Test window contains four main areas, as visualized in the figure below:
Test Suite Editor Window
Preliminaries
- Test Suite Editor window allows to implement the test defined for a specific test suite.
- Any test suite can contain as many tests as needed.
- Test Suite Editor window contains the following page editors (with corresponding purposes for each editor), as visualized in the figure below:
Main Pages
- Variables
-
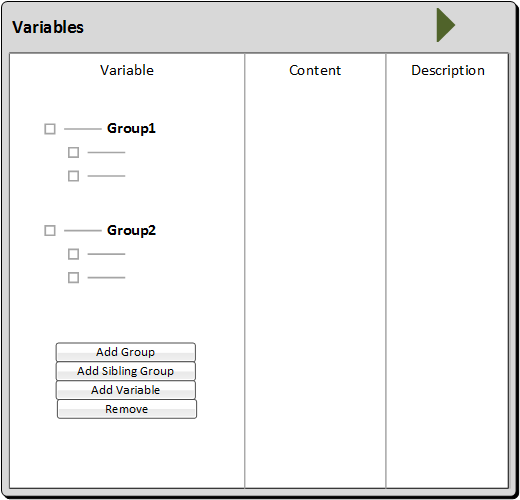
Variableseditor window allows definition of configuration parameters as variables for the test cases contained in the test suite instance. -
Variableseditor window comprises three columns, i.e. variable, content, and description columns. - The variables can be categorized in groups.
- All the elements of the window are contained in a tree data structure.
- Groups and variables are created via a context menu, which allows:
- to add groups to the currently selected group in the tree.
- to add sibling groups to the currently selected group or variable in the tree.
- to add variables to the currently selected group in the tree.
- to remove any selected element from the tree.
- Any entity in the tree can be dragged and dropped in the corresponding group.
- Drag and drop is supported for generic entities defined in the
Variableseditor window. - Drag and drop is supported for multiple selected entities in the
Variableseditor window. - Any entity in the
Variableseditor window can be renamed by double clicking the entity itself and inserting the new name. - For a summary of the
Variableseditor window see the figure below:
Troubleshooting
- If errors occur and they cannot be tracked and solved by the error log messages, they should be reported as Bugzilla issues to the responsible party.

