Notice: this Wiki will be going read only early in 2024 and edits will no longer be possible. Please see: https://gitlab.eclipse.org/eclipsefdn/helpdesk/-/wikis/Wiki-shutdown-plan for the plan.
Difference between revisions of "DLTK Validators User Guide"
| (12 intermediate revisions by one other user not shown) | |||
| Line 1: | Line 1: | ||
| + | [[Category:DLTK]] | ||
DLTK Validators Framework provides tools to run custom scripts on your source files and integrate these scripts into your workbench. Such scripts are commonly targeted to find and report problems in source files - so they are called "validators" or "checkers". DLTK Validators framework provides flexible yet simple way to manage checkers. | DLTK Validators Framework provides tools to run custom scripts on your source files and integrate these scripts into your workbench. Such scripts are commonly targeted to find and report problems in source files - so they are called "validators" or "checkers". DLTK Validators framework provides flexible yet simple way to manage checkers. | ||
| − | + | == Getting Started == | |
| − | == | + | |
| − | + | ||
| − | + | ||
There are two types of checkers currently supported in DLTK Validators Framework: External Checker and ActiveState Tcl Checker. External checker allows you to integrate custom scripts. Tcl Checker - a batch mode code analyzer that uncovers errors in Tcl language scripts. | There are two types of checkers currently supported in DLTK Validators Framework: External Checker and ActiveState Tcl Checker. External checker allows you to integrate custom scripts. Tcl Checker - a batch mode code analyzer that uncovers errors in Tcl language scripts. | ||
| − | == | + | == External Checker Tutorial == |
| − | + | ||
| − | + | ||
You need to have DLTK Project created in your workspace. If you want to integrate any number of custom checkers into your project, follow these steps: | You need to have DLTK Project created in your workspace. If you want to integrate any number of custom checkers into your project, follow these steps: | ||
| Line 26: | Line 22: | ||
[[Image:Tutorial3.JPG]] | [[Image:Tutorial3.JPG]] | ||
| − | 4. Type name of the validator into '''Validator name''' text field. The name may be completely arbitrary - you will use names to distinguish between validators on your list. | + | |
| + | 4.Type name of the validator into '''Validator name''' text field. The name may be completely arbitrary - you will use names to distinguish between validators on your list. | ||
[[Image:VTutorial4.JPG ]] | [[Image:VTutorial4.JPG ]] | ||
| + | |||
5. Provide a path to your script in the '''Command to run checker field'''. | 5. Provide a path to your script in the '''Command to run checker field'''. | ||
| Line 43: | Line 41: | ||
[[Image:VTutorial6.JPG ]] | [[Image:VTutorial6.JPG ]] | ||
| + | |||
7. Into '''Filename extensions''' text field type extensions of files on which the script must be performed. Separate extensions by commas. Use * if you want to run script on all the files. | 7. Into '''Filename extensions''' text field type extensions of files on which the script must be performed. Separate extensions by commas. Use * if you want to run script on all the files. | ||
[[Image:Tutorial7.JPG ]] | [[Image:Tutorial7.JPG ]] | ||
| + | |||
8. We have configured the input for DLTK Validators. | 8. We have configured the input for DLTK Validators. | ||
Now let's configure the output. Validator is supposed generate error and/or warning reports. However to integrate these reports into workbench infrastructure DLTK validators Framework must be familiar with the format of such reports. So we provide interface for errors and warnings reports specification. Consider the following example of error report: | Now let's configure the output. Validator is supposed generate error and/or warning reports. However to integrate these reports into workbench infrastructure DLTK validators Framework must be familiar with the format of such reports. So we provide interface for errors and warnings reports specification. Consider the following example of error report: | ||
| + | |||
''Error: myfile.tcl: line 16 Something wrong here'' | ''Error: myfile.tcl: line 16 Something wrong here'' | ||
| − | |||
| − | + | In this line we have the following tokens: | |
| − | + | ||
| − | + | ||
| − | ''Something wrong here'' | + | <table> |
| − | + | <tr> | |
| + | <td> ''myfile.tcl'' </td> | ||
| + | <td>-name of file where error has been found </td> | ||
| + | </tr> | ||
| + | <tr> | ||
| + | <td>''16''</td> | ||
| + | <td>-number of line where error is located </td> | ||
| + | </tr> | ||
| + | <tr> | ||
| + | <td>''Something wrong here''</td> | ||
| + | <td>-message describing the error</td> | ||
| + | </tr> | ||
| + | </table> | ||
We assume that above mentioned tokens: file name, line number and problem message are common for problem reports. So we provide set of predefined wildcards which you can use to define set of output rules. | We assume that above mentioned tokens: file name, line number and problem message are common for problem reports. So we provide set of predefined wildcards which you can use to define set of output rules. | ||
| − | + | <table> | |
| − | %f | + | <tr> |
| − | + | <td> ''%f'' </td> | |
| − | + | <td>-file name</td> | |
| − | + | </tr> | |
| − | %m | + | <tr> |
| − | + | <td>''16''</td> | |
| + | <td>-number of line where error is located </td> | ||
| + | </tr> | ||
| + | <tr> | ||
| + | <td> ''%m''</td> | ||
| + | <td>-problem message</td> | ||
| + | </tr> | ||
| + | </table> | ||
So let's write a rule that assigns "error" to the pattern in our example: Error: %f line %n %m | So let's write a rule that assigns "error" to the pattern in our example: Error: %f line %n %m | ||
| − | Now push Add Rule button and type your pattern into pattern Output rule column of Pattern rules table | + | Now push '''Add Rule''' button and type your pattern into pattern '''Output rule''' column of '''Pattern rules''' table |
[[Image:VTutorial8.JPG]] | [[Image:VTutorial8.JPG]] | ||
| − | + | 8. Select appropriate problem type from the drop down menu of the '''Type''' column. The default value is '''Error''', but you can select '''Warning''' if you need to. | |
| − | 8. Select appropriate problem type from the drop down menu of the Type column. The default value is Error, but you can select Warning if you need to. | + | |
[[Image:VTutorial9.JPG ]] | [[Image:VTutorial9.JPG ]] | ||
| − | |||
| − | |||
9. Repeat the steps 7-8 to add all the patterns you want to match | 9. Repeat the steps 7-8 to add all the patterns you want to match | ||
| − | 11. Push Ok. | + | 11. Push '''Ok'''. |
| − | + | ||
10. Repeat the steps 3-9 to add and configure all the external scripts you want to use. | 10. Repeat the steps 3-9 to add and configure all the external scripts you want to use. | ||
| + | 11. Return to '''Validators''' preferences page and select a checkboxes on those items which you want to run with the project build. | ||
| − | + | [[Image:VTutorial10.JPG]] | |
| − | + | ||
| − | + | ||
| − | + | ||
12. Now external checkers are configured. Let's see what output you get and how it is integrated into your workbench infrastructure. Run project build. | 12. Now external checkers are configured. Let's see what output you get and how it is integrated into your workbench infrastructure. Run project build. | ||
| − | 13. Open Console view (if it is not opened by default). You 'll see an output of the checker. The line matched by the error pattern became hyperlink. | + | 13. Open '''Console''' view (if it is not opened by default). You 'll see an output of the checker. The line matched by the error pattern became hyperlink. |
| + | [[Image:Ext checker console.JPG]] | ||
It navigates to the line of the file where problem has been detected. The problem itself is marked by the typical Eclipse error marker: | It navigates to the line of the file where problem has been detected. The problem itself is marked by the typical Eclipse error marker: | ||
| + | [[Image:VTutorial12.JPG]] | ||
| + | 14. Open '''Problems''' view. You'll see the error displayed in a manner compiler/interpreter errors and warnings are shown. | ||
| − | + | [[Image:VTutorial13.JPG]] | |
| − | + | ||
| Line 120: | Line 133: | ||
Have fun! | Have fun! | ||
| + | == Tcl Checker Tutorial == | ||
| − | |||
You need to have DLTK Project created in your workspace. | You need to have DLTK Project created in your workspace. | ||
| − | 1. Run Window -> Preferences | + | 1. Run '''Window''' -> '''Preferences''' |
| + | [[Image:ValidTutorial1.JPG]] | ||
2. From the tree view of Preferences page select DLTK -> Validators. In the Validators table select Tcl Checker and push Edit Button | 2. From the tree view of Preferences page select DLTK -> Validators. In the Validators table select Tcl Checker and push Edit Button | ||
| + | [[Image:Choose_checker.jpg]] | ||
| + | 3. In '''Edit Validator''' dialog box provide configuration options for Tcl Checker: correct path to Tcl Checker binary, Working mode and list of supressed problems. | ||
| − | + | [[Image:Tcl_opptions.jpg ]] | |
| + | 4. Push '''Ok'''. Now Tcl Checker is integrated into your workbench. | ||
| − | |||
| − | |||
| − | |||
| − | |||
| + | == How to run checkers without building a project. == | ||
| − | + | 1. Select source files in Package Explorer. | |
| − | + | ||
| + | 2. From the context menu select '''DLTK Validators -> Validate Selection With Console''' | ||
| + | [[Image:Console_edit.jpg]] | ||
| − | + | == How to edit validators == | |
| − | 1. From the menu bar select | + | 1. From the menu bar select '''Window -> Preferences'''. |
| − | 2. From the tree view of Preferences page select DLTK -> Validators. | + | 2. From the tree view of '''Preferences''' page select''' DLTK -> Validators'''. |
| − | 3. From the Validators table select the validator and push Edit button | + | 3. From the '''Validators''' table select the validator and push '''Edit''' button |
4. Provide options for validator | 4. Provide options for validator | ||
| − | 5. | + | 5. Push '''Ok''' |
Latest revision as of 09:28, 6 May 2008
DLTK Validators Framework provides tools to run custom scripts on your source files and integrate these scripts into your workbench. Such scripts are commonly targeted to find and report problems in source files - so they are called "validators" or "checkers". DLTK Validators framework provides flexible yet simple way to manage checkers.
Contents
Getting Started
There are two types of checkers currently supported in DLTK Validators Framework: External Checker and ActiveState Tcl Checker. External checker allows you to integrate custom scripts. Tcl Checker - a batch mode code analyzer that uncovers errors in Tcl language scripts.
External Checker Tutorial
You need to have DLTK Project created in your workspace. If you want to integrate any number of custom checkers into your project, follow these steps:
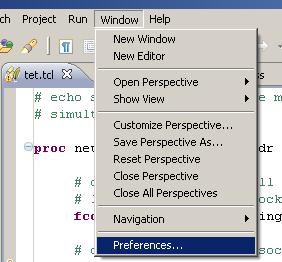
1. From the menu bar select Window -> Preferences.
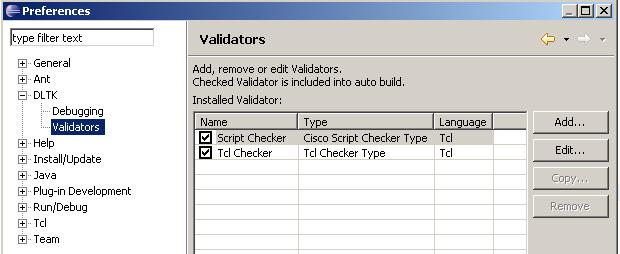
2. From the tree view of Preferences page select DLTK -> Validators. You'll see Validators page where you can add, remove and edit validators.
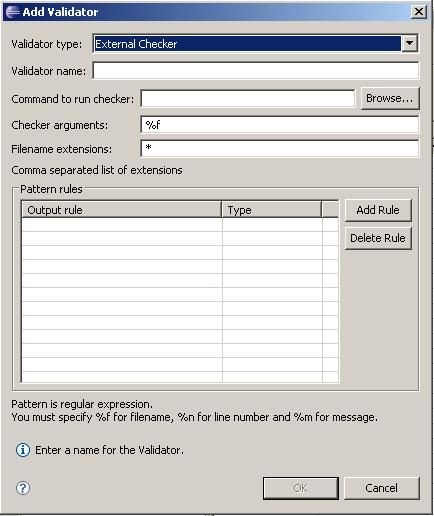
3. Push Add button. You'll see Add Validator dialog box. In the Validator Type drop down menu select External Checker.
4.Type name of the validator into Validator name text field. The name may be completely arbitrary - you will use names to distinguish between validators on your list.
5. Provide a path to your script in the Command to run checker field.
On Unix/Linux: Provide a path to any file that is marked as executable. on Windows: Provide a path to .bat file or .exe file.
You can use Browse... button to locate file on your hard drive.
6. Type arguments of your validation script into Checker arguments text field. You can use %f wildcard as a substitute for input file name.
7. Into Filename extensions text field type extensions of files on which the script must be performed. Separate extensions by commas. Use * if you want to run script on all the files.
8. We have configured the input for DLTK Validators.
Now let's configure the output. Validator is supposed generate error and/or warning reports. However to integrate these reports into workbench infrastructure DLTK validators Framework must be familiar with the format of such reports. So we provide interface for errors and warnings reports specification. Consider the following example of error report:
Error: myfile.tcl: line 16 Something wrong here
In this line we have the following tokens:
| myfile.tcl | -name of file where error has been found |
| 16 | -number of line where error is located |
| Something wrong here | -message describing the error |
We assume that above mentioned tokens: file name, line number and problem message are common for problem reports. So we provide set of predefined wildcards which you can use to define set of output rules.
| %f | -file name |
| 16 | -number of line where error is located |
| %m | -problem message |
So let's write a rule that assigns "error" to the pattern in our example: Error: %f line %n %m
Now push Add Rule button and type your pattern into pattern Output rule column of Pattern rules table
8. Select appropriate problem type from the drop down menu of the Type column. The default value is Error, but you can select Warning if you need to.
9. Repeat the steps 7-8 to add all the patterns you want to match
11. Push Ok.
10. Repeat the steps 3-9 to add and configure all the external scripts you want to use.
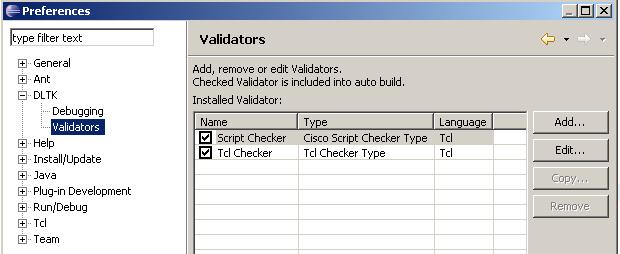
11. Return to Validators preferences page and select a checkboxes on those items which you want to run with the project build.
12. Now external checkers are configured. Let's see what output you get and how it is integrated into your workbench infrastructure. Run project build.
13. Open Console view (if it is not opened by default). You 'll see an output of the checker. The line matched by the error pattern became hyperlink.
It navigates to the line of the file where problem has been detected. The problem itself is marked by the typical Eclipse error marker:
14. Open Problems view. You'll see the error displayed in a manner compiler/interpreter errors and warnings are shown.
The problem detected by your external script is now fully integrated into Eclipse workbench infrastructure.
Have fun!
Tcl Checker Tutorial
You need to have DLTK Project created in your workspace.
1. Run Window -> Preferences
2. From the tree view of Preferences page select DLTK -> Validators. In the Validators table select Tcl Checker and push Edit Button
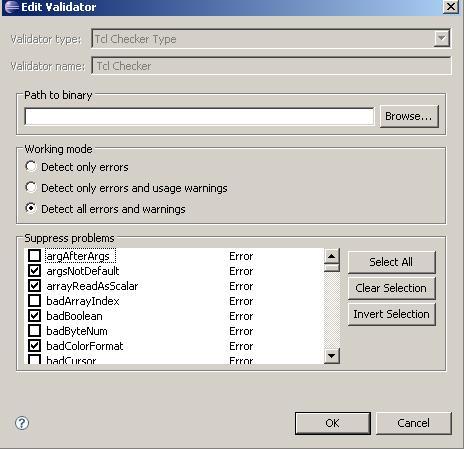
3. In Edit Validator dialog box provide configuration options for Tcl Checker: correct path to Tcl Checker binary, Working mode and list of supressed problems.
4. Push Ok. Now Tcl Checker is integrated into your workbench.
How to run checkers without building a project.
1. Select source files in Package Explorer.
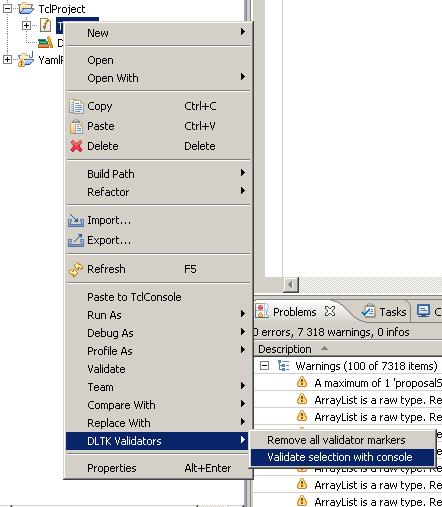
2. From the context menu select DLTK Validators -> Validate Selection With Console
How to edit validators
1. From the menu bar select Window -> Preferences.
2. From the tree view of Preferences page select DLTK -> Validators.
3. From the Validators table select the validator and push Edit button
4. Provide options for validator
5. Push Ok

