Notice: this Wiki will be going read only early in 2024 and edits will no longer be possible. Please see: https://gitlab.eclipse.org/eclipsefdn/helpdesk/-/wikis/Wiki-shutdown-plan for the plan.
DD Manual Test Plan
Nav: DSDP/DD | DSDP/DD/Testing | DD Test Instructions | DD Known Issues and Workarounds | DD Manual Test Plan
DSF Features
Debug view
- Launch
- Check: debug perspective activated on launch
- Check: debug view activated on launch
- Check: stack frame selected on break on main after launch
- Target
- Check: process name shown in label
- Expand process to show threads.
- Select the target
- Check: resume/suspend operations are enabled
- Try resuming suspending
- Check: all threads should resume/suspend
- Check: stepping operations should be disabled
- Terminating the target
- Check: Terminated target should remain in the view with a "<terminated>" label prefix a terminated target icon.
- Run program to the completion,
- Check: target should change state to terminated.
- Threads
- Check: thread label shows thread ID and the current status.
- Select a thread.
- Check: resume/suspend operations should be enabled
- Check: step operations should also be enabled
- Try resuming/suspending/stepping
- Try stepping fast by holding down the F5 key
- Run a multi-threaded program
- Check: new threads should be added to the bottom of the thread list as they are created
- Check: exited threads are removed from the thread list
- Expand threads to show stack traces
- Check: When stepping a thread, other threads should remain collapsed/expanded as they were
- Stack frames
- Check: frame label should contain:
- Stack frame number
- Function name if known
- File and line
- Current program counter
- Select a stack frame
- Check: source editor is opened and positioned to the location of the PC
- Check: run control operations should be the same as when a thread is selected
- Check: when a thread hits a breakpoint, that thread's stack frame is automatically selected
- Check: frame label should contain:
- Source Display
- Run a program with multiple source files
- Set a breakpoint at a function call which is in another source file
- Run to breakpoint
- Check: the source file with the breakpoint is displayed
- Step into the function
- Check: the new source file is displayed at the start of the new function
Variables view
- Stop a debugged program when it has at least two stack levels
- Open variables view
- Check that all variables of the current stack are shown
- Check that all values are shown
- Check that the layout menu behaves as expected
- Check that complex variables have a little arrow on the left
- Check that the arrow can be expanded to show children
- Select different variables in the view and check that the details pane shows the different formats
- Scroll down in the variable view
- Check that newly displayed variables are correct
- Change the stack frame in the debug view
- Check that the variables view properly shows the variables for the selected stack frame
- Go back to the previous stack frame in the debug view
- Check that the variables view properly shows the variables for the selected stack frame
- Step the program
- Check that variable changes are reflected in the view and highlighted in color
- Select a variable and change its value in the variables view
- Check that the value is shown in the view
- Step the program
- Check that the value for the changed variable is still correct
Registers view
Expressions view
- Stop a debugged program when it has at least two stack levels
- Open expressions view
- Create two or tree expressions including some of children of variables
- Check that an expression can be added with the "Add new expression" line
- Check that an expression can be added with "Add Watch Expression" context menu
- Check that the created expressions are shown
- Check that expressions values are shown
- Check that the layout menu works as expected
- Check that complex expressions have a little arrow on the left
- Check that the arrow can be expanded to show children
- Select different expressions in the view and check that the details pane shows the different formats
- Add expressions to allow to scroll down in the expressions view
- Check that newly displayed expressions are correct
- Change the stack frame in the debug view
- Check that the expressions view properly shows the expressions for the selected stack frame
- Go back to the previous stack frame in the debug view
- Check that the expressions view properly shows the expressions for the selected stack frame
- Step the program
- Check that expressions changes are reflected in the view and highlighted in color
- Select a expressions and change its value in the expressions view
- Check that the value is shown in the view
- Step the program
- Check that the value for the changed expression is still correct
- Remove an expression using the context menu
- Check that the expression is removed
- Check that the same expression can be added again
- Remove all expressions using the context menu "Remove all..." command
- Check that all expressions are removed
- Check that expressions can be added again
- Modify an expression directly in the view
- Check that the expression changes and its value and type correspond to the new expression
Modules view
- Start a debug session and open the Modules view.
- Select the process in Debug view
- Check that the list of modules is shown in the Modules view.
- Select a thread then a stack frame in Debug view.
- Check that the Modules view still shows a list of loaded modules.
- Select a module in the modules view.
- Check that the detailed module info (type, symbols loaded, file, base address, size) are shown.
Number formats detail pane
Update modes
Breakpoints (General)
Before you start...
- To avoid stack overflow, set memory to 512M
- In the launch configuration, Arguments tab, VM arguments section: -Xmx512M
- To ensure integrity between the UI and the back-end, all verifications (Check:) are performed from 3 points:
- Back-end activities with GDB/MI traces
- Back-end breakpoint status with "info break" at the console
- Platform breakpoint status in Breakpoint View (with Breakpoint Properties)
Breakpoints
- Test Setup
- Launch the Eclipse workbench
- Start a DSF debug session (DsfBreakpoints)
- Test 1: Breakpoint setting
- In the editor, add a new line breakpoint (BP-1)
- Check: A new breakpoint is inserted and it is enabled
- In the editor, enable the "Show Full Paths" check box
- Check: The breakpoint full path is displayed in the view
- In the editor, disable the "Show Full Paths" check box
- Check: The breakpoint full path is not displayed in the view
- Test 2: Breakpoint activation
- Test 3: Breakpoint condition
- Set an invalid condition on BP-1
- Check: The update is rejected and BP-1 is not changed
- Set a valid condition on BP-1
- Check: The update is accepted and BP-1 has the new condition
- Set an invalid condition on BP-1
- Check: The update is rejected and BP-1 kept the valid condition
- Clear the BP-1 condition
- Check: The update is accepted and BP-1 no longer has a condition
- Test 4: Breakpoint ignore count
- Test 5: Breakpoint deletion (simple)
- From the GUI, delete BP-1
- Check: BP-1 is removed
- Test 6: Breakpoint persistence
- Create 4 breakpoints with the following characteristics:
- BP-1: enabled, no condition, no ignore count
- BP-2: disabled, with condition, no ignore count
- BP-3: disabled, no condition, with ignore count
- BP-4: enabled, with condition, with ignore count
- Check: The 4 breakpoints are correctly created
- Terminate the debugging session
- Start a new debugging session
- Check: The 4 breakpoints are correctly restored
- Terminate the debugging session
- Enable all breakpoints
- Start a new debugging session
- Check: The 4 breakpoints are correctly restored (and enabled)
- Create 4 breakpoints with the following characteristics:
- Test 7: Breakpoint deletion (multiple)
- From the GUI, delete BP-1, BP-2, BP-3 and BP-4
- Check: the 4 breakpoints are removed
- Test 8: Import/export breakpoints to file
- Create 4 breakpoints with the following characteristics:
- BP-1: enabled, no condition, no ignore count
- BP-2: disabled, with condition, no ignore count
- BP-3: disabled, no condition, with ignore count
- BP-4: enabled, with condition, with ignore count
- Check: The 4 breakpoints are correctly created
- Export the 4 breakpoints to file
- Check: The breakpoints file is created
- Remove all breakpoints
- Check: The 4 breakpoints are removed
- Import the breakpoint file
- Check: The 4 breakpoints are correctly restored
- Remove all breakpoints
- Terminate the debugging session
- Start a new debugging session
- Check: No breakpoint is installed
- Import the breakpoint file
- Check: The 4 breakpoints are correctly restored
- Create 4 breakpoints with the following characteristics:
Watchpoints
- Test Setup
- Launch the Eclipse workbench
- Start a DSF debug session (DsfBreakpoints)
- Test 1: Watchpoint setting
- In the Breakpoint View, add a new watchpoint (WP-1)
- Check: A new watchpoint is inserted and it is enabled
- Test 2: Watchpoint activation
- Test 3: Watchpoint condition
- Set an invalid condition on WP-1
- Check: The update is rejected and WP-1 is not changed
- Set a valid condition on WP-1
- Check: The update is accepted and WP-1 has the new condition
- Set an invalid condition on WP-1
- Check: The update is rejected and WP-1 kept the valid condition
- Clear the WP-1 condition
- Check: The update is accepted and WP-1 no longer has a condition
- Test 4: Watchpoint ignore count
- Test 5: Watchpoint deletion (simple)
- From the GUI, delete WP-1
- Check: WP-1 is removed
- Test 6: Watchpoint persistence
- Create 4 watchpoints with the following characteristics:
- WP-1 enabled, write, no condition, no ignore count
- WP-2 disabled, read, with condition, no ignore count
- WP-3 disabled, read/write, no condition, with ignore count
- WP-4 enabled, write, with condition, with ignore count
- Check: The 4 watchpoints are correctly created
- Terminate the debugging session
- Start a new debugging session
- Check: The 4 watchpoints are correctly restored
- Terminate the debugging session
- Enable all watchpoints
- Start a new debugging session
- Check: The 4 watchpoints are correctly restored (and enabled)
- Create 4 watchpoints with the following characteristics:
- Test 7: Watchpoint deletion (multiple)
- From the GUI, delete WP-1, WP-2, WP-3 and WP-4
- Check: The 4 watchpoints are removed
- Test 8: Import/export watchpoints to file
- Create 4 watchpoints with the following characteristics:
- WP-1 enabled, write, no condition, no ignore count
- WP-2 disabled, read, with condition, no ignore count
- WP-3 disabled, read/write, no condition, with ignore count
- WP-4 enabled, write, with condition, with ignore count
- Check: The 4 watchpoints are correctly created
- Export the 4 watchpoints to file
- Check: The watchpoints file is created
- Remove all watchpoints
- Check: The 4 watchpoints are removed
- Import the watchpoints file
- Check: The 4 watchpoints are correctly restored
- Remove all watchpoints
- Terminate the debugging session
- Start a new debugging session
- Check: No watchpoints is installed
- Import the watchpoints file
- Check: The 4 watchpoints are correctly restored
- Create 4 watchpoints with the following characteristics:
Skip All Button
- Test Setup
- Launch the Eclipse workbench
- Create 3 line breakpoints (anything will do)
- Start a DSF debug session (DsfBreakpoints)
- Check: Breakpoints are created and enabled
- Test 1: Simple ON/OFF
- Test 2: ON/OFF with some disabled BPs
- Disable BP 2
- Check: Only BP-2 is disabled
- Toggle the SAB to ON
- Check: All breakpoints are disabled
- Toggle the SAB to OFF
- Check: BPs 1, 3 are enabled
- Disable BP 1 and 3
- Enable BP 2
- Check: Only BP-2 is enabled
- Toggle the SAB to ON
- Check: All breakpoints are disabled
- Toggle the SAB to OFF
- Check: Only BP-2 is enabled
- Test 3: ON/OFF with all BPs disabled
- Test 4: Change BPs state while OFF
- Test 6: Startup
GDB Features
GDB Basic Sanity Test
- Check out and build the sanity test project from /cvsroot/dsdp/org.eclipse.dd.dsf/tests/SanityTest
- Launch the DSF debugger with break at main
- Follow instructions in the test.
Launching
- Perspective
- In Preferences->Run/Debug->Perspectives, make sure that at least one perspective change option is set to prompt.
- Set the java or c++ perspective
- Launch a DSF program
- Verify that there is a prompt to switch perspective to Debug, Answer yes
- Verify the perspective switches
- Expanding after launch
- Verify from the above test that the Debug view has a selection to the top-most thread
- Close Debug view
- Open Debug view
- Verify that the Debug view has a selection to the top-most thread
- Break on main
- Set a valid break-on-main symbol, and launch.
- Check: the program breaks at the correct location.
- Set an invalid break-on-main symbol, and launch.
- Check: the launch should fail with an error from creating the break-on-main breakpoint
- Set a break-on-main symbol that is not reachable by the program, but the program continues running, and launch.
- Check: the launch should complete as if there was no break-on-main symbol set.
- Set a break-on-main symbol that is not reachable by the program, but and the program exits quickly.
- Check: the launch should complete and the program should run and terminate normally.
Breakpoints (CDT)
Before you start...
- To avoid stack overflow, set memory to 512M
- In the launch configuration, Arguments tab, VM arguments section: -Xmx512M
- To ensure integrity between the UI and the back-end, all verifications (Check:) are performed from 3 points:
- Back-end activities with GDB/MI traces
- Back-end breakpoint status with "info break" at the console
- Platform breakpoint status in Breakpoint View (with Breakpoint Properties)
Thread Filters
- Test Setup
- Test 1: Filter out a thread
- Test 2: Filtered thread substitution
- Test 3: Remove a filtered thread
- Test 4: Add a filtered thread
- Change filter for thread 2, 3
- Check: 2 identical breakpoints are installed, one for each thread selected
- Test 5: Remove thread filters
- Test 6: Initial state propagation
- Test 7: Invalid condition propagation
- Test 8: Valid condition propagation
- Add a valid condition
- Check: Condition is properly set for both breakpoints
- Test 9: Condition/Ignore count removal propagation
- Remove condition and ignore count
- Check: Condition and ignore count are removed from both breakpoints
- Test 10: State persistence
- Test 11: Simultaneous update of state and thread filter
- Add filter for threads 1, 2, a valid condition and an ignore count
- Check: The original breakpoint is removed
- Check: 2 new breakpoints are set with proper ignore count, condition
- Remove thread filter
- Check: The breakpoints for threads 1, 2 are removed
- Check: A new breakpoint is set with the correct condition, ignore count and no thread filter
- Test 12: Addition of thread filter, invalid condition and ignore count
- Add filter for threads 1, 2, invalid condition, ignore count
- Check: The original breakpoint is removed
- Check: 2 new breakpoints are set with proper ignore count and old (valid) condition
- Remove thread filter
- Check: The breakpoints for threads 1, 2 are removed
- Check: A new breakpoint is set with the correct condition, ignore count and no thread filter
- Test 13: Enable, disable breakpoints
- Disable the breakpoint
- Check: The breakpoint is disabled
- Add filter for threads 1, 2
- Check: The original breakpoint is removed
- Check: 2 new disabled breakpoints are set with proper ignore count, condition
- Enable the breakpoint
- Check: Both back-end breakpoints are enabled
- Remove thread filter
- Check: The breakpoints for threads 1, 2 are removed
- Check: A new (enabled) breakpoint is set with the correct condition, ignore count and no thread filter
Traditional Memory Rendering
IP-XACT Editor
More tests to be added
- Test 1 - GUI additions
- Launch Eclipse with IP-XACT editor installed
- Open or select the Resource perspective.
- Select View/Open perspective/Other..
- Check: that the IP-XACT perspective is in the list shown in the dialog box
- Press cancel
- Select File/New/Other...
- Check: that the dialog box contains an entry for IP-XACT, and when this is expanded it contains an entry for IP-XACT file
- Press cancel
- Select Window/Preferences...
- Check: that the left hand side of the dialog box contains an entry for IP-XACT
- Click on this entry
- Check: that the IP-XACT preferences window appears and contains two modifiable fields: 'Default Vendor Name' and 'Default Library Name'
- Expand the IP-XACT menu item in the left subwindow.
- Check: that it has a sub-entry for 'Document Checker'
- Click on 'Document Checker' in the left subwindow.
- Check: that the Document Checker preferences window appears and contains:
- A 'File Paths Variables' table, with two columns; 'Variable' and 'Value'
- New, Remove, and Edit buttons associated with this table.
- A 'Treat System Variables as File Path Variables' check box associated with this table
- A 'File Paths Roots' table
- New, Remove, Up, and Down buttons associated with this table.
- Test 2 - IP-XACT perspective
- Open the IP-XACT perspective
- Reset the perspective (Window/Reset Perspective)
- Check: The perspective contains the views shown in the attached image, arranged this way (possibly scaled for Eclipse window size etc.)
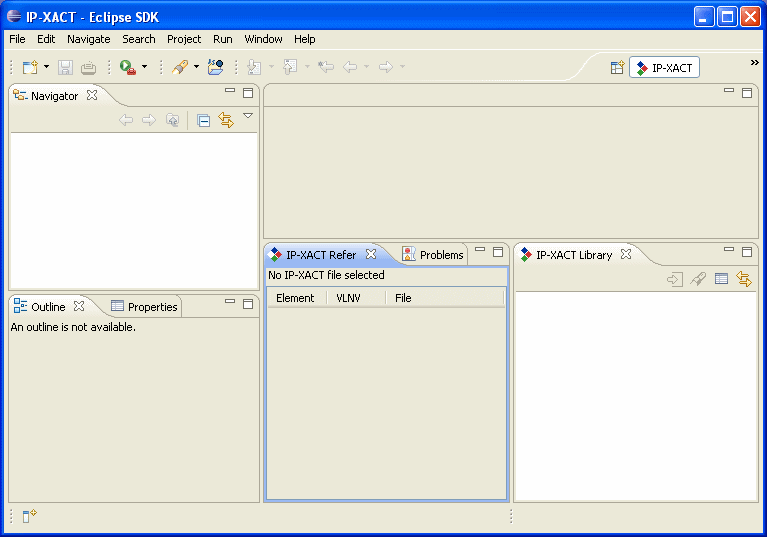
- Check: The IP-XACT icon on the IP-XACT views matches that shown in the image.
- Create a new project with New/Project.../General/Project
- Name the project 'Test'
- In the navigator window right click on the test project and select 'New'
- Check: 'IP-XACT file...' appears in the submenu

- Test 3 - Creating IP-XACT files.
- Right click on 'Test' in the Navigator window
- Select New/IP-XACT file...'
- Check: A wizard starts with title 'Create IP-XACT file'
- Check: The first page of the wizard is file creation dialog with title 'IP-XACT file name', default folder 'Test' and default name 'NewFile.spirit'
- Click 'Next'
- Check: The second page of the wizard has title Select IP-XACT schema standard and a pull down giving the option of 'IP-XACT Standard V1.4' or 'IP-XACT Standard V1.2'
- Select 'IP-XACT Standard V1.4' and click 'Next'
- Note: there may be a slight delay before the next page appears.
- Check: The third page of the wizard appears as shown below:
- Check: The pull-down menu contains the items:
- abstractionDefinition
- abstractor
- busDefinition
- component
- design
- designConfiguration
- generatorChain
- Select 'abstractionDefinition' on the pull-down menu, and leave everything else unchanged. Click Next
- Check: The fourth page of the wizard appears title 'Set VLNV' and four settable fields:
- Vendor - initialized to <username>
- Library - initialized to <username>lib
- Name - initialized to NewFile
- Version - initialized to 1.0
- Click Finish
- Check:
- NewFile.spirit appears under Test in the Navigator window, with an IP-XACT icon
- The IP-XACT editor (with an IP-XACT icon) opens for NewFile.spirit.
- An outline of NewFile.spirit appears in the outline window
- A new entry appears for your user name in the IP-XACT library window
- This does not currently work, see defect 225761. To work round this click on "Refresh Library" in the library window's context menu.
- Check: The pull-down menu contains the items: