Notice: this Wiki will be going read only early in 2024 and edits will no longer be possible. Please see: https://gitlab.eclipse.org/eclipsefdn/helpdesk/-/wikis/Wiki-shutdown-plan for the plan.
Difference between revisions of "Creating an XML Project (ELUG)"
m |
m |
||
| Line 8: | Line 8: | ||
==Introduction to XML Project Creation== | ==Introduction to XML Project Creation== | ||
| − | |||
You can create a project using the Workbench or Java code. | You can create a project using the Workbench or Java code. | ||
| − | We recommend using the Workbench to create projects and generate deployment XML or Java source versions of the project for use at run time. For more information on how to create a project using Workbench, see [[Creating%20a%20Project%20(ELUG)|How to Create a Project Using the Workbench]]. For information on how to create a project using Java, see [[Creating%20a%20Project%20(ELUG)|How to Create a Project Using Java]]. | + | We recommend using the Workbench to create projects and generate deployment XML or Java source versions of the project for use at run time. For more information on how to create a project using Workbench, see [[Creating%20a%20Project%20(ELUG)#How to Create a Project Using the Workbench|How to Create a Project Using the Workbench]]. For information on how to create a project using Java, see [[Creating%20a%20Project%20(ELUG)#How to Create a Project Using Java|How to Create a Project Using Java]]. |
| − | You can use EclipseLink to create an XML project, if you have an XML schema (XSD) document, but no object model yet (see [[#Creating an XML Project from an XML Schema]]). If you have both XSD and object model classes, you can create an XML project using the procedure described in | + | You can use EclipseLink to create an XML project, if you have an XML schema (XSD) document, but no object model yet (see [[#Creating an XML Project from an XML Schema|Creating an XML Project from an XML Schema]]). If you have both XSD and object model classes, you can create an XML project using the procedure described in [[Creating%20a%20Project%20(ELUG)#How to Create a Project Using the Workbench|How to Create a Project Using the Workbench]] |
| − | + | ||
| − | + | ||
For more information, see [[Introduction%20to%20XML%20Projects%20(ELUG)|Introduction to XML Projects]]. | For more information, see [[Introduction%20to%20XML%20Projects%20(ELUG)|Introduction to XML Projects]]. | ||
| Line 22: | Line 19: | ||
==Creating an XML Project from an XML Schema== | ==Creating an XML Project from an XML Schema== | ||
| − | |||
If you have an existing data model (XML schema document), but you do not have a corresponding object model (Java classes for domain objects), use this procedure to create your EclipseLink project and automatically generate the corresponding object model. | If you have an existing data model (XML schema document), but you do not have a corresponding object model (Java classes for domain objects), use this procedure to create your EclipseLink project and automatically generate the corresponding object model. | ||
| − | |||
| − | |||
{| class="Note oac_no_warn" width="80%" border="1" frame="hsides" rules="groups" cellpadding="3" frame="hsides" rules="groups" | {| class="Note oac_no_warn" width="80%" border="1" frame="hsides" rules="groups" cellpadding="3" frame="hsides" rules="groups" | ||
| align="left" | | | align="left" | | ||
| − | '''Note:''' If you have both XSD and object model classes, you can create an XML project using the procedure described in [[Creating%20a%20Project%20(ELUG)|How to Create a Project Using the Workbench]]. | + | '''Note:''' If you have both XSD and object model classes, you can create an XML project using the procedure described in [[Creating%20a%20Project%20(ELUG)#How to Create a Project Using the Workbench|How to Create a Project Using the Workbench]]. |
|} | |} | ||
| Line 36: | Line 30: | ||
Using the EclipseLink JAXB compiler simplifies JAXB application development with EclipseLink by automatically generating both the required JAXB files and the EclipseLink files from your XML schema (XSD) document. Once generated, you can open the Workbench project to fine-tune XML mappings without having to recompile your JAXB object model. | Using the EclipseLink JAXB compiler simplifies JAXB application development with EclipseLink by automatically generating both the required JAXB files and the EclipseLink files from your XML schema (XSD) document. Once generated, you can open the Workbench project to fine-tune XML mappings without having to recompile your JAXB object model. | ||
| − | You can use the EclipseLink JAXB compiler from | + | You can use the EclipseLink JAXB compiler from [[#How to Create an XML Project from an XML Schema Using Workbench|the Workbench]] or from the [[#How to Create an XML Project from an XML Schema Using the Command Line|command line ]]. |
| Line 47: | Line 41: | ||
| − | For more information, see | + | For more information, see: |
| − | + | * [[Introduction%20to%20XML%20Projects%20(ELUG)|#EclipseLink Support for Java Architecture for XML Binding (JAXB)|EclipseLink Support for Java Architecture for XML Binding (JAXB)]] | |
| − | * [[Introduction%20to%20XML%20Projects%20(ELUG)|EclipseLink Support for Java Architecture for XML Binding (JAXB)]] | + | * [[Introduction%20to%20XML%20Projects%20(ELUG)#Using EclipseLink JAXB Compiler Generated Files at Run Time|Using EclipseLink JAXB Compiler Generated Files at Run Time]] |
| − | * [[Introduction%20to%20XML%20Projects%20(ELUG)|Using EclipseLink JAXB Compiler Generated Files at Run Time]] | + | |
===How to Create an XML Project from an XML Schema Using Workbench=== | ===How to Create an XML Project from an XML Schema Using Workbench=== | ||
| − | |||
To create a new, mapped Workbench project from an XML schema using JAXB, use this procedure: | To create a new, mapped Workbench project from an XML schema using JAXB, use this procedure: | ||
| − | |||
# From Workbench, select '''File > New > Project > From XML Schema (JAXB)'''.<br><span id="Figure 53-1"></span>''''' Create Workbench Project using JAXB Dialog Box'''''<br>[[Image:creatjaxb.gif|Create Workbench Project using JAXB Dialog Box]] | # From Workbench, select '''File > New > Project > From XML Schema (JAXB)'''.<br><span id="Figure 53-1"></span>''''' Create Workbench Project using JAXB Dialog Box'''''<br>[[Image:creatjaxb.gif|Create Workbench Project using JAXB Dialog Box]] | ||
| − | # Complete each field on the Create Workbench Project using JAXB dialog box, | + | # Complete each field on the Create Workbench Project using JAXB dialog box, and then click '''OK'''. |
| + | |||
Use the following information to enter data in each field of this dialog box: | Use the following information to enter data in each field of this dialog box: | ||
| − | |||
| Line 73: | Line 64: | ||
| headers="r2c1-t4 r1c2-t4" align="left" | Use these fields to specify your existing JAXB information. | | headers="r2c1-t4 r1c2-t4" align="left" | Use these fields to specify your existing JAXB information. | ||
|- align="left" valign="top" | |- align="left" valign="top" | ||
| − | | id="r3c1-t4" headers="r1c1-t4" align="left" | '''Schema File''' | + | | id="r3c1-t4" headers="r1c1-t4" align="left" | <blockquote>'''Schema File'''</blockquote> |
| headers="r3c1-t4 r1c2-t4" align="left" | Click '''Browse''' and select the fully qualified path to your XSD file. | | headers="r3c1-t4 r1c2-t4" align="left" | Click '''Browse''' and select the fully qualified path to your XSD file. | ||
|- align="left" valign="top" | |- align="left" valign="top" | ||
| − | | id="r4c1-t4" headers="r1c1-t4" align="left" | '''JAXB Customization File''' | + | | id="r4c1-t4" headers="r1c1-t4" align="left" | <blockquote>'''JAXB Customization File'''</blockquote> |
| headers="r4c1-t4 r1c2-t4" align="left" | This in an optional setting. It can be used if you have a standard JAXB configuration file that you wish to use to override the default JAXB compiler behavior. The JAXB customization file contains binding declarations for customizing the default binding between an XSD component and its Java representation. | | headers="r4c1-t4 r1c2-t4" align="left" | This in an optional setting. It can be used if you have a standard JAXB configuration file that you wish to use to override the default JAXB compiler behavior. The JAXB customization file contains binding declarations for customizing the default binding between an XSD component and its Java representation. | ||
|- align="left" valign="top" | |- align="left" valign="top" | ||
| Line 82: | Line 73: | ||
| headers="r5c1-t4 r1c2-t4" align="left" | Use these fields to specify the location and options of the Workbench project. | | headers="r5c1-t4 r1c2-t4" align="left" | Use these fields to specify the location and options of the Workbench project. | ||
|- align="left" valign="top" | |- align="left" valign="top" | ||
| − | | id="r6c1-t4" headers="r1c1-t4" align="left" | ''' Output Directory''' | + | | id="r6c1-t4" headers="r1c1-t4" align="left" |<blockquote>''' Output Directory'''</blockquote> |
| headers="r6c1-t4 r1c2-t4" align="left" | Click '''Browse''' and select the path to the directory into which generated files are written. All paths used in the project are relative to this directory. | | headers="r6c1-t4 r1c2-t4" align="left" | Click '''Browse''' and select the path to the directory into which generated files are written. All paths used in the project are relative to this directory. | ||
|- align="left" valign="top" | |- align="left" valign="top" | ||
| − | | id="r7c1-t4" headers="r1c1-t4" align="left" | '''Output Source Directory''' | + | | id="r7c1-t4" headers="r1c1-t4" align="left" | <blockquote>'''Output Source Directory'''</blockquote> |
| headers="r7c1-t4 r1c2-t4" align="left" | Click '''Browse''' and select the path to the directory (relative to the '''Output Directory''') into which generated interfaces, implementation classes, and deployment files are written. Default: directory named <tt>source</tt> in the specified output directory. | | headers="r7c1-t4 r1c2-t4" align="left" | Click '''Browse''' and select the path to the directory (relative to the '''Output Directory''') into which generated interfaces, implementation classes, and deployment files are written. Default: directory named <tt>source</tt> in the specified output directory. | ||
|- align="left" valign="top" | |- align="left" valign="top" | ||
| − | | id="r8c1-t4" headers="r1c1-t4" align="left" | '''Output Workbench Project Directory''' | + | | id="r8c1-t4" headers="r1c1-t4" align="left" | <blockquote>'''Output Workbench Project Directory'''</blockquote> |
| headers="r8c1-t4 r1c2-t4" align="left" | Click Browse and select the path to the directory (relative to the '''Output Directory''') into which the Workbench project files are written. Default: directory named <tt>mw</tt> in the specified output directory. | | headers="r8c1-t4 r1c2-t4" align="left" | Click Browse and select the path to the directory (relative to the '''Output Directory''') into which the Workbench project files are written. Default: directory named <tt>mw</tt> in the specified output directory. | ||
|- align="left" valign="top" | |- align="left" valign="top" | ||
| − | | id="r9c1-t4" headers="r1c1-t4" align="left" | ''' Package Name for Generated Interfaces''' | + | | id="r9c1-t4" headers="r1c1-t4" align="left" | <blockquote>''' Package Name for Generated Interfaces'''</blockquote> |
| headers="r9c1-t4 r1c2-t4" align="left" | The optional name of the package to which generated interfaces belong. This defines your context path. If it is not specified, a package name of <tt>jaxbderived.<schema name></tt> is used where <tt><schema name></tt> is the name of the schema specified by the '''Schema File''' field. | | headers="r9c1-t4 r1c2-t4" align="left" | The optional name of the package to which generated interfaces belong. This defines your context path. If it is not specified, a package name of <tt>jaxbderived.<schema name></tt> is used where <tt><schema name></tt> is the name of the schema specified by the '''Schema File''' field. | ||
|- align="left" valign="top" | |- align="left" valign="top" | ||
| − | | id="r10c1-t4" headers="r1c1-t4" align="left" | '''Package Name for Generated Implementation Classes''' | + | | id="r10c1-t4" headers="r1c1-t4" align="left" | <blockquote>'''Package Name for Generated Implementation Classes'''</blockquote> |
| headers="r10c1-t4 r1c2-t4" align="left" | The optional name of the package to which generated implementation classes belong. This defines your context path. If it is not specified, a package name of <tt>jaxbderived.<schema name></tt> is used where <tt><schema name></tt> is the name of the schema specified by the '''Schema File''' field. | | headers="r10c1-t4 r1c2-t4" align="left" | The optional name of the package to which generated implementation classes belong. This defines your context path. If it is not specified, a package name of <tt>jaxbderived.<schema name></tt> is used where <tt><schema name></tt> is the name of the schema specified by the '''Schema File''' field. | ||
|} | |} | ||
| Line 100: | Line 91: | ||
| − | The EclipseLink JAXB compiler generates | + | The EclipseLink JAXB compiler generates [[Introduction%20to%20XML%20Projects%20(ELUG)#Working with JAXB-Specific Generated Files|JAXB-specific files ]] and [[Introduction%20to%20XML%20Projects%20(ELUG)#Working with EclipseLink-Specific Generated Files|EclipseLink-specific files]]. |
| − | + | ||
| − | + | ||
| − | + | ||
| + | Optionally, open the generated [[Introduction%20to%20XML%20Projects%20(ELUG)#Workbench Project|workbench project]]), customize the generated mappings and descriptors, and reexport the EclipseLink project XML. | ||
{| class="Note oac_no_warn" width="80%" border="1" frame="hsides" rules="groups" cellpadding="3" frame="hsides" rules="groups" | {| class="Note oac_no_warn" width="80%" border="1" frame="hsides" rules="groups" cellpadding="3" frame="hsides" rules="groups" | ||
| Line 113: | Line 102: | ||
| − | |||
| − | |||
| − | |||
| + | |||
| + | ===How to Create an XML Project from an XML Schema Using the Command Line=== | ||
To create a new, mapped Workbench project from an XML schema using JAXB from the command line, use the <tt>tljaxb.cmd</tt> or <tt>tljaxb.sh</tt> file (located in the ''<tt><ECLIPSELINK_HOME></tt>''<tt>/bin</tt> directory) as follows: | To create a new, mapped Workbench project from an XML schema using JAXB from the command line, use the <tt>tljaxb.cmd</tt> or <tt>tljaxb.sh</tt> file (located in the ''<tt><ECLIPSELINK_HOME></tt>''<tt>/bin</tt> directory) as follows: | ||
<ol> | <ol> | ||
| − | <li> Using a text editor, edit the <tt>tljaxb.cmd</tt> or <tt>tljaxb.sh</tt> file to set proxy settings (if required).If you are using a schema that imports another schema by URL and you are operating behind a proxy, then you must uncomment the lines shown in [[#Example 53-1|Proxy Settings in tljaxb.cmd]] or [[#Example 53-2|Proxy Settings in tljaxb.sh]] and edit them to set your proxy host (name or IP address) and port: | + | <li> Using a text editor, edit the <tt>tljaxb.cmd</tt> or <tt>tljaxb.sh</tt> file to set proxy settings (if required).If you are using a schema that imports another schema by URL and you are operating behind a proxy, then you must uncomment the lines shown in the [[#Example 53-1|Proxy Settings in tljaxb.cmd]] or [[#Example 53-2|Proxy Settings in tljaxb.sh]] examples and edit them to set your proxy host (name or IP address) and port: |
<br><span id="Example 53-1"></span> | <br><span id="Example 53-1"></span> | ||
''''' Proxy Settings in tljaxb.cmd''''' | ''''' Proxy Settings in tljaxb.cmd''''' | ||
| Line 132: | Line 120: | ||
</div> | </div> | ||
</li> | </li> | ||
| − | <li> Execute the <tt>tljaxb.cmd</tt> or <tt>tljaxb.sh</tt> file (located in the ''<tt><ECLIPSELINK_HOME></tt>''<tt>/bin</tt> directory).The EclipseLink JAXB compiler generates JAXB-specific files (see [[Introduction%20to%20XML%20Projects%20(ELUG)|Working with JAXB-Specific Generated Files]]) and EclipseLink-specific files (see [[Introduction%20to%20XML%20Projects%20(ELUG)|Working with EclipseLink-Specific Generated Files]]). [[#Example 53-3|Generating an Object Model from a Schema with tljaxb.cmd]] illustrates how to generate an object model from a schema using the EclipseLink JAXB compiler. [[#Table 53-1|EclipseLink JAXB Binding Compiler Arguments]] lists the compiler arguments. | + | <li> Execute the <tt>tljaxb.cmd</tt> or <tt>tljaxb.sh</tt> file (located in the ''<tt><ECLIPSELINK_HOME></tt>''<tt>/bin</tt> directory).The EclipseLink JAXB compiler generates JAXB-specific files (see [[Introduction%20to%20XML%20Projects%20(ELUG)|Working with JAXB-Specific Generated Files]]) and EclipseLink-specific files (see [[Introduction%20to%20XML%20Projects%20(ELUG)|Working with EclipseLink-Specific Generated Files]]). The [[#Example 53-3|Generating an Object Model from a Schema with tljaxb.cmd]] example illustrates how to generate an object model from a schema using the EclipseLink JAXB compiler. The [[#Table 53-1|EclipseLink JAXB Binding Compiler Arguments]] table lists the compiler arguments. |
<br><span id="Example 53-3"></span> | <br><span id="Example 53-3"></span> | ||
''''' Generating an Object Model from a Schema with tljaxb.cmd''''' | ''''' Generating an Object Model from a Schema with tljaxb.cmd''''' | ||
<div class="pre"> | <div class="pre"> | ||
| − | tljaxb.cmd -sourceDir ./app/src -generateWorkbench -workbenchDir ./app/mw -schema purchaseOrder.xsd -targetPkg examples.ox.model.if -implClassPkg examples.ox.model.impl | + | tljaxb.cmd -sourceDir ./app/src -generateWorkbench -workbenchDir ./app/mw -schema purchaseOrder.xsd<br> -targetPkg examples.ox.model.if -implClassPkg examples.ox.model.impl |
</div> | </div> | ||
<br> | <br> | ||
| Line 179: | Line 167: | ||
<tt>-workbenchDir</tt> | <tt>-workbenchDir</tt> | ||
| headers="r6c1-t6 r1c2-t6" align="left" | | | headers="r6c1-t6 r1c2-t6" align="left" | | ||
| − | The path to the directory into which the Workbench project files are written. This argument requires the <tt>-generateWorkbench</tt> argument.Default: directory named <tt>mw</tt> in the specified output directory. | + | The path to the directory into which the Workbench project files are written. This argument requires the <tt>-generateWorkbench</tt> argument. |
| + | |||
| + | Default: directory named <tt>mw</tt> in the specified output directory. | ||
| headers="r6c1-t6 r1c3-t6" align="left" | | | headers="r6c1-t6 r1c3-t6" align="left" | | ||
Yes | Yes | ||
| Line 193: | Line 183: | ||
<tt>-targetPkg</tt> | <tt>-targetPkg</tt> | ||
| headers="r8c1-t6 r1c2-t6" align="left" | | | headers="r8c1-t6 r1c2-t6" align="left" | | ||
| − | The name of the package to which both generated interfaces and classes belong. This defines your context path. To specify a different package for implementation classes, set the <tt>-implClassPkg</tt> argument.Default: a package name of <tt>jaxbderived.<schema name></tt> where <tt><schema name></tt> is the name of the schema specified by the <tt>-schema</tt> argument. | + | The name of the package to which both generated interfaces and classes belong. This defines your context path. To specify a different package for implementation classes, set the <tt>-implClassPkg</tt> argument. |
| + | |||
| + | Default: a package name of <tt>jaxbderived.<schema name></tt> where <tt><schema name></tt> is the name of the schema specified by the <tt>-schema</tt> argument. | ||
| headers="r8c1-t6 r1c3-t6" align="left" | | | headers="r8c1-t6 r1c3-t6" align="left" | | ||
Yes | Yes | ||
| Line 207: | Line 199: | ||
<tt>-interface</tt> | <tt>-interface</tt> | ||
| headers="r10c1-t6 r1c2-t6" align="left" | | | headers="r10c1-t6 r1c2-t6" align="left" | | ||
| − | Generate only interfaces. This argument is optional.Default: generate both interfaces and implementation classes. | + | Generate only interfaces. This argument is optional. |
| + | |||
| + | Default: generate both interfaces and implementation classes. | ||
| headers="r10c1-t6 r1c3-t6" align="left" | | | headers="r10c1-t6 r1c3-t6" align="left" | | ||
Yes | Yes | ||
| Line 214: | Line 208: | ||
<tt>-verbose</tt> | <tt>-verbose</tt> | ||
| headers="r11c1-t6 r1c2-t6" align="left" | | | headers="r11c1-t6 r1c2-t6" align="left" | | ||
| − | The interfaces and classes generated. This argument is optional.Default: not verbose. | + | The interfaces and classes generated. This argument is optional. |
| + | |||
| + | Default: not verbose. | ||
| headers="r11c1-t6 r1c3-t6" align="left" | | | headers="r11c1-t6 r1c3-t6" align="left" | | ||
Yes | Yes | ||
| Line 227: | Line 223: | ||
<br> | <br> | ||
</li> | </li> | ||
| − | <li> Optionally, open the generated | + | <li> Optionally, open the generated [[Introduction%20to%20XML%20Projects%20(ELUG)#Workbench Project|Workbench project]] in Workbench, customize the generated mappings and descriptors, and reexport the EclipseLink project XML. |
{| class="Note oac_no_warn" width="80%" border="1" frame="hsides" rules="groups" cellpadding="3" frame="hsides" rules="groups" | {| class="Note oac_no_warn" width="80%" border="1" frame="hsides" rules="groups" cellpadding="3" frame="hsides" rules="groups" | ||
| Line 235: | Line 231: | ||
</li> | </li> | ||
</ol> | </ol> | ||
| + | |||
| + | |||
| + | |||
---- | ---- | ||
| Line 243: | Line 242: | ||
[[Category: Draft]] | [[Category: Draft]] | ||
[[Category: Task]] | [[Category: Task]] | ||
| + | [[Category: XML]] | ||
Revision as of 09:24, 17 December 2007
Contents
This section describes the various components that you must configure in order to create an XML project.
For information on how to create more than one type of EclipseLink projects, see Creating a Project.
Introduction to XML Project Creation
You can create a project using the Workbench or Java code.
We recommend using the Workbench to create projects and generate deployment XML or Java source versions of the project for use at run time. For more information on how to create a project using Workbench, see How to Create a Project Using the Workbench. For information on how to create a project using Java, see How to Create a Project Using Java.
You can use EclipseLink to create an XML project, if you have an XML schema (XSD) document, but no object model yet (see Creating an XML Project from an XML Schema). If you have both XSD and object model classes, you can create an XML project using the procedure described in How to Create a Project Using the Workbench
For more information, see Introduction to XML Projects.
Creating an XML Project from an XML Schema
If you have an existing data model (XML schema document), but you do not have a corresponding object model (Java classes for domain objects), use this procedure to create your EclipseLink project and automatically generate the corresponding object model.
|
Note: If you have both XSD and object model classes, you can create an XML project using the procedure described in How to Create a Project Using the Workbench. |
Using the EclipseLink JAXB compiler simplifies JAXB application development with EclipseLink by automatically generating both the required JAXB files and the EclipseLink files from your XML schema (XSD) document. Once generated, you can open the Workbench project to fine-tune XML mappings without having to recompile your JAXB object model.
You can use the EclipseLink JAXB compiler from the Workbench or from the command line .
|
Note: Before you compile your generated classes, be sure to configure your IDE classpath to include <ECLIPSELINK_HOME>\lib\xml.jar. For example, see Using an Integrated Development Environment. |
For more information, see:
- #EclipseLink Support for Java Architecture for XML Binding (JAXB)|EclipseLink Support for Java Architecture for XML Binding (JAXB)
- Using EclipseLink JAXB Compiler Generated Files at Run Time
How to Create an XML Project from an XML Schema Using Workbench
To create a new, mapped Workbench project from an XML schema using JAXB, use this procedure:
- From Workbench, select File > New > Project > From XML Schema (JAXB).
Create Workbench Project using JAXB Dialog Box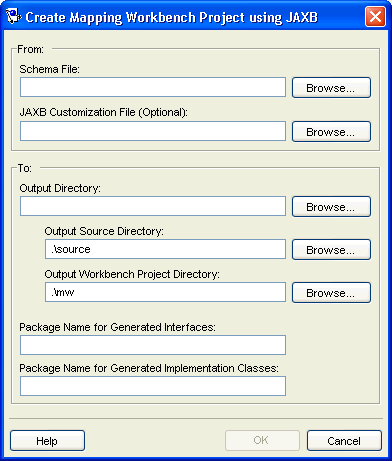
- Complete each field on the Create Workbench Project using JAXB dialog box, and then click OK.

Use the following information to enter data in each field of this dialog box:
| Field | Description |
|---|---|
| From | Use these fields to specify your existing JAXB information. |
Schema File |
Click Browse and select the fully qualified path to your XSD file. |
JAXB Customization File |
This in an optional setting. It can be used if you have a standard JAXB configuration file that you wish to use to override the default JAXB compiler behavior. The JAXB customization file contains binding declarations for customizing the default binding between an XSD component and its Java representation. |
| To | Use these fields to specify the location and options of the Workbench project. |
Output Directory |
Click Browse and select the path to the directory into which generated files are written. All paths used in the project are relative to this directory. |
Output Source Directory |
Click Browse and select the path to the directory (relative to the Output Directory) into which generated interfaces, implementation classes, and deployment files are written. Default: directory named source in the specified output directory. |
Output Workbench Project Directory |
Click Browse and select the path to the directory (relative to the Output Directory) into which the Workbench project files are written. Default: directory named mw in the specified output directory. |
Package Name for Generated Interfaces |
The optional name of the package to which generated interfaces belong. This defines your context path. If it is not specified, a package name of jaxbderived.<schema name> is used where <schema name> is the name of the schema specified by the Schema File field. |
Package Name for Generated Implementation Classes |
The optional name of the package to which generated implementation classes belong. This defines your context path. If it is not specified, a package name of jaxbderived.<schema name> is used where <schema name> is the name of the schema specified by the Schema File field. |
The EclipseLink JAXB compiler generates JAXB-specific files and EclipseLink-specific files.
Optionally, open the generated workbench project), customize the generated mappings and descriptors, and reexport the EclipseLink project XML.
|
Note: Before you compile your generated classes, be sure to configure your IDE classpath to include <ECLIPSELINK_HOME>\lib\xml.jar. For example, see Using an Integrated Development Environment. |
How to Create an XML Project from an XML Schema Using the Command Line
To create a new, mapped Workbench project from an XML schema using JAXB from the command line, use the tljaxb.cmd or tljaxb.sh file (located in the <ECLIPSELINK_HOME>/bin directory) as follows:
- Using a text editor, edit the tljaxb.cmd or tljaxb.sh file to set proxy settings (if required).If you are using a schema that imports another schema by URL and you are operating behind a proxy, then you must uncomment the lines shown in the Proxy Settings in tljaxb.cmd or Proxy Settings in tljaxb.sh examples and edit them to set your proxy host (name or IP address) and port:
Proxy Settings in tljaxb.cmd@REM set JVM_ARGS=%JVM_ARGS% -DproxySet=true -Dhttp.proxyHost= -Dhttp.proxyPort=
Proxy Settings in tljaxb.sh# JVM_ARGS="${JVM_ARGS} -DproxySet=true -Dhttp.proxyHost= -Dhttp.proxyPort=" - Execute the tljaxb.cmd or tljaxb.sh file (located in the <ECLIPSELINK_HOME>/bin directory).The EclipseLink JAXB compiler generates JAXB-specific files (see Working with JAXB-Specific Generated Files) and EclipseLink-specific files (see Working with EclipseLink-Specific Generated Files). The Generating an Object Model from a Schema with tljaxb.cmd example illustrates how to generate an object model from a schema using the EclipseLink JAXB compiler. The EclipseLink JAXB Binding Compiler Arguments table lists the compiler arguments.
Generating an Object Model from a Schema with tljaxb.cmdtljaxb.cmd -sourceDir ./app/src -generateWorkbench -workbenchDir ./app/mw -schema purchaseOrder.xsd
-targetPkg examples.ox.model.if -implClassPkg examples.ox.model.impl
EclipseLink JAXB Binding Compiler ArgumentsArgument Description Optional? -help
Prints this usage information.
Yes
-version
Prints the release version of the EclipseLink JAXB compiler.
Yes
-sourceDir
The path to the directory into which generated interfaces, implementation classes, and deployment files are written.Default: directory named source in the specified output directory.
Yes
-generateWorkbench
Generate a Workbench project and necessary project files. If omitted, only runtime information is generated.
Yes
-workbenchDir
The path to the directory into which the Workbench project files are written. This argument requires the -generateWorkbench argument.
Default: directory named mw in the specified output directory.
Yes
-schema
The fully qualified path to your XSD file.
No
-targetPkg
The name of the package to which both generated interfaces and classes belong. This defines your context path. To specify a different package for implementation classes, set the -implClassPkg argument.
Default: a package name of jaxbderived.<schema name> where <schema name> is the name of the schema specified by the -schema argument.
Yes
-implClassPkg
The name of the package to which generated implementation classes belong. If this option is set, interfaces belong to the package specified by the -targetPkg argument. This defines your context path.
Yes
-interface
Generate only interfaces. This argument is optional.
Default: generate both interfaces and implementation classes.
Yes
-verbose
The interfaces and classes generated. This argument is optional.
Default: not verbose.
Yes
-customize
The fully qualified path and file name of a standard JAXB customization file that you can use to override default JAXB compiler behavior.
Yes
- Optionally, open the generated Workbench project in Workbench, customize the generated mappings and descriptors, and reexport the EclipseLink project XML.
Note: Before you compile your generated classes, be sure to configure your IDE classpath to include <ECLIPSELINK_HOME>\lib\xml.jar. For example, see Using an Integrated Development Environment.