Notice: this Wiki will be going read only early in 2024 and edits will no longer be possible. Please see: https://gitlab.eclipse.org/eclipsefdn/helpdesk/-/wikis/Wiki-shutdown-plan for the plan.
Difference between revisions of "Creating a message batch, using an XML data source as example"
| Line 27: | Line 27: | ||
<code>Window->Preferences->OHF H3ET->Batch Generator->XML Batch Data Source</code>: | <code>Window->Preferences->OHF H3ET->Batch Generator->XML Batch Data Source</code>: | ||
| − | + | [[Image:XmlPreference.PNG]] | |
We are now ready to invoke the wizard which will guide us through the batch generation. We right-click on the sample message instance and select | We are now ready to invoke the wizard which will guide us through the batch generation. We right-click on the sample message instance and select | ||
Revision as of 09:01, 15 August 2007
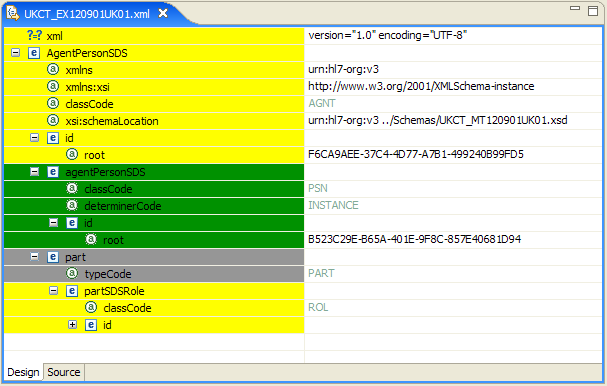
Within OHF, message instances are special XML files that are created according to an Health Level 7 model. We'll use one such message instance, UKCT_EX120901UK01.xml.
When generated, the message looks something like this (if viewed within the Message Instance Editor):
In order to indicate to the generator that a certain field should be populated by outside data, we must put a token in that field. A token has the form
${name}, where name must be something meaningful to the data source (see the tutorials on the different data sources for more on this). For the
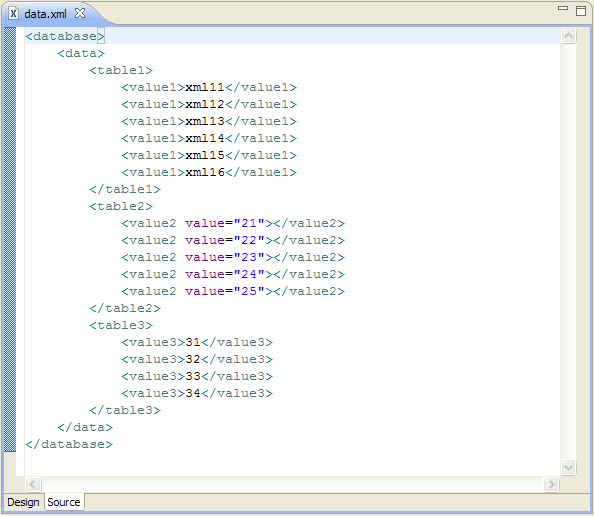
XML data source, the token must be an XPath to the data in the XML data file. For example, let's use the following data file, called data.xml:
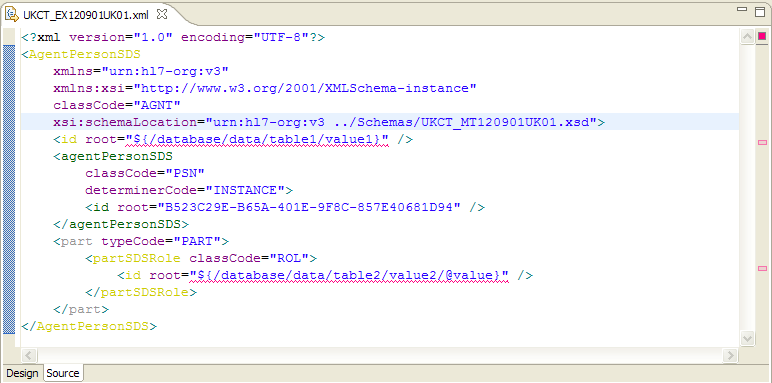
We will use the data in the value1 element, and the value attribute of the value2 element. The corresponding XPath queries are
/database/data/table1/value1 and
/database/data/table2/value2/@value.
We place these tokens into the sample message instance (we first switch to the source view of the Message Instance Editor):
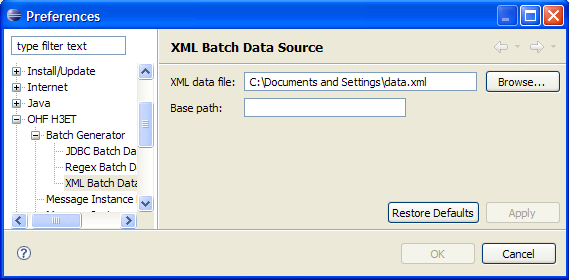
Before generating the message batch, we first must specify the location of the data file. This is done on the preference page accessed through
Window->Preferences->OHF H3ET->Batch Generator->XML Batch Data Source:
We are now ready to invoke the wizard which will guide us through the batch generation. We right-click on the sample message instance and select
New->Other->Message Instance Batch
picture of selecting the wizard
We first choose the sample message instance (it is already selected since we right-clicked on it, so we just accept).
picture of file selection page about to click next
We then choose a location for the output batch. This must be an existing location in our workspace.
picture of output location page with location selected and about to click next
The last page of the wizard allows us to set some options. First, we select XML as the data source. The next option allows us to restrict the number of files created. This can be useful if the database is very large, but in the present case we will use all of the available data and create as many files as we can. The last option allows us to specify how the batch files are named; we will just use the default. The default batch name uses the same name and extension as the sample message file, but appends an underscore and index to each created file. For example, if we create 2 files using a sample message called sample.xml, the output files will be called sample_1.xml and sample_2.xml. After these options have been selected, the options page looks like this:
picture of options page with all options set as described above
Finally, we press Finish. The batch generator creates the batch messages, and opens up the folder in which they are contained. Each created file has had the token replaced with the appropriate values from the data file.
pictures of created files


