Notice: this Wiki will be going read only early in 2024 and edits will no longer be possible. Please see: https://gitlab.eclipse.org/eclipsefdn/helpdesk/-/wikis/Wiki-shutdown-plan for the plan.
Cosmosi9DevelopmentEnvironment
Revision as of 16:06, 25 January 2008 by Sleeloy.ca.ibm.com (Talk | contribs) (→Installing and Running Code)
Back to Data Reporting Design
Overview
This document provides the development environment for COSMOS i9.
The reader should be aware that the modules for the User Interface follow a team sharing structure. The team structure strategies outlined in "Eclipse Web Tools Platform: Developing Java Web Applications" technical document were used. Chapter 6 covers these stategies: Organize your Web Tools platform (WTP) development project.
One can view chapter 6 online at http://whitepapers.zdnet.com/abstract.aspx?docid=307008
Installing and Running Code
- Download and Install WTP
- WTP - http://www.eclipse.org/downloads/download.php?file=/webtools/downloads/drops/R3.0/S-3.0M3-20071114232332/wtp-S-3.0M3-20071114232332.zip
- Eclipse - http://www.eclipse.org/downloads/download.php?file=/eclipse/downloads/drops/S-3.4M3-200711012000/eclipse-SDK-3.4M3-win32.zip
- EMF - http://www.eclipse.org/downloads/download.php?file=/modeling/emf/emf/downloads/drops/2.4.0/S200711062140/emf-sdo-xsd-SDK-2.4.0M3.zip
- GEF - http://www.eclipse.org/downloads/download.php?file=/tools/gef/downloads/drops/S-3.4M3-200711051144//GEF-SDK-3.4M3.zip
- Download apache muse and wsdl4j. Currently these bundles are not in CVS. Bug 216626 address this problem. For now these bundles should be retrieved from the COSMOS driver. Go to the COSMOS download page. Select the latest i8 candidate build. Download and extract the "COSMOS Demo" driver to a temporary directory.
- Download and unzip the following project set file in a temporary directory. COSMOS I9 project set file
- Start up Eclipse
- Import the wsdl4j and apache muse complete plugin by going to File>Import...
- Select Plug-in Development>Plugi-ins and Fragments
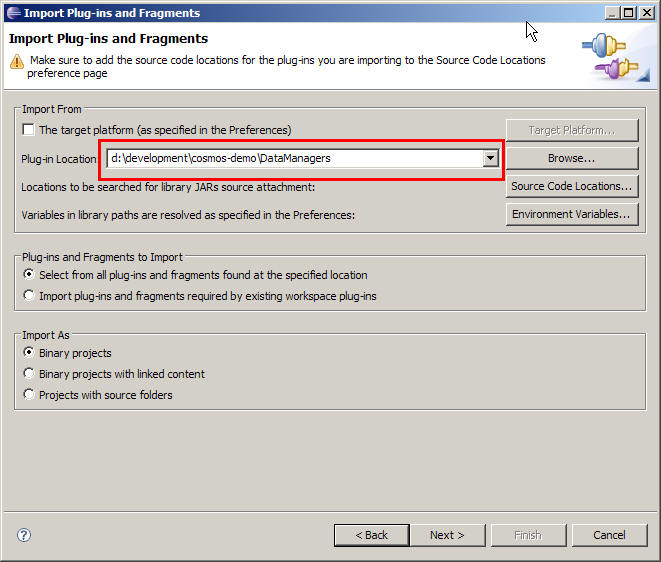
- Specify the directory of the DatamManager directory in the next dialog as highlighted in the following screen shot.
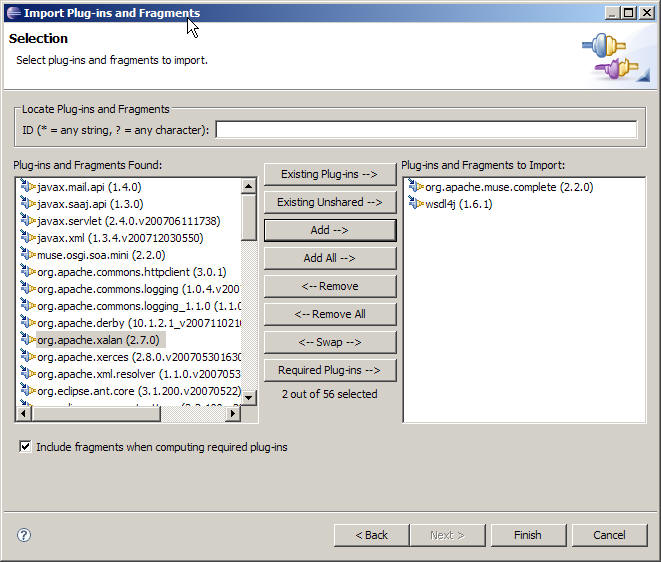
- Add the org.eclipse.apache.muse.complete and wsdl4j as shown below and click finish
- Import the project set file by going to File>Import...
- Select Team>Team Project Set and click Next.
- In the "Team Project Set" page specify the project set file you saved to the temporary directory and click "Finish".
- You now need to define a Tomcat Server Runtime. Go to Windows>Preferences..
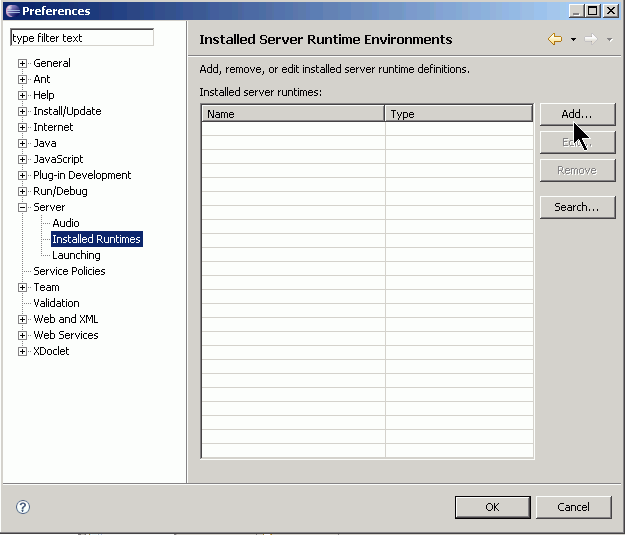
- Select the "Server>Installed Runtimes" node and click the "Add.." button.
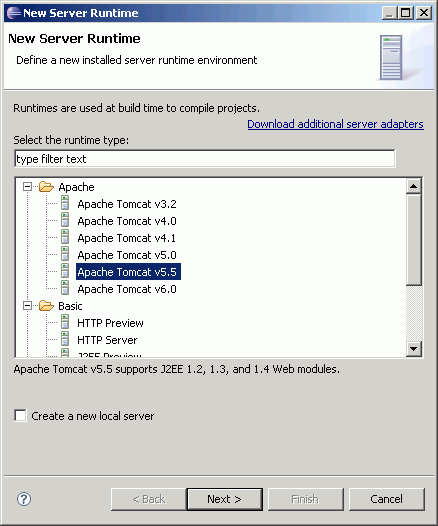
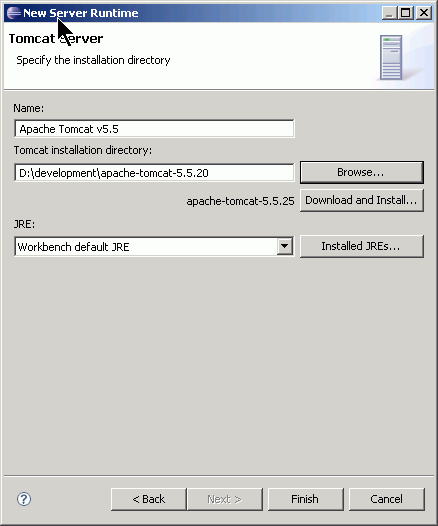
- Specify Apache Tomcat 5.5 runtime and click Next.
- Enter the location of the tomcat directory and click Finish. Then click OK.
- Download dojo 1.0.0 and save it to a temporary directory. http://download.dojotoolkit.org/release-1.0.0/dojo-release-1.0.0.zip
- In your workspace right click the "org.eclipse.cosmos.dr.dojotoolkit\WebContent" folder and import the contents of the dojo zip file.
- Now you need to set up the org.eclipse.cosmos.examples.e2e.web.ui directory. Note that the WebContent directories under the org.eclipse.cosmos.examples.e2e.web.ui use linked folders. This step is needed since eclipse does not use relative paths to link folders.
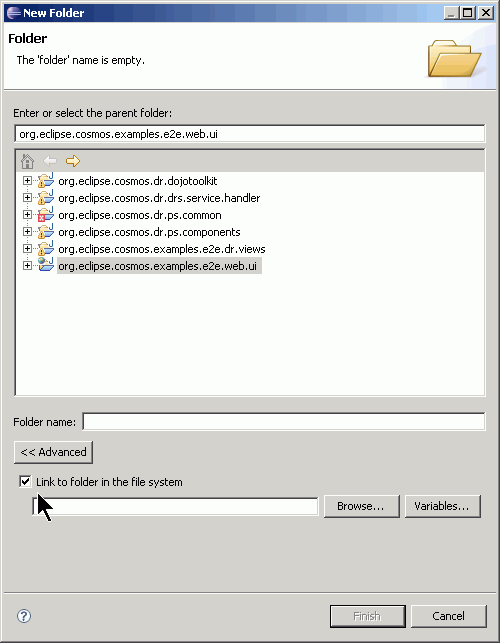
- Right click the org.eclipse.cosmos.examples.e2e.web.ui project and create a new Folder by selecting New>Folder from the popup menu. Click the "<<Advance Button" and click the "Link to folder in the file system" check box
- Click the "Variables..." button. This should bring up a dialog box.
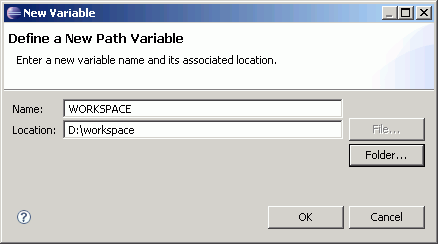
- Then click the "New..." button. This should bring up dialog box where you can enter a variable name. The linked folders use a variable named "WORKSPACE" to resolve the workspace directory. Therefore we need to define this variable as follows:
- Click OK, Click OK again and then Cancel. Note that we don't want to create a directory we just needed to add a variable name since the directories are already created.
- Right click the org.eclipse.cosmos.examples.e2e.web.ui project and select "Refresh".
- The workspace still may not be clean you have to apply the patch from bug 216207
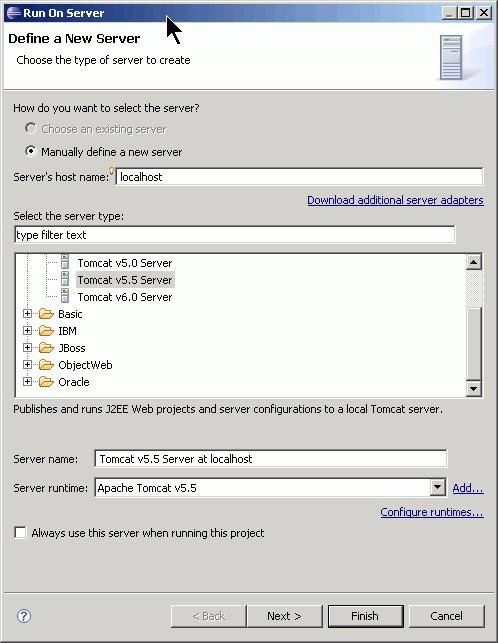
- At this point the workspace is setup to run. Right click the org.eclipse.cosmos.examples.e2e.web.ui project and select "Run As>Run on Server".
- Select Tomcat v5.5 Server and click Finish. The server will start.
- Now open FireFox 2.0 or IE 6+ and type http://localhost:8080/COSMOSUI/?page=cosmos. You should see the COSMOS UI.


