Notice: this Wiki will be going read only early in 2024 and edits will no longer be possible. Please see: https://gitlab.eclipse.org/eclipsefdn/helpdesk/-/wikis/Wiki-shutdown-plan for the plan.
Difference between revisions of "Converting Eclipse Java Project to Maven Project"
| Line 1: | Line 1: | ||
| + | == Overview == | ||
Using Integration for Apache Maven (IAM)plugin, you can immediately convert existing eclipse java project to maven project. | Using Integration for Apache Maven (IAM)plugin, you can immediately convert existing eclipse java project to maven project. | ||
| + | == How To == | ||
Just right click on the java project and click "Convert to Maven Project" in the pop-up menu. | Just right click on the java project and click "Convert to Maven Project" in the pop-up menu. | ||
| + | [[Image:Convertjavatomavenproject.jpg]] | ||
| + | The first columns contains the basic information of the pom. Source directory and test directory combo box is already filled with current source directories in your class path. In the above image, it is filled with src & test. If it is left blank, the source directory will be automatically src/main/java & test directory will be src/main/test. These are the default directory structure of a maven project. | ||
| + | The table in the second column contains the libraries resolved in the selected java project. You have the option to add it to pom dependency or just leave it as a referenced libraries. If you choose to add it as a dependency, it will be uploaded to your local repository. By default, the jar name is the groupid and artifact id. You have the option of editing the information of each dependency that you wish to add by clicking on the item in the table and click edit button. The remove button will remove the selected library from the dependencies. | ||
| + | |||
| + | The libraries not added to dependency will be left as a referenced libraries. | ||
== Proposed Enhancements == | == Proposed Enhancements == | ||
| − | Usability/User Interface: | + | === Usability/User Interface: === |
- Use the wizard interface, to simplify the UI | - Use the wizard interface, to simplify the UI | ||
- Place the Convert to maven project option in the Maven menu | - Place the Convert to maven project option in the Maven menu | ||
| + | - Hide the "Convert to Maven Project" option if it's already a maven project. | ||
- Some fields have rounded corners in the mac, which is used only for search/filter input boxes. | - Some fields have rounded corners in the mac, which is used only for search/filter input boxes. | ||
| − | New features: | + | === New features: === |
| − | + | - Provide assistance when replacing libraries with dependencies. Using the MD5 of the jar file to look it up on the indexes or in remote services in repositories like Archiva. | |
- Provide autocompletion based on known groupIds (use existing indexes) | - Provide autocompletion based on known groupIds (use existing indexes) | ||
- Relocate existing source folders to match maven conventions | - Relocate existing source folders to match maven conventions | ||
Latest revision as of 23:46, 6 November 2008
Contents
Overview
Using Integration for Apache Maven (IAM)plugin, you can immediately convert existing eclipse java project to maven project.
How To
Just right click on the java project and click "Convert to Maven Project" in the pop-up menu.
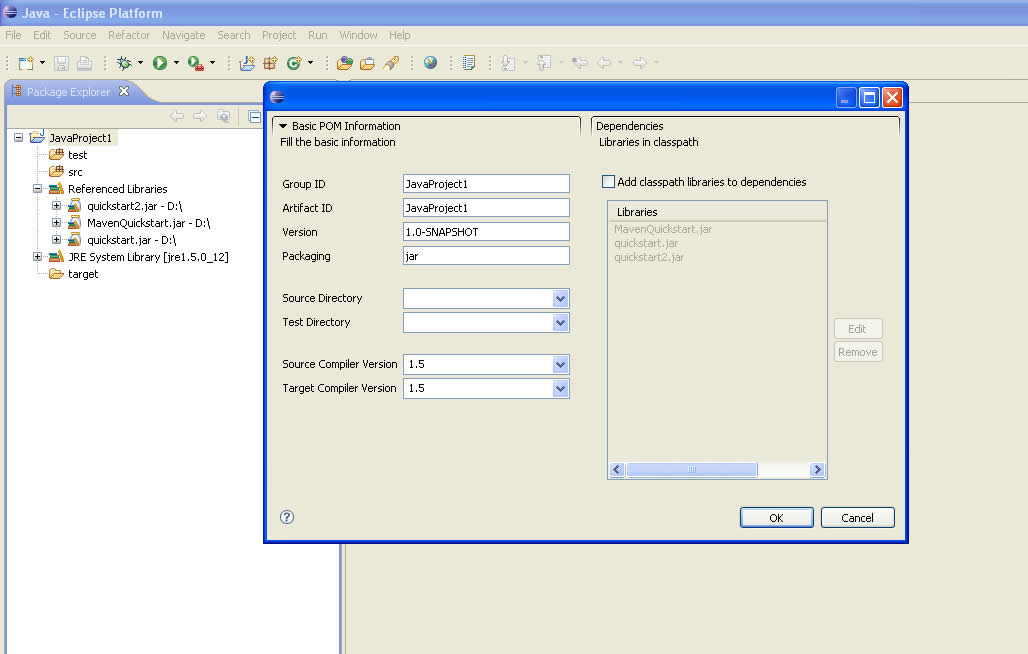

The first columns contains the basic information of the pom. Source directory and test directory combo box is already filled with current source directories in your class path. In the above image, it is filled with src & test. If it is left blank, the source directory will be automatically src/main/java & test directory will be src/main/test. These are the default directory structure of a maven project.
The table in the second column contains the libraries resolved in the selected java project. You have the option to add it to pom dependency or just leave it as a referenced libraries. If you choose to add it as a dependency, it will be uploaded to your local repository. By default, the jar name is the groupid and artifact id. You have the option of editing the information of each dependency that you wish to add by clicking on the item in the table and click edit button. The remove button will remove the selected library from the dependencies.
The libraries not added to dependency will be left as a referenced libraries.
Proposed Enhancements
Usability/User Interface:
 - Use the wizard interface, to simplify the UI
 - Place the Convert to maven project option in the Maven menu
 - Hide the "Convert to Maven Project" option if it's already a maven project.
 - Some fields have rounded corners in the mac, which is used only for search/filter input boxes.
New features:
- Provide assistance when replacing libraries with dependencies. Using the MD5 of the jar file to look it up on the indexes or in remote services in repositories like Archiva.
 - Provide autocompletion based on known groupIds (use existing indexes)
 - Relocate existing source folders to match maven conventions