Notice: this Wiki will be going read only early in 2024 and edits will no longer be possible. Please see: https://gitlab.eclipse.org/eclipsefdn/helpdesk/-/wikis/Wiki-shutdown-plan for the plan.
Codewind Git Repo Setup
Setup Git Environment for Codewind Development
Complete the following steps to setup your Codewind Git repository.
Step 1: Create a fork of repo
In this document, the eclipse/codewind repo is used as an example but the setup process is the same for other Codewind repos (you just need to replace the codewind repo name with the one that you are working on). The complete list of Codewind repos can be found in Codewind Project-Developer Resources.
Navigate to the corresponding repo page, e.g. https://github.com/eclipse/codewind, and click the Fork in the top upper right corner and select your account as the location to hold the fork. If you already have a fork, click the Fork button will bring you to your existing fork. Your fork will be called github-user/codewind.
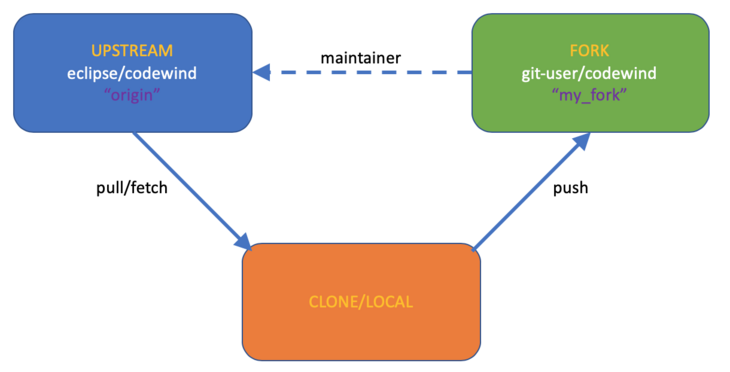
Step 2: Setting up the inbound/outbound "triangle"
NOTE: The following highlighted commands are utilized from a Git-Bash command window. Also ensure that you've started your SSH agent.
First, create a directory on your local system to hold the source code.
 mkdir codewind
 cd codewind
Windows users: Set this config flag to allow file paths to go beyond 260 chars.
git config --global core.longpaths true
Clone the main repository onto your local system via this command.
git clone https://github.com/eclipse/codewind.git
Next, setup the second side of the triangle via this command (NOTE: ensure you change github-user to your public github.com user name and the directory to the repo directory name):
 cd codewind
 git remote add my_fork https://github.com/github-user/codewind.git
Next, configure the local repository to push your commits to the fork repository you created above:
git config remote.pushdefault my_fork
This will now pull from origin, the main repository, and push to the fork, your fork repository.
This option requires at least Git 1.8.4. It is also recommended that you configure
git config push.default simple
unless you are already using Git 2.0 where it is the default. To check the git version:
git --version
Finally, the third side of the triangle is pull requests from your fork repo to the main repo.
You can run the following command to verify your triangle was created successfully:
git remote -v
You should see output similar to the following:
 > $ git remote -v
 > my_fork https://github.com/github-user/codewind.git (fetch)
 > my_fork https://github.com/github-user/codewind.git (push)
 > origin  https://github.com/eclipse/codewind.git (fetch)
 > origin  https://github.com/eclipse/codewind.git (push)
You will need to setup your 'master' branch since integration is the default:
 git checkout -b master origin/master
 git pull
 git push
Now you are ready for development.
After you have make the code changes, commit the code to your fork and refer the instructions on Making a pull request to make a pull request. And the committer will go through the PR review process to review the code.

