Notice: this Wiki will be going read only early in 2024 and edits will no longer be possible. Please see: https://gitlab.eclipse.org/eclipsefdn/helpdesk/-/wikis/Wiki-shutdown-plan for the plan.
Difference between revisions of "Aperi/build/dev-env"
(→SNIA HBA API 2.2) |
(→6. Running Aperi in a debug environment) |
||
| (48 intermediate revisions by 3 users not shown) | |||
| Line 14: | Line 14: | ||
* [http://java.sun.com/javase/downloads/index.jsp Java 1.5 JDK] | * [http://java.sun.com/javase/downloads/index.jsp Java 1.5 JDK] | ||
* [http://msdn2.microsoft.com/en-us/visualc/default.aspx MSVC 6.0 (MS Visual C)] | * [http://msdn2.microsoft.com/en-us/visualc/default.aspx MSVC 6.0 (MS Visual C)] | ||
| − | * [http://www.eclipse.org/downloads/ Eclipse SDK 3. | + | * [http://www.eclipse.org/downloads/ Eclipse SDK 3.3] |
* [http://ant.apache.org/bindownload.cgi Ant 1.7.0] | * [http://ant.apache.org/bindownload.cgi Ant 1.7.0] | ||
* [http://prdownloads.sourceforge.net/jsch/jsch-0.1.31.jar?download JSch 0.1.31] | * [http://prdownloads.sourceforge.net/jsch/jsch-0.1.31.jar?download JSch 0.1.31] | ||
| Line 43: | Line 43: | ||
| − | ==== Eclipse SDK 3. | + | ==== Eclipse SDK 3.3 ==== |
* Go to http://www.eclipse.org/downloads/. | * Go to http://www.eclipse.org/downloads/. | ||
| − | * Click Eclipse | + | * Click on Eclipse Classic |
| − | * | + | * Download the eclipse-SDK-3.3-win32.zip file. |
| − | * Extract the contents of the zip file to C:\Aperi-Dev\BuildTools\eclipse | + | * Extract the contents of the zip file to C:\Aperi-Dev\BuildTools\eclipse |
==== Ant 1.7.0 ==== | ==== Ant 1.7.0 ==== | ||
| Line 59: | Line 59: | ||
=== 2. Downloading Aperi Source and Eclipse Components === | === 2. Downloading Aperi Source and Eclipse Components === | ||
| − | + | Start the Eclipse IDE. | |
| − | + | * Start the Eclipse IDE by running: C:\Aperi-dev\BuildTools\eclipse\eclipse.exe. | |
| − | * Start the Eclipse IDE by running: C:\dev\ | + | |
* Select a workspace directory of C:\Aperi-Dev\Code. | * Select a workspace directory of C:\Aperi-Dev\Code. | ||
| − | |||
| − | + | Download the aperi.psf file. | |
| + | * Go here - [http://dev.eclipse.org/viewcvs/index.cgi/org.eclipse.aperi/org.eclipse.aperi.build/aperi.psf?root=Technology_Project&view=log CVS]. | ||
| + | * Right click the download link and 'Save Target As'; then save the file to 'C:\Aperi-Dev\Code\aperi.psf' | ||
| + | |||
| + | Import the aperi.psf file into the IDE - this triggers the download of the source code. From the IDE: | ||
* Select File > Import. | * Select File > Import. | ||
* Select Team > Team Project Set. | * Select Team > Team Project Set. | ||
| − | * Browse and select aperi.psf | + | * Browse and select aperi.psf |
| + | * Click Finish | ||
=== 3. Downloading Third Party Packages === | === 3. Downloading Third Party Packages === | ||
Perform these steps to download important third-party libraries and complete the Aperi runtime code base. | Perform these steps to download important third-party libraries and complete the Aperi runtime code base. | ||
| − | + | ==== Manual Download of 3rd Party Files ==== | |
| − | + | ||
| − | + | ||
| − | + | ||
| − | + | ||
| − | + | ||
| − | + | ||
| − | + | ||
| − | + | ||
| − | + | ||
| − | + | ||
| − | + | ||
| − | + | ||
| − | + | ||
| − | + | ||
| − | + | ||
| − | + | ||
| − | + | ||
| − | + | ||
| − | + | ||
| − | + | ||
| − | + | ||
| − | + | ||
| − | + | ||
| − | + | ||
| − | + | ||
| − | + | ||
| − | + | ||
| − | + | ||
| − | + | ||
| − | + | ||
| − | + | ||
| − | + | ||
| − | + | ||
| − | + | ||
| − | + | ||
| − | + | ||
| − | + | ||
| + | * JavaHelp 1.1.3 | ||
| + | ** Go to http://java.sun.com/products/javahelp/download_binary.html. | ||
| + | ** Click the Download button under the JavaHelp 1.1.3 (Zip) section. | ||
| + | ** Click Accept License Agreement. | ||
| + | ** Click the down arrow to download the javahelp-1_1_3.zip file. | ||
| + | ** Unzip the contents of the downloaded file to ''C:\Aperi-Dev\Etc'' | ||
| + | ** Copy the file ''C:\Aperi-Dev\Etc\jh1.1.3\javahelp\lib\jh.jar'' into the "C:\Aperi-Dev\Code\javax.help" directory | ||
| + | ** From within the IDE, select the javax.help project and hit F5 to refresh | ||
| − | ==== | + | ==== Automatic Download of 3rd Party Files ==== |
| − | + | ||
| − | + | ||
| − | + | ||
| − | + | ||
| − | + | ||
| − | + | ||
| − | + | ||
| − | + | # Configure your eclipse workspace to use Ant 1.7.0 | |
| − | + | #* Click Window -> Preferences... | |
| − | * Click | + | #* Navigate to Ant -> Runtime and click the "Ant Home" button <br>[[Image:AntHome.JPG]] |
| − | * | + | #* Select the base directory on Ant 1.7.0 (C:\Aperi-Dev\BuildTools\apache-ant-1.7.0) |
| − | * | + | # Run the ant task "Download 3rd Party Components to IDE" |
| − | * | + | #* Click Run -> External Tools -> Open External Tools Dialog... |
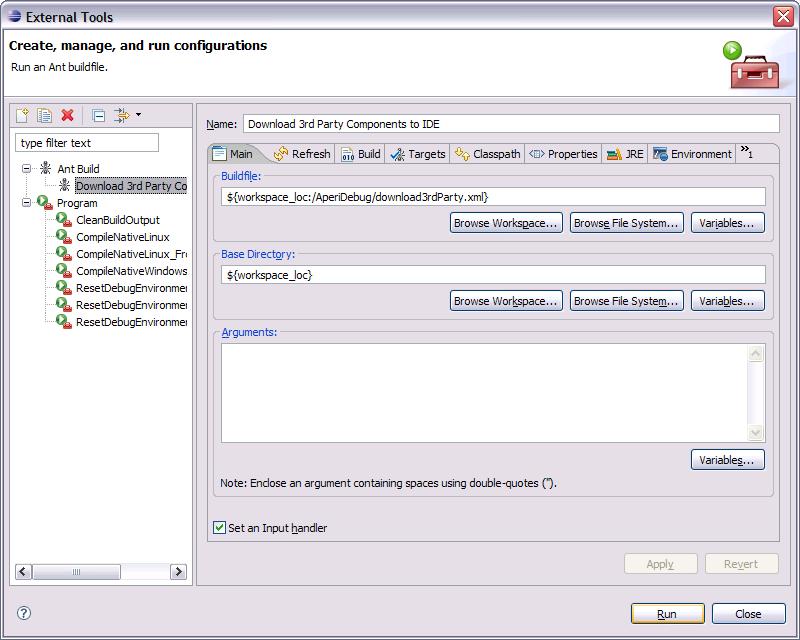
| + | #* Select Ant Build -> Download 3rd Party Components to IDE and click the Run button. <br> [[Image:Download3rdPartyToIDE.JPG]] | ||
| + | #* Eclipse will take a few minutes to download and place third party files | ||
| + | #* From within the IDE, select all the Aperi projects and hit F5 to refresh the projects with the filesystem. | ||
| − | === | + | === 4. Building Native Code === |
| − | + | Most users do not need to actually compile the native code. Such users can simply use the latest binaries (already compiled code). To do this: | |
| − | + | * Run --> External Tools --> ResetDebugEnvironmentNoNativeCompile | |
| − | + | When this run correctly, skip to section 5 | |
| − | + | ||
| − | + | ||
| − | + | ||
| − | + | ||
| − | + | ||
| − | + | ||
| − | + | ||
| − | + | ||
| − | + | ||
| − | + | ||
| − | + | ||
| − | + | ||
| − | + | ||
| − | + | ||
| − | + | ||
| − | + | ||
| − | + | ||
| − | + | ||
| − | * | + | |
| − | + | ||
| − | + | ||
| − | + | ||
| − | + | ||
| − | + | ||
| − | + | ||
| − | + | ||
| − | + | ||
| − | + | ||
| − | + | ||
| − | + | ||
| − | + | ||
| − | + | ||
| − | + | ||
| − | + | ||
| − | + | ||
| − | + | ||
=== 4a. Building Aperi on Windows === | === 4a. Building Aperi on Windows === | ||
| Line 205: | Line 139: | ||
[[Image:Aperi-build-2.PNG]] | [[Image:Aperi-build-2.PNG]] | ||
| − | + | === 5. Installing & Configuring Aperi === | |
| + | Installing will configure Aperi for runtime (set ports, etc.). From the IDE, open the Run Dialog and select the following run script: | ||
| − | + | * Aperi-Install (for simplicity, just accept all of the defaults when the installer runs) | |
| − | === | + | === 6. Running Aperi in a debug environment === |
| − | If the | + | If the installation completes successfully, Aperi is ready to start. Launch the following processes in the following order: |
| − | * | + | * Aperi-DerbyDB-Start |
| − | * | + | * Aperi-DataServer |
| − | * | + | * Aperi-DeviceServer |
| − | * | + | * Aperi-Agent |
| − | * | + | * Aperi-GUI |
| − | * | + | * Aperi-ReportServer |
Latest revision as of 23:24, 25 May 2008
Contents
- 1 Aperi Development Environment
- 1.1 1. Begin setting up the development environment
- 1.2 2. Downloading Aperi Source and Eclipse Components
- 1.3 3. Downloading Third Party Packages
- 1.4 4. Building Native Code
- 1.5 4a. Building Aperi on Windows
- 1.6 4b. Building Aperi on Linux
- 1.7 5. Installing & Configuring Aperi
- 1.8 6. Running Aperi in a debug environment
Aperi Development Environment
This document describes how to set up a development environment on a “clean” Windows machine for working with Aperi. This includes:
- Setting up a development environment
- Downloading the Aperi source code
- Downloading third-party libraries
- Building aperi
- Running Aperi in a debug environment
1. Begin setting up the development environment
Perform this step to begin establishing the appropriate development environment on a Windows machine. The following components are needed for the environment:
Create a directory - C:\Aperi-Dev\BuildTools\ to house the tools needed to build Aperi.
Create a directory - C:\Aperi-Dev\Etc to house downloaded packages integrated into the product
Java 1.5 JDK
- Go to http://java.sun.com/javase/downloads/index.jsp
- Click Download next to JDK 5.0 Update 9 with Java EE.
- Click Accept License Agreement.
- Click Java EE SDK 5 Update 1 for Windows to download the jdk-1_5_0_09-windows-i586-p.exe file.
- Run the executable and accept the default settings.
MSVC 6.0 (MS Visual C) + SP6
Use this component to compile the native code to the Windows platform. Install this into the default directory. Aperi assumes this default location to be: "C:\Program Files\Microsoft Visual Studio\VC98\" If you have a licensed copy of MSVC 6.0 you can download service pack 6 from here: http://www.microsoft.com/downloads/details.aspx?familyid=A8494EDB-2E89-4676-A16A-5C5477CB9713&displaylang=en
NTDDK
The version of the DDK available at that site is Windows Server 2003 SP1. It supports versions of Windows going back to Windows 2000. An ISO download is available. To avoid burning it to a CD prior to installation, you can use WinRAR (http://www.rarlab.com/ ) to extract the contents of the ISO to a local folder. When installing, stick with all of the defaults. There's no need to install any of the samples. By default, the files are written to the following directory: C:\WINDDK\3790.1830.
DXSDK
The version of the Platform SDK available at that site is Windows Server 2003 SP1. Similar to the DDK, it supports versions of Windows going back to Windows 2000. Download the appropriate file for your system (ex: PSDK-x86.exe). Double click this file on the target system and install everything. The install is web-based, and will thus take some time. By default, the Platform SDK files are written to the following directory: C:\Program Files\Microsoft Platform SDK.
Eclipse SDK 3.3
- Go to http://www.eclipse.org/downloads/.
- Click on Eclipse Classic
- Download the eclipse-SDK-3.3-win32.zip file.
- Extract the contents of the zip file to C:\Aperi-Dev\BuildTools\eclipse
Ant 1.7.0
- Go to http://ant.apache.org/bindownload.cgi.
- Click apache-ant-1.7.0-bin.zip in the Current Release of Ant section to download Ant 1.7.0.
- Unzip the distribution file into C:\Aperi-Dev\BuildTools\. The resulting ANT_HOME directory should be C:\Aperi-Dev\BuildTools\apache-ant-1.7.0.
JSch 0.1.31
- Download jsch-0.1.31.jar to C:\Aperi-Dev\BuildTools\apache-ant-1.7.0\lib\jsch-0.1.31.jar.
2. Downloading Aperi Source and Eclipse Components
Start the Eclipse IDE.
- Start the Eclipse IDE by running: C:\Aperi-dev\BuildTools\eclipse\eclipse.exe.
- Select a workspace directory of C:\Aperi-Dev\Code.
Download the aperi.psf file.
- Go here - CVS.
- Right click the download link and 'Save Target As'; then save the file to 'C:\Aperi-Dev\Code\aperi.psf'
Import the aperi.psf file into the IDE - this triggers the download of the source code. From the IDE:
- Select File > Import.
- Select Team > Team Project Set.
- Browse and select aperi.psf
- Click Finish
3. Downloading Third Party Packages
Perform these steps to download important third-party libraries and complete the Aperi runtime code base.
Manual Download of 3rd Party Files
- JavaHelp 1.1.3
- Go to http://java.sun.com/products/javahelp/download_binary.html.
- Click the Download button under the JavaHelp 1.1.3 (Zip) section.
- Click Accept License Agreement.
- Click the down arrow to download the javahelp-1_1_3.zip file.
- Unzip the contents of the downloaded file to C:\Aperi-Dev\Etc
- Copy the file C:\Aperi-Dev\Etc\jh1.1.3\javahelp\lib\jh.jar into the "C:\Aperi-Dev\Code\javax.help" directory
- From within the IDE, select the javax.help project and hit F5 to refresh
Automatic Download of 3rd Party Files
- Configure your eclipse workspace to use Ant 1.7.0
- Click Window -> Preferences...
- Navigate to Ant -> Runtime and click the "Ant Home" button
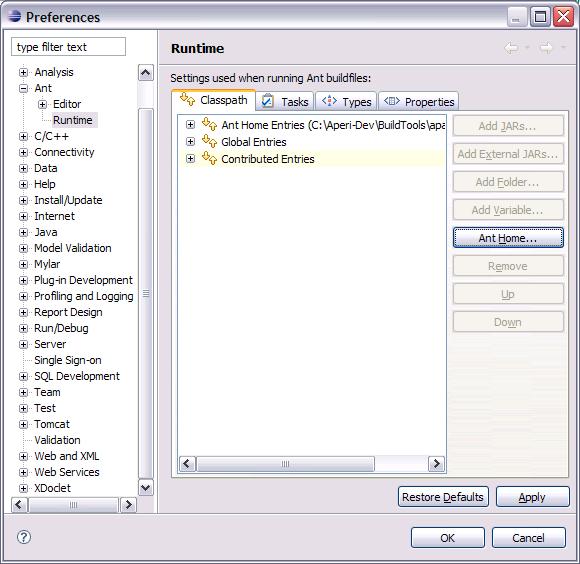
- Select the base directory on Ant 1.7.0 (C:\Aperi-Dev\BuildTools\apache-ant-1.7.0)
- Run the ant task "Download 3rd Party Components to IDE"
- Click Run -> External Tools -> Open External Tools Dialog...
- Select Ant Build -> Download 3rd Party Components to IDE and click the Run button.
- Eclipse will take a few minutes to download and place third party files
- From within the IDE, select all the Aperi projects and hit F5 to refresh the projects with the filesystem.


4. Building Native Code
Most users do not need to actually compile the native code. Such users can simply use the latest binaries (already compiled code). To do this:
- Run --> External Tools --> ResetDebugEnvironmentNoNativeCompile
When this run correctly, skip to section 5
4a. Building Aperi on Windows
- Make sure the C:\Aperi-Dev\Code\Aperi\build_env.bat file is updated so that variables are correct. A default directory, C:\Aperi-Dev\BuildTools\, is used to house the tools needed to build Aperi. If this directory not used, build_env.bat should be updated accordingly.
- Launch ResetDebugEnvironment from Eclipse. This launch script is preconfigured to build the native code on a Windows platform. The image below illustrates the launch.

NOTE: If the launch scripts do not appear as illustrated in the above image, there is a small work around. Go to Window -> Open Perspective -> Other -> CVS Repository Exploring. “Re-check out” the AperiDebug project. For some reason, this resolves the problem. You should now see the scripts as illustrated above. Launch ‘ResetDebugEnvironment’.

- Launch RunConfigureAperiIDE to install Aperi and creates a runtime Derby database.

4b. Building Aperi on Linux
- Create a Linux aperi build user:
username: aperi
password: aperi
home directory: /home/aperi
- Verify you have SSH access to localhost
ssh aperi@localhost
- Make a symbolic link from "/usr/lib/jvm/jdk1.5.0" to the Sun JDK.
- Make sure the /Aperi-Dev/Code/Aperi/build_env.sh file is updated so that variables are correct. A default directory, /Aperi-Dev/BuildTools/, is used to house the tools needed to build Aperi. If this directory not used, build_env.sh should be updated accordingly.
- If you would like to compile the native code then Launch CompileNativeLinux_FromLinux. If not, proceed to the next step.

- Launch ResetDebugEnvironmentLinux from Eclipse. The image below illustrates the launch.

NOTE: If the launch scripts do not appear as illustrated in the above image, there is a small work around. Go to Window -> Open Perspective -> Other -> CVS Repository Exploring. “Re-check out” the AperiDebug project. For some reason, this resolves the problem. You should now see the scripts as illustrated above. Launch ‘ResetDebugEnvironment’.
5. Installing & Configuring Aperi
Installing will configure Aperi for runtime (set ports, etc.). From the IDE, open the Run Dialog and select the following run script:
- Aperi-Install (for simplicity, just accept all of the defaults when the installer runs)
6. Running Aperi in a debug environment
If the installation completes successfully, Aperi is ready to start. Launch the following processes in the following order:
- Aperi-DerbyDB-Start
- Aperi-DataServer
- Aperi-DeviceServer
- Aperi-Agent
- Aperi-GUI
- Aperi-ReportServer