Notice: this Wiki will be going read only early in 2024 and edits will no longer be possible. Please see: https://gitlab.eclipse.org/eclipsefdn/helpdesk/-/wikis/Wiki-shutdown-plan for the plan.
AMP Fuel Plugin
This page describes the AMP Fuel plugin for ICE that can be used with the AMP Fuel simulator from the Nuclear Energy Advanced Modeling and Simulation program. There are currently two pieces to the AMP Fuel plugin: a job launcher that will execute AMP on locally or on ORNL machines (given sufficient access rights) and a "model builder" that will create input files for AMP.
Contents
Configuring NiCE
You should download or build ICE following the instructions on the [Getting ICE] page. For regular users, downloading the nightly binary of nice.product-*.zip should be sufficient, (where * is equal to the os type and architecture of your machine).
You will also need to install the "Painfully Simple Form" file that describes the input parameters for AMP. This file is called AMPDocumentedDefaultsForNiCE.psf and can be downloaded from [the serialized plugins directory] on ICE's Sourceforge.net page. This file needs to be placed in the default data directory that use for ICE under the "defaultUsers/default" subfolder.
If you have never used ICE, then you will be asked for a default data directory when you run the program. This directory must exist, but ICE will create the "defaultUser/default" directory structure in the data directory if it does not exist. The final directory structure will look something like this for a user named Spock that is running on Linux with a default directory for ICE named "ICEFiles":
- /home/spock/NiCEFiles/
- /defaultUser
- /default
Configuring AMP
AMP should already be built and installed on the machine where you intend to run it. If it is not, you may need to contact your system's administrator. The only other thing that needs to be done is to configure your .bashrc file that machine to load the AMP environment variables and set the proper paths for MPI. This must be in your .bashrc file and not the .bash_profile file because ICE will launch AMP across an SSH connection.
AMP is not installed in a world-readable directory on any ORNL machines. ICE looks in your home directory for an "AMP_INSTALL" directory for your AMP installation.
Setting up an AMP Input File
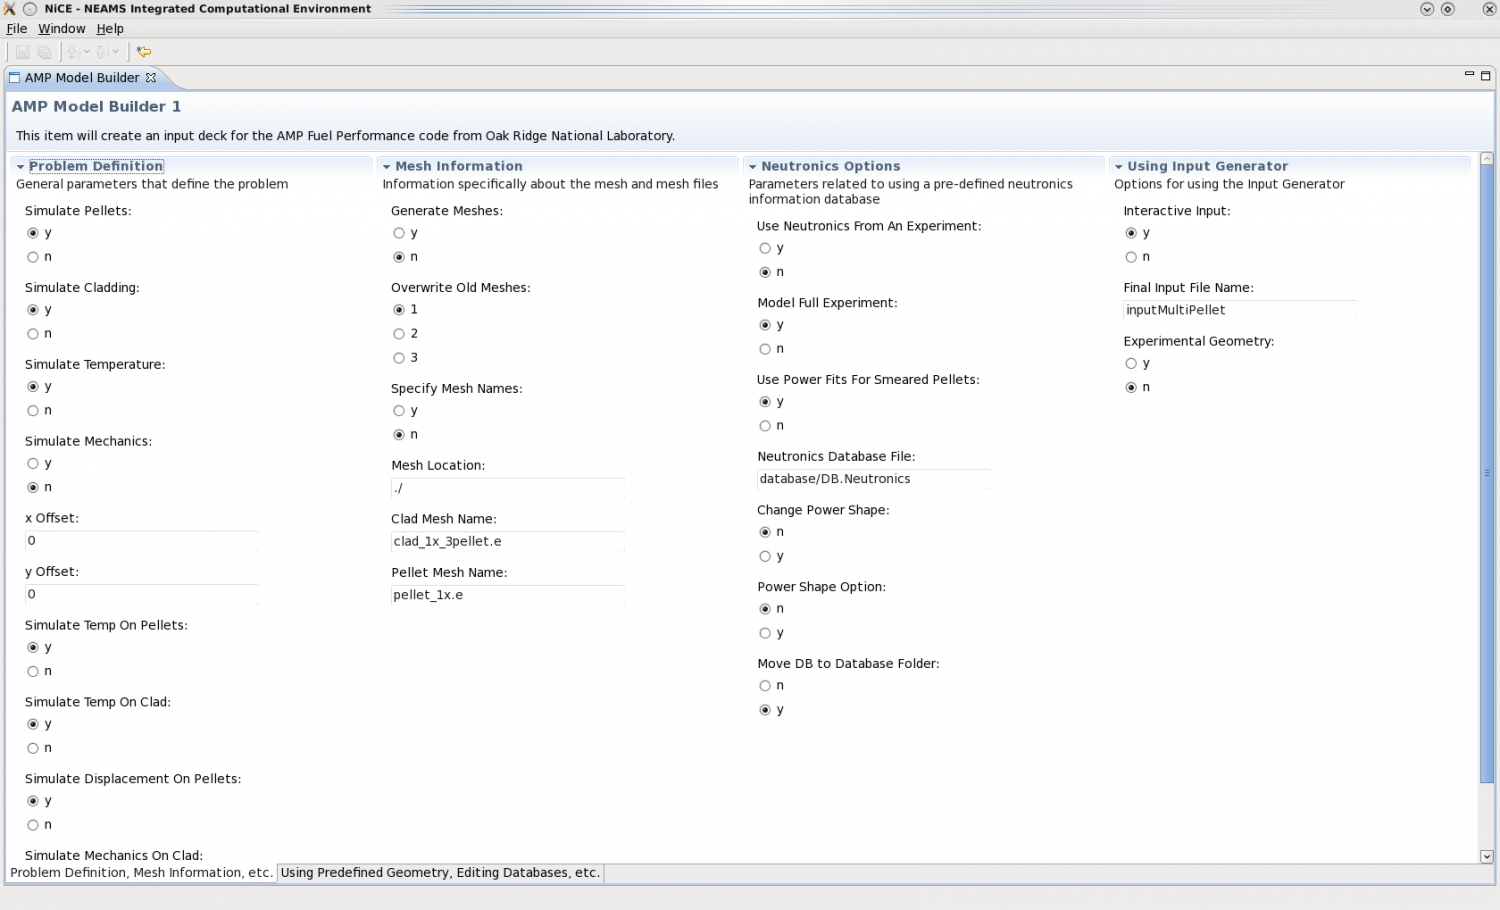
To create an AMP input file in ICE, click File > Create an Item... and choose AMP Model Builder from the list. If AMP Model Builder is not in the list or ICE says that it cannot load it, please contact us!
When the model editor appears on the screen, you can configure most of the options available in AMP Fuel. The paths for the mesh files need to be absolute. When you have configured the options that you want, click the "Save" button at the top. After the model is saved, it will be reviewed and some new options may become available. To write the file to disk, choose the option to create a "key-value pair output" in the dropdown at the top right and click "Go!" The new input file will be saved in the default data directory and will be called AMP_Model_Builder_{id}.dat where {id} is the id number of the model in ICE.
There are two pages of options in the model builder and the pages can be changed by clicking the labelled tabs at the bottom of the screen.
Launching a Job
Launching AMP with ICE is done in a way very similar to creating an input file. Click File->Create an Item... and choose AMP Model Builder from the list. The form displayed on this screen is much simpler than the form for creating the input file, but it works the same way. Select the input file that you want to use and the target machine from the drop down menus, click save, choose Launch the Job... from the process menu in the upper right and click "Go!"
If you are launching AMP locally, it will immediately launch. If you are executing AMP on a remote machine, ICE will prompt you for a user name and password to access that machine. When AMP finishes executing the contents that it dumped to stdout will be available in the table on the "Output Page," which can be accessed by clicking the second tab at the bottom of the screen.
Known Issues
For the time being, the full, absolute path to the AMP clad and pellet mesh files must be specified in the model builder or AMP will fail to launch because the files can't be found.

