Notice: This Wiki is now read only and edits are no longer possible. Please see: https://gitlab.eclipse.org/eclipsefdn/helpdesk/-/wikis/Wiki-shutdown-plan for the plan.
Difference between revisions of "Building the Higgins I-Card Manager Service"
| Line 1: | Line 1: | ||
| − | + | This page contains instructions on how to check out and build web application from the source code of the involved Higgins components. See [[Web-based Selector Solution]] for more information on the involved Higgins components and how they interact with each other, and see [[Deploying the Higgins I-Card Manager Service]] for information on how to deploy and configure web application. | |
| + | |||
| + | ==Prerequisites== | ||
| + | |||
| + | This guide assumes you have the following software: | ||
| + | * Eclipse IDE 3.3 or later (see http://www.eclipse.org/) | ||
| + | * Subclipse svn plug- in v 1.2.4 or later (see http://subclipse.tigris.org/) | ||
| + | * Web standard tools 2.0.1 or later (see http://www.eclipse.org/webtools/) | ||
| + | * Apache Tomcat 5.5 or later (or other servlet container) | ||
| + | * JDK 1.4 or later | ||
| + | |||
| + | ==Set up your Eclipse workspace== | ||
| + | |||
| + | ===Open a blank workspace=== | ||
| + | |||
| + | After you start Eclipse, it should display a blank workspace. If you have already been working in Eclipse and your workspace is not empty, you can create a new empty one by selecting File -> Switch Workspace -> Other. Select a folder to use for your new, blank workspace. | ||
| + | |||
| + | Your workspace should look like this: | ||
| + | |||
| + | [[Image:saml2idp-setup1.png|thumb|none|Blank Eclipse workspace]] | ||
| + | |||
| + | Make sure your blank workspace is configured to build all projects automatically: | ||
| + | |||
| + | [[Image:Blank-Build-Automatically.PNG|thumb|none|Build Automatically]] | ||
| + | |||
| + | ===Configure JDK=== | ||
| + | |||
| + | You should configure your Eclipse IDE to use JDK instead of JRE in order to be able to use Java compiler from ant scripts to build the Higgins components. Click Window -> Preferences and select Java -> Installed JREs. The default JRE is the one that was used to launch Eclipse, however you need to add a different one and set it as the workspace-default one for building. Higgins components are usually built with a Java 1.4 compiler. | ||
| + | |||
| + | [[Image:saml2idp-setup11.png|thumb|none|Configure JRE]] | ||
| + | |||
| + | ''Note: You should also check Java -> Compiler -> Compiler compliance level, and make sure this matches the JRE you use to build the projects.'' | ||
| + | |||
| + | ===Configure server runtime=== | ||
| + | |||
| + | In order to work with web applications, Eclipse needs to know about the servlet container (e.g. Tomcat) you want to use. Click Window -> Preferences and select Server -> Installed Runtimes. Click "Add...". Select the server you want to use (e.g. Tomcat 5.5), click "Next", specify the installation directory and click "Finish". | ||
| + | |||
| + | [[Image:saml2idp-setup10.png|thumb|none|Configure server runtime]] | ||
| + | |||
| + | ''Note: It is recommended to install Tomcat at a path that does not contain any spaces.'' | ||
| + | |||
| + | ==Populate the Eclipse workspace== | ||
| + | |||
| + | The next step is to populate your Eclipse workspace with the required projects. This could be done in two simple steps: | ||
| + | |||
| + | * Check out main project. | ||
| + | * Check out required projects. | ||
| + | |||
| + | ===Check out main project=== | ||
| + | |||
| + | First of all import '''org.eclipse.higgins.icm''' project into workspace, click '''File -> Import'''. In the import source list, select '''Other -> Checkout Projects from SVN'''. The URL for connecting to the Eclipse SVN is as follows: | ||
{| class="wikitable" style="text-align:left; border="1" cellpadding="5" cellspacing="0" | {| class="wikitable" style="text-align:left; border="1" cellpadding="5" cellspacing="0" | ||
| − | |||
| − | |||
| − | |||
| − | |||
| − | |||
| − | |||
| − | |||
|- | |- | ||
| − | | | + | | https://dev.eclipse.org/svnroot/technology |
|- | |- | ||
|} | |} | ||
| − | + | Checkout '''org.eclipse.higgins.icm''' project from '''https://dev.eclipse.org/svnroot/technology/org.eclipse.higgins/trunk/app/org.eclipse.higgins.icm''' | |
| − | + | ||
| − | + | ||
| − | + | ||
| − | + | ||
| − | + | ||
| − | + | ||
| − | + | ||
| − | + | ||
| − | + | ||
| − | + | ||
| − | + | ||
| − | + | ||
| − | + | ||
| − | + | ||
| − | + | ||
| − | + | ||
| − | + | ||
| − | + | ||
| − | + | ||
| − | + | ||
| − | + | ||
| − | + | ''Note: This may take several minutes, depending on your internet connection and current Eclipse server load.'' | |
| − | + | ||
| − | + | ===Check out required projects=== | |
| − | + | # Right click on org.eclipse.higgins.icm/'''projectWithDeps.psf -> Import Project Set ...''' | |
| − | + | # Answer '''No''' on the request whether to override '''org.eclipse.higgins.icm''' project | |
| − | + | ||
| − | + | ||
| − | + | ||
| − | + | ||
| − | + | ||
| − | + | ''Note: This may take several minutes, depending on your internet connection and current Eclipse server load.'' | |
| − | + | After checking out the projects, your workspace should be without build errors. | |
| − | == | + | ==Build Web Application== |
| − | + | ||
| − | + | ||
| − | + | ||
Revision as of 09:39, 14 January 2008
This page contains instructions on how to check out and build web application from the source code of the involved Higgins components. See Web-based Selector Solution for more information on the involved Higgins components and how they interact with each other, and see Deploying the Higgins I-Card Manager Service for information on how to deploy and configure web application.
Contents
Prerequisites
This guide assumes you have the following software:
- Eclipse IDE 3.3 or later (see http://www.eclipse.org/)
- Subclipse svn plug- in v 1.2.4 or later (see http://subclipse.tigris.org/)
- Web standard tools 2.0.1 or later (see http://www.eclipse.org/webtools/)
- Apache Tomcat 5.5 or later (or other servlet container)
- JDK 1.4 or later
Set up your Eclipse workspace
Open a blank workspace
After you start Eclipse, it should display a blank workspace. If you have already been working in Eclipse and your workspace is not empty, you can create a new empty one by selecting File -> Switch Workspace -> Other. Select a folder to use for your new, blank workspace.
Your workspace should look like this:
Make sure your blank workspace is configured to build all projects automatically:
Configure JDK
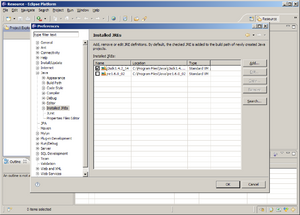
You should configure your Eclipse IDE to use JDK instead of JRE in order to be able to use Java compiler from ant scripts to build the Higgins components. Click Window -> Preferences and select Java -> Installed JREs. The default JRE is the one that was used to launch Eclipse, however you need to add a different one and set it as the workspace-default one for building. Higgins components are usually built with a Java 1.4 compiler.
Note: You should also check Java -> Compiler -> Compiler compliance level, and make sure this matches the JRE you use to build the projects.
Configure server runtime
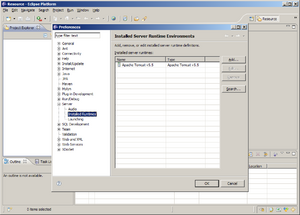
In order to work with web applications, Eclipse needs to know about the servlet container (e.g. Tomcat) you want to use. Click Window -> Preferences and select Server -> Installed Runtimes. Click "Add...". Select the server you want to use (e.g. Tomcat 5.5), click "Next", specify the installation directory and click "Finish".
Note: It is recommended to install Tomcat at a path that does not contain any spaces.
Populate the Eclipse workspace
The next step is to populate your Eclipse workspace with the required projects. This could be done in two simple steps:
- Check out main project.
- Check out required projects.
Check out main project
First of all import org.eclipse.higgins.icm project into workspace, click File -> Import. In the import source list, select Other -> Checkout Projects from SVN. The URL for connecting to the Eclipse SVN is as follows:
| https://dev.eclipse.org/svnroot/technology |
Checkout org.eclipse.higgins.icm project from https://dev.eclipse.org/svnroot/technology/org.eclipse.higgins/trunk/app/org.eclipse.higgins.icm
Note: This may take several minutes, depending on your internet connection and current Eclipse server load.
Check out required projects
- Right click on org.eclipse.higgins.icm/projectWithDeps.psf -> Import Project Set ...
- Answer No on the request whether to override org.eclipse.higgins.icm project
Note: This may take several minutes, depending on your internet connection and current Eclipse server load.
After checking out the projects, your workspace should be without build errors.


