Notice: This Wiki is now read only and edits are no longer possible. Please see: https://gitlab.eclipse.org/eclipsefdn/helpdesk/-/wikis/Wiki-shutdown-plan for the plan.
Difference between revisions of "IAM Target Platform"
(→Install the required bundles) |
(→Configure a target definition) |
||
| Line 36: | Line 36: | ||
# Start '''your''' eclipse (i.e. do not use the new installation you've just set up) | # Start '''your''' eclipse (i.e. do not use the new installation you've just set up) | ||
| − | # Create a new (simple) project. You can name it <tt>Target Platform</tt> | + | # Create a new (simple) project. You can name it <tt>IAM Target Platform</tt> |
| − | # ''File > New > Other... > Plug-in Development > Target Definiton'' | + | #: [[Image:Iam-3-new-project-target-platform.png]] |
| − | # Enter <tt>iam-ganymede</tt> as the name of the file | + | # Select the <tt>IAM Target Platform</tt> project and create a new <tt>Target Definition</tt>. |
| − | # Set Target Name to <tt>IAM Ganymede</tt> | + | #: ''File > New > Other... > Plug-in Development > Target Definiton'' |
| − | # Set Target Location to your <tt> | + | #: [[Image:Iam-4-new-target-definition.png]] |
| − | # Click on ''Set as Target Platform'' (you will need to repeat this last step if you change the bundles installed on your target definition). | + | # Fill out the Target Definition Details |
| − | + | ## Select the '''IAM Target Platform''' project you created earlier. | |
| − | + | ## Enter '''<tt>iam-ganymede</tt>'' as the name of the file. (NOTE: dialog will supply the ".target" suffix on its own) | |
| + | ## Select the "Create a target with basic settings" for the file content selection. | ||
| + | ## You are done. Select Finish. | ||
| + | #: [[Image:Iam-5-target-definition-details.png]] | ||
| + | # At this point you will have '''Target Definition Overview''' page presented to you. Fill it out accordingly. | ||
| + | ## Set Target Name to '''<tt>IAM Ganymede</tt>''' | ||
| + | ## Set Target Location to your '''<tt>.../trunk/dev-tools/eclipse</tt>''' folder that you initialized in the previous section. | ||
| + | #: [[Image:Iam-6-target-definition-overview.png]] | ||
| + | # Now we need to set this configuration as the Target Platform. Click on '''Set as Target Platform''' (you will need to repeat this last step if you change the bundles installed on your target definition). | ||
| + | #: [[Image:Iam-7-set-as-target-platform.png]] | ||
| + | # Almost done, now verify that the Target Platform has been created successfully. | ||
| + | #: ''Window > Preferences > Plug-in Development > Target Platform'' | ||
| + | #: [[Image:Iam-8-preferences-target-platform.png]] | ||
[[Category:IAM]] | [[Category:IAM]] | ||
Revision as of 19:11, 5 December 2008
< To: IAM Environment
Contents
Setting up the Target Platform
This page describes the process for setting up the target platform used to build IAM.
Create the base folder
Create a target-platform folder somewhere in your filesystem.
Install a new eclipse SDK
- Download the SDK from:
- Install on your target-platform folder
You should get the eclipse folder inside your target-platform folder.
Install the required bundles
The iam-prep-target-platform.xml (ANT Script) uses Ant 1.6.5+ & the P2.director application to populate the target-platform with the selection of plugins and features that IAM uses to build & test against.
The iam-prep-target-platform.xml ant script is checked into subversion at [1], you should check out all of trunk anyway if you are going to be working on IAM.
Basic operation of ant script...
[dev-tools]$ ant -f iam-prep-target-platform.xml |
The ant script expects an Eclipse SDK installation to be present in the trunk/dev-tools/eclipse folder.
- Most bundles come from ganymede update site.
- (TODO: specify versions to avoid changes with maintenance releases.)
- AJDT is downloaded from the AJDT update site.
- Some bundles are downloaded from Orbit.
- JTidy is downloaded from q4e.
- (TODO: a CQ for JTidy it is warranted, but maybe not needed if we upgrade the embedder)
Configure a target definition
Target platforms are managed through target definition files. You will need to set up your own target definitions.
- Start your eclipse (i.e. do not use the new installation you've just set up)
- Create a new (simple) project. You can name it IAM Target Platform
-
- Select the IAM Target Platform project and create a new Target Definition.
- File > New > Other... > Plug-in Development > Target Definiton
-
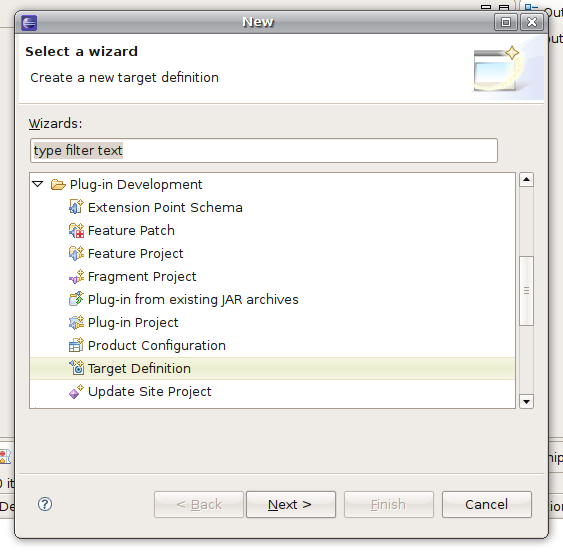
- Fill out the Target Definition Details
- Select the IAM Target Platform project you created earlier.
- Enter 'iam-ganymede as the name of the file. (NOTE: dialog will supply the ".target" suffix on its own)
- Select the "Create a target with basic settings" for the file content selection.
- You are done. Select Finish.
- At this point you will have Target Definition Overview page presented to you. Fill it out accordingly.
- Set Target Name to IAM Ganymede
- Set Target Location to your .../trunk/dev-tools/eclipse folder that you initialized in the previous section.
- Now we need to set this configuration as the Target Platform. Click on Set as Target Platform (you will need to repeat this last step if you change the bundles installed on your target definition).
-
- Almost done, now verify that the Target Platform has been created successfully.
- Window > Preferences > Plug-in Development > Target Platform
-


