Notice: This Wiki is now read only and edits are no longer possible. Please see: https://gitlab.eclipse.org/eclipsefdn/helpdesk/-/wikis/Wiki-shutdown-plan for the plan.
Difference between revisions of "Linux Tools Project/Systemtap/User Guide"
| Line 69: | Line 69: | ||
that you are able to run Systemtap GUI and are unfamiliar with how to procede. If you cannot yet start | that you are able to run Systemtap GUI and are unfamiliar with how to procede. If you cannot yet start | ||
the application, please refer to our [[Linux_Tools_Project/Systemtap/User_Guide/installation | Installation help page]] | the application, please refer to our [[Linux_Tools_Project/Systemtap/User_Guide/installation | Installation help page]] | ||
| − | + | '''NOTE:''' If this is the first time opening the IDE Perspective it will take a while to load as it has to | |
parse the tapsets. | parse the tapsets. | ||
| Line 179: | Line 179: | ||
== Concepts == | == Concepts == | ||
=== SystemTap Perspectives === | === SystemTap Perspectives === | ||
| + | SystemTap has three perspectives, each with its own purpose. | ||
| + | |||
| + | * [[Image:ide.png]] '''IDE Perspective''' - This is the primary perspective for SystemTap script writers. It contains the [[Linux_Tools_Project/Systemtap/User_Guide/ide/functionBrowser.html | Function Browser ]], [[Linux_Tools_Project/Systemtap/User_Guide/ide/kernelBrowser.html | Kernel Browser ]], [[Linux_Tools_Project/Systemtap/User_Guide/ide/probeAliasBrowser.html | Probe Alias Browser ]], and [[Linux_Tools_Project/Systemtap/User_Guide/ide/viewsAndEditors.html | Views and Editors ]]. The IDE Perspective contains the features necessary execute SystemTap scripts and the syntax highlighting and code | ||
| + | completion features that facilitate efficient development of scripts. | ||
| + | * [[Image:graphing.png]] '''Graphing Perspective''' - This perspective is invoked when the user calls the Run /w Chart option. It defaults to showing a data table containing the script results and is capable of producing six different chart types: Line Graph, Multi-Line Graph, Bar Graph, Multi-Bar Graph, Scatter Graph, and Multi-Scatter Graph. | ||
| + | * [[Image:dash.png]]'''Dashboard Perspective''' - This perspective is capable of storing meta-data related to each graph such as filters, aggregates, and display options in addition to showing a "dashboard" interface with multiple graphs updating simultaneously. | ||
| + | |||
=== STP Editor === | === STP Editor === | ||
| + | This editor is the most commonly used; it is used for the authoring and editing of Systemtap scripts. It is invoked when the user starts a new file or opens a file with the .stp extension. It provides syntax highlighting, code completion, and run support. | ||
| + | |||
| + | [[Image:Editor.png]] | ||
| + | |||
| + | |||
| + | See also: [[Linux_Tools_Project/Systemtap/User_Guide/ide/menus.html | Menus ]], | ||
| + | [[Linux_Tools_Project/Systemtap/User_Guide/ide/exampleScripts.html | Example SystemTap Scripts ]], [[Linux_Tools_Project/Systemtap/User_Guide/ide/toolbars.html | Toolbars ]] | ||
| + | |||
=== Function Browser === | === Function Browser === | ||
| + | The Funtion Browser lists all of the functions that are defined in the tapset library. Functions are grouped by the file that they are defined. Each listed function has an icon that corresponds to its return type. | ||
| + | |||
| + | * [[Image:var_str.gif]] String | ||
| + | * [[Image:var_long.gif]] Long | ||
| + | * [[Image:var_void.gif]] Void | ||
| + | |||
| + | If you double click on any function a call to that function will be added to the active editor at the current cursor location. Also if you right click on a function and click "View Definition" the tapset file where the function is defined will be opened. | ||
| + | |||
| + | [[Image:function.png]] | ||
| + | |||
=== Kernel Browser === | === Kernel Browser === | ||
| + | The Kernel Source Browser is used to display the kernel tree. This provides you with a quick way to locate places to add probes. Any file in the Kernel Source tree can be opened by double clicking on it. This will open up the selected file in the Editor view. You can then double click on the ruler next to any line that you wish to probe. If SystemTap can probe that line a probe point will be inserted at the end of the script you were most recently working on. If the line can't be probed, an error message will be displayed. | ||
| + | |||
| + | [[Image:KernelSource.png]] | ||
| + | |||
=== Probe Alias Browser === | === Probe Alias Browser === | ||
| + | The Probe Alias Browser lists all of the probe aliases that are defined in the tapset library. Probes are grouped based on their type. In addition to the list of probes, each probe lists all of the variables that it has access to. Each variable is listed with an icon that represents its type. Types are as follows: | ||
| + | |||
| + | * [[Image:Var str.gif]] String | ||
| + | * [[Image:Var long.gif]] Long | ||
| + | * [[Image:Var unk.gif]] Unknown | ||
| + | |||
| + | If you double click on any probe alias, probe point will be added to the end of the active editor. Also if you right click on a probe and click "View Definition" the tapset file where the probe is defined will be opened. | ||
| + | |||
| + | [[Image:ProbeAlias.png]] | ||
| + | |||
== Tasks == | == Tasks == | ||
=== Creating SystemTap Scripts === | === Creating SystemTap Scripts === | ||
| + | |||
| + | Create a SystemTap script by selecting '''<u>F</u>ile-><u>N</u>ew''' in the IDE Perspective. You'll be prompted to enter a name for the file; ''make sure that you use a .stp extension or else SystemTap GUI will not recognize the file as a SystemTap script and certain editor and run features will not be active.'' | ||
| + | |||
| + | Your new file will be open and ready for coding in the Editor pane. | ||
| + | |||
| + | A [[Linux_Tools_Project/Systemtap/User_Guide/ide/IDETutorial.html | IDE Tutorial ]] is also provided in the help pages for a step by step demo. | ||
| + | |||
| + | For advanced SystemTap langauge help please see the SystemTap Development User's Guide and the documentation available at the SystemTap website's documentation page - http://sourceware.org/systemtap/documentation.html | ||
| + | |||
=== Using the STP Editor === | === Using the STP Editor === | ||
| + | The STP Editor is used for the authoring and editing of Systemtap scripts. It is invoked when the user starts a new file or opens a file with the .stp extension. Using the editor is as easy as setting the focus to the editor pane and typing. | ||
| + | |||
| + | [[Image:Editor.png]] | ||
| + | |||
| + | There are certain features within the editor you may want to take advantage of: | ||
| + | * Syntax Highlighting - Certain code items are colored in .stp and .c files based on a set of rules and | ||
| + | colors. You can turn this on or off and change the colors in '''<u>W</u>indow-><u>P</u>references'''. | ||
| + | * Code Assist - SystemTap GUI will attempt to finish your probe alias names based on what you have already | ||
| + | typed. You can then select the appropriate probe alias or continue typing to filter the list down even more. | ||
| + | You can turn this feature on and off or set the speed on it in '''<u>W</u>indow-><u>P</u>references'''. | ||
| + | * Run Support - See the [[Linux_Tools_Project/Systemtap/User_Guide/ide/lesson3.html | Lesson 3: Running Your Script ]] | ||
| + | help page on a walk through use of the Run command. The Run command allows scripts to be executed directly | ||
| + | through SystemTap GUI. | ||
| + | |||
| + | See also: [[Linux_Tools_Project/Systemtap/User_Guide/ide/menus.html | Menus ]], | ||
| + | [[Linux_Tools_Project/Systemtap/User_Guide/ide/toolbars.html | Toolbars ]], [[Linux_Tools_Project/Systemtap/User_Guide/ide/exampleScripts.html | Example SystemTap Scripts ]] | ||
| + | |||
=== Viewing Data Charts === | === Viewing Data Charts === | ||
| + | Viewing data charts from a SystemTap script is accomplished by running that script with the '''<u>R</u>un-><u>R</u>un w/ Chart''' option. This is covered in the [[Linux_Tools_Project/Systemtap/User_Guide/ide/lesson3.html | Lesson 3: Running Your Script ]]. After running a script with the chart option, the user is taken into the Graphing Perspective and the Data Table is loaded by default. The data table immediately begins populating as it recieves input back through the console from the running SystemTap script. | ||
| + | |||
| + | [[Image:IDEGraphics.png]] | ||
| + | |||
== Reference == | == Reference == | ||
=== Views and Editors === | === Views and Editors === | ||
| + | This section details the views and editor in relation to the IDE Perspective. | ||
| + | |||
| + | ==== Views ==== | ||
| + | |||
| + | The IDE Perspective consists of 5 views and and two editors. | ||
| + | |||
| + | * '''Probe Alias Browser''' - A list of all probe aliases currently available in your version of Systemtap. Covered in detail [[Linux_Tools_Project/Systemtap/User_Guide/ide/probeAliasBrowser.html | here ]]. | ||
| + | * '''Function Browser''' - A list of functions currently supported in your version of Systemtap. Covered in detail [[Linux_Tools_Project/Systemtap/User_Guide/ide/functionBrowser.html | here ]]. | ||
| + | * '''Kernel Source Browser''' - Used to display the kernel tree. Covered in detail [[Linux_Tools_Project/Systemtap/User_Guide/ide/kernelBrowser.html | here ]]. | ||
| + | * '''Console''' - The console view is where all of the output from the running script is shown. If more then one script is running at the same time you are able to switch between which console is currently displayed by clicking on the "Display Selected Console" button. The script can halt execution here if the user selects the '''Stop''' button. The user also has the option of saving the console output to a file, which can be done by clicking the '''Save log output''' button at the top of the console.[[Image:IDEConsole.png]] | ||
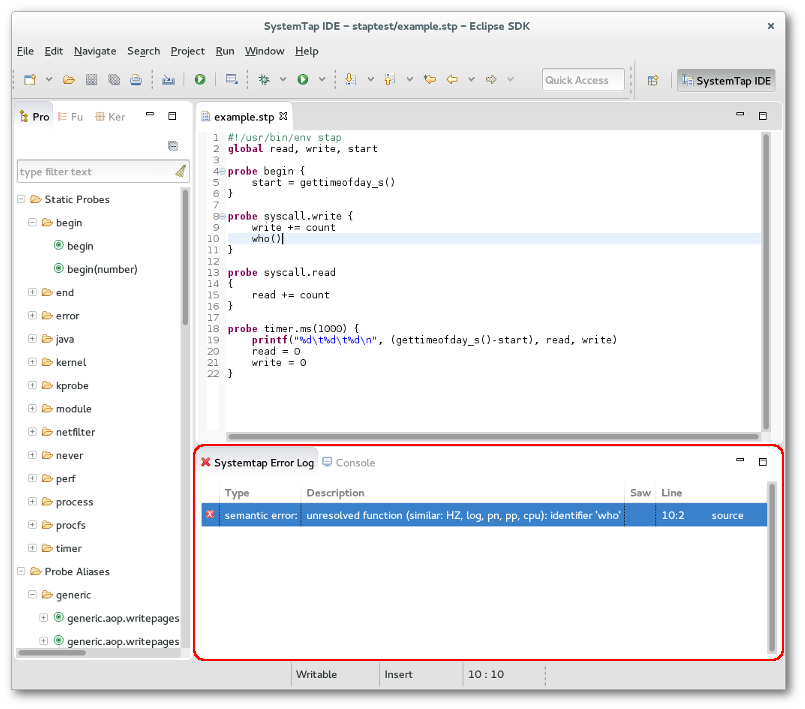
| + | * '''Error Log''' - If the script you tried to run contained errors, this view will become active and display the errors. You can double click on the eror message to jump to the line in the file where the error occured. [[Image:ErrorLog.png]] | ||
| + | |||
| + | ==== Editors ==== | ||
| + | |||
| + | Three editors are available in Systemtap GUI. | ||
| + | |||
| + | * '''STP Editor''' - This editor is the most commonly used; it is used for the authoring and editing of Systemtap scripts. It is invoked when the user starts a new file or opens a file with the .stp extension. It provides syntax highlighting, code completion, and run support. | ||
| + | * '''C Editor''' - This editor is available for the read only viewing of kernel source. It is invoked when the user opens a file of extension .c. Syntax highlighting is supported in this mode. | ||
| + | * '''Plain Text Editor''' - A plain text editor is also implemented for the user should they need it. | ||
| + | |||
=== Menus === | === Menus === | ||
| + | What follows is a comprehension list of the menu options available within the IDE Perspective of Systemtap GUI. | ||
| + | |||
| + | ==== <u>F</u>ile ==== | ||
| + | * '''<u>N</u>ew File''' - This option will bring up a dialog to create a new file. You may specify any location. Files ending in a .stp or .c extension will have syntax highlighting and code completion features as appropriate. (Shortcut: Crtl+L) | ||
| + | [[Image:newbox1.png]] | ||
| + | * '''<u>O</u>pen File''' - This option will bring up a dialog to select a file to open. Once a file is selected it will open in the editor window. (Shortcut: Crtl+O) | ||
| + | [[Image:openbox1.png]] | ||
| + | * '''<u>C</u>lose''' - This option closes the file in the editor pane that currently has the focus. (Shortcut: Crtl+F4) | ||
| + | * '''C<u>l</u>ose All''' - This option closes all files in the editor pane. (Shortcut: Shift+Crtl+F4) | ||
| + | * '''<u>S</u>ave''' - This option saves the file that currently has the focus. (Shortcut: Crtl+S) | ||
| + | * '''Save <u>A</u>s''' - This option prompts the user for a new location and file name and saves the file that currently has the focus under that new name and location. | ||
| + | * '''Sav<u>e</u> All''' - This option saves all files currently open in the editor pane. (Shortcut: Shift+Crtl+S) | ||
| + | * '''Rever<u>t</u>''' - This option discards changes to the file currently under the focus replaces it with the last saved version. | ||
| + | * '''<u>P</u>rint''' - This option prints the file in the editor pane currently holding the focus. (Shortcut: Crtl+P) | ||
| + | * '''<u>E</u>xport Script''' - This option prompts the user to enter metadata associated with the Systemtap script to be exported and used in the Dashboard perspective. See the [[Linux_Tools_Project/Systemtap/User_Guide/dashboard/creatingModules.html | Creating Modules guide]] for instructions. | ||
| + | * '''<u>I</u>mport Tapset''' - This option allows you to include additional tapset directories when you run a script. (Shortcut: Crtl+I) | ||
| + | [[Image:importbox1.png]] | ||
| + | * '''E<u>x</u>it''' - Exits Systemtap GUI. | ||
| + | |||
| + | ==== <u>E</u>dit ==== | ||
| + | * '''<u>U</u>ndo''' - Undos the previous editor related action. (Shortcut: Crtl+Z) | ||
| + | * '''<u>R</u>edo''' - Redos the previous editor related action removed by Undo. (Shortcut: Crtl+Y) | ||
| + | * '''Cu<u>t</u>''' - Removes the selected text from the editor pane and places it in the clipboard. (Shortcut: Shift+Delete, Ctrl+X) | ||
| + | * '''<u>C</u>opy''' - Copies the selected text from the editor pane and places it in the clipboard. (Shortcut: Ctrl+Insert, Crtl+C) | ||
| + | * '''<u>P</u>aste''' - Copies the text from the clipboard to the location of the focus in the editor pane. (Shortcut: Shift+Insert, Crtl+V) | ||
| + | * '''Select <u>A</u>ll''' - Selects all text within the file in the editor that the focus is currently in. (Shortcut: Crtl+A) | ||
| + | * '''<u>F</u>ind/Replace''' - Opens the Find/Replace dialogue in which users may specify a text string to find and/or replace, with options to search forwards or backwards, the entire document or just the selected lines, and whether or not they want the following options: | ||
| + | ** Case sensitive | ||
| + | ** Wrap Search | ||
| + | ** Whole Word | ||
| + | ** Incremental | ||
| + | ** Regular expressions | ||
| + | (Shortcut: Crtl+F) | ||
| + | |||
| + | [[Image:findbox1.png]] | ||
| + | * '''Find <u>N</u>ext''' - Finds the next instance of the search string in the direction indicated in the Find/Replace dialogue box. (Shortcut: Crtl+K) | ||
| + | * '''Find Pre<u>v</u>ious''' - Finds the previous instance of the search string in the direction indicated in the Find/Replace dialogue box. (Shortcut: Shift+Crtl+K) | ||
| + | * '''<u>I</u>ncremental Find Next''' - Finds the next occurrence of the text and updates the selection after each character typed. To use Incremental Find: | ||
| + | ** In the text (or Java) editor, press Ctrl+J or select Edit > Incremental Find Next from the menu bar. | ||
| + | ** The workbench status line displays "Incremental Find:". The editor is now in the Incremental Find mode. | ||
| + | ** As you type, the editor finds the next occurrence of the text and updates the selection after each character typed. | ||
| + | ** Navigate to the next or previous match by pressing Arrow Down or Arrow Up. | ||
| + | ** Undo the last action within the Incremental Find mode by pressing Backspace. | ||
| + | ** You can leave the Incremental Find mode by pressing Esc | ||
| + | * '''Incre<u>m</u>ental Find Previous''' - Operates as illustrated in above bullet but in the reverse. (Shortcut: Shift+Crtl+J) | ||
| + | * '''Select <u>A</u>ll''' - Selects all the text in the file that currently has the focus. (Shortcut: Ctrl+A) | ||
| + | * '''<u>W</u>ord Completion''' - Completes the string being typed by using the last example typed by the user. (Shortcut: Alt+/) | ||
| + | |||
| + | ==== <u>N</u>avigate ==== | ||
| + | * '''<u>F</u>orward''' - Navigates to the next file in sequence as they were opened in the editor pane. (Shortcut: Alt+Right) | ||
| + | * '''<u>B</u>ack''' - Navigates to the previous file in sequence as they were opened in the editor pane. (Shortcut: Alt+Left) | ||
| + | * '''Last Edit Lo<u>c</u>ation''' - Moves the focus to the file containing the last known edit. (Shortcut: Crtl+Q) | ||
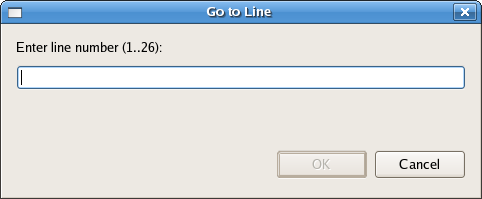
| + | * '''<u>G</u>oto Line...''' - Moves the focus to the specified line number, with the range of line numbers listed in the dialogue box. (Shortcut: Ctrl+L)[[Image:gotobox1.png]] | ||
| + | |||
| + | ==== <u>R</u>un ==== | ||
| + | * '''<u>R</u>un''' - Available when a Systemtap script is loaded into the editor, this feature runs the script. You will be prompted to enter details of the remote machine running the systemtapgui server.ShortCut(Ctrl+F5) | ||
| + | [[Image:consolebox1.png]] | ||
| + | * '''<u>R</u>un w/Chart''' - Available when a Systemtap script is loaded into the editor, this feature will prompt the user for the number of columns for the chart, in addition to their titles and regular expressions. The regular expressions are used to parse the console output for the script and determine the values of each column at a certain sample point. The combined regular expression is shown at the bottom of the dialogue box. The user has the option to use Command Line Options as well. When you click OK you will be prompted to enter the details of the remote machine running the systemtapgui server. When the script is executed the application will switch into the Graphing perspective. A Data View chart is populated with live data, in addition to the output in the console. More information regarding the Graphing perspective is available here. | ||
| + | [[Image:chartbox1.png]] | ||
| + | * '''<u>S</u>top''' - This option terminates the script thread associated with whichever script currently has the focus. (Shortcut: Ctrl+F9) | ||
| + | |||
| + | ==== <u>W</u>indow ==== | ||
| + | * '''Open in <u>N</u>ew Window''' - This option opens a new instance of SystemTap GUI. | ||
| + | * '''<u>O</u>pen Perspective''' - This submenu lists each of the available perspectives to open: | ||
| + | ** IDE Perspective | ||
| + | ** Graphing Perspective | ||
| + | ** Dashboard Perspective | ||
| + | * '''Show <u>V</u>iews''' - This submenus lists each of the available views to open: | ||
| + | ** Console | ||
| + | ** Error Log | ||
| + | ** Functions | ||
| + | ** Kernel Source | ||
| + | ** Probe Alias | ||
| + | ** Other - Lists all views in the application. | ||
| + | [[Image:viewbox1.png]] | ||
| + | * '''<u>P</u>references''' - Due to the breath of this topic it is covered in another section. Please see [[Linux_Tools_Project/Systemtap/User_Guide/ide/preferences.html | Preferences ]]. | ||
| + | |||
=== Preferences === | === Preferences === | ||
| + | This section details each of the options listed under '''<u>W</u>indow-><u>P</u>references'''. The Preferences dialog is the dialog used to set user preferences. The Preferences dialog pages can be searched using the filter function. To filter by matching the page title, simply type the name of the page you are seeking and the available pages will be presented below. The filter also searches on keywords such as appearance and java. | ||
| + | |||
| + | * '''Logging''' | ||
| + | ** '''Enable logging''' - This option turns on and off the ability to log data from the console. | ||
| + | ** '''Logging level''' - This dropdown box allows you to select one of our levels of logging. | ||
| + | *** Debug - A very large quantity of debug information, difficult to identify what you are looking for but extremely exhaustive. | ||
| + | *** Info - Displays most information regarding program execution; the default level. | ||
| + | *** Critical - Lists only critical errors duration execution. | ||
| + | *** Fatal - Lists only fatal errors during execution. | ||
| + | ** ''Log to''' - Specifies where you wish the logging to be written: | ||
| + | *** Console - Writes the debug information directly to the console. | ||
| + | *** File - Write the debug information to a file. | ||
| + | ** '''File''' - The location of the file that logging sends the debug information to. | ||
| + | * '''SystemTap''' - This section contains options relevent to SystemTap itself. | ||
| + | ** '''Remember window state''' - Preserves the state of the window on exitting SystemTap GUI. | ||
| + | ** '''Dashboard Preferences''' - Preferences relate to the Dashboard Perspective. | ||
| + | *** Additional Modules - Provides for the addition of more modules to the Dashboard. Modules are files containing a SystemTap script and associated metadata. | ||
| + | ** '''Environment Variables''' - Allows the user to set specific values to the following environment variables | ||
| + | *** LD_LIBRARY_PATH | ||
| + | *** PATH | ||
| + | *** SYSTEMTAP_TAPSET | ||
| + | *** SYSTEMTAP_RUNTIME | ||
| + | ** '''Graphing''' - Preferences related to the Graphing Perspective. | ||
| + | *** '''<u>R</u>efresh Delay (ms)''' - Milliseconds in between re-painting the graph. | ||
| + | *** '''Data Table''' - Preferences related to the data table. | ||
| + | **** <u>J</u>ump to the newest entry - Determines whether the scroll bar maintains its location at the newest entry. | ||
| + | **** <u>A</u>uto resize columns - Determines whether columns automatically resize to the width of the contents or whether they remain placed when moved. | ||
| + | **** <u>M</u>ax data items - Maximum number of entries that the table shows, though the table itself may have more not visible. | ||
| + | *** '''Graph''' - Preferences related to graphs. | ||
| + | **** <u>S</u>how grid lines - Turns on and off painting of the grid lines. | ||
| + | **** <u>V</u>iewable data items - Number of maximum samples plotted at any time. | ||
| + | ** '''IDE''' - Preferences when loading the IDE Perspective. | ||
| + | *** '''Use stored tapset trees''' - Loads the stored tapset trees on initialization. | ||
| + | *** '''Editor''' - Preferences related to the editor. | ||
| + | **** <u>E</u>ditor Background Color - Sets the color painted in the background of the editor pane. | ||
| + | **** Show Line <u>N</u>umbers - Option to turn on and off line numbers in the editor pane. | ||
| + | **** Code Assist | ||
| + | ***** <u>U</u>se Code Assist - Turns on and off the option to use Code Assist, which is a method that predicts what you are typing based on existing probe aliasi and opens a window that allows you to scroll down and select and/or continue typing for refined results. | ||
| + | ***** How Code Assist adds code - Method used in Code Assist. | ||
| + | ****** <u>I</u>nsert - Inserts the selected text directly into the cursor point. | ||
| + | ****** <u>O</u>verwrite - Overwrites as you type. | ||
| + | ***** Activation <u>D</u>elay (requires restart) - Delay in milliseconds before the code assist routines attempts to run. | ||
| + | ***** Activation <u>T</u>rigger - This is the key that actives Code Assist. For SystemTap GUI it is set to the divider between tapset and probe alias. | ||
| + | **** Syntax Coloring - These options assign color values to identified types within the .stp and .c editors. | ||
| + | ***** STP editor | ||
| + | ****** <u>D</u>efault Color - Color of normal code. | ||
| + | ****** <u>K</u>eyword Color - Color of keywords. | ||
| + | ****** <u>E</u>mbedded C Color - Color of embedded C code. | ||
| + | ****** <u>E</u>mbedded Color - Color of embedded code. | ||
| + | ****** <u>C</u>omment Color - Color of comments. | ||
| + | ****** <u>T</u>ype Color - Color of items identified as types. | ||
| + | ****** <u>S</u>tring Color - Color of strings. | ||
| + | ***** C editor | ||
| + | ****** <u>D</u>efault Color - Color of normal code. | ||
| + | ****** <u>K</u>eyword Color - Color of keywords. | ||
| + | ****** <u>P</u>reprocessor Color - Color of preprocessor code. | ||
| + | ****** <u>C</u>omment Color - Color of comments. | ||
| + | ****** <u>T</u>ype Color - Color of items identified as types. | ||
| + | ****** <u>S</u>tring Color - Color of strings. | ||
| + | **** Typeing - No options available at this time. | ||
| + | *** '''Path''' | ||
| + | **** <u>K</u>ernel Source Directory - Location of the directory that the kernel source code is pulled from. | ||
| + | **** Stap - No options available at this time. | ||
| + | ***** Tapsets - Preferences related to tapsets. | ||
| + | ****** <u>A</u>dditional Tapsets - Allows you to specify additional tapsets scripts to be added in with every script. | ||
| + | ** '''Remote Server''' - Details regarding the remote machine running the systemtapgui Server | ||
| + | *** '''Host Name''' - IP address of the remote machine | ||
| + | *** '''Port''' - Port used for communication. Default is 22462. | ||
| + | *** '''User Name''' - User name that has sufficient permissions to transfer and run the script on the remote machine. | ||
| + | *** '''Password''' - Password for the above user. | ||
| + | |||
=== Frequently Asked Questions === | === Frequently Asked Questions === | ||
| + | This section details frequently asked questions relating to the IDE Perspective. | ||
| + | |||
| + | '''Where can I find information regarding the Systemtap scripting language?''' | ||
| + | |||
| + | A: The best place to look for up to date information regarding Systemtap itself is its homepage - http://sourceware.org/systemtap/documentation.html | ||
| + | |||
| + | |||
| + | '''How do I run a script once I've written it?''' | ||
| + | |||
| + | A: There are different options as far as running your Systemtap script. Please visit the [[Linux_Tools_Project/Systemtap/User_Guide/ide/menus.html | Menus ]] to learn more about the four ways of running Systemtap scripts. | ||
| + | |||
| + | |||
| + | '''Why does the application seem to hang when switching to the IDE Perspective?''' | ||
| + | |||
| + | A: If this is the first time you are trying to open the IDE perspective, or have recently gotten a new version of SystemTap this is expected. In order to generate a full list of all of the available probes, and functions the GUI has to run the stap command. If there are tapsets that do not run correctly using the 'stap -up2' comamnd this takes a long time. In order to build as complete a list as possible it will use a binary filtering algorithm to figure out which tapset function is broken and generate data for all of the others. | ||
| + | |||
| + | |||
=== Example SystemTap Scripts === | === Example SystemTap Scripts === | ||
| + | |||
| + | What follows is a few SystemTap Scripts that you may use in SystemTap GUI, taken from and linked to | ||
| + | http://sourceware.org/systemtap/documentation.html | ||
| + | |||
| + | There is also a description of the examples - http://sourceware.org/systemtap/examples/demo_script.txt | ||
| + | |||
| + | ==== top.stp - Prints the top 20 system calls (http://sourceware.org/systemtap/examples/top.stp) ==== | ||
| + | |||
| + | <pre> | ||
| + | #!/usr/bin/env stap | ||
| + | # | ||
| + | # This script continuously lists the top 20 systemcalls on the system | ||
| + | # | ||
| + | |||
| + | global syscalls | ||
| + | |||
| + | function print_top () { | ||
| + | cnt=0 | ||
| + | log ("SYSCALL\t\t\t\tCOUNT") | ||
| + | foreach ([name] in syscalls-) { | ||
| + | printf("%-20s\t\t%5d\n",name, syscalls[name]) | ||
| + | if (cnt++ == 20) | ||
| + | break | ||
| + | } | ||
| + | printf("--------------------------------------\n") | ||
| + | delete syscalls | ||
| + | } | ||
| + | |||
| + | probe kernel.function("sys_*") { | ||
| + | syscalls[probefunc()]++ | ||
| + | } | ||
| + | |||
| + | # print top syscalls every 5 seconds | ||
| + | probe timer.ms(5000) { | ||
| + | print_top () | ||
| + | </pre> | ||
| + | |||
| + | ==== prof.stp - Simple profiling (http://sourceware.org/systemtap/examples/prof.stp) ==== | ||
| + | |||
| + | <pre> | ||
| + | #!/usr/bin/env stap | ||
| + | |||
| + | # This is an example of profiling a specific command or pid. | ||
| + | # It works by recording the time when a system call is entered | ||
| + | # exited. | ||
| + | |||
| + | # Usage: prof.stp -c "top -n5" | ||
| + | # Will start up "top" and after 5 iterations, will exit. | ||
| + | # | ||
| + | # Usage: prof.stp -x 3323 | ||
| + | # Will profile pid 3323 until it ^c is hit. | ||
| + | # | ||
| + | |||
| + | probe kernel.function("sys_*") { | ||
| + | if (target() == tid()) | ||
| + | calltime[tid()] = gettimeofday_us() | ||
| + | } | ||
| + | |||
| + | probe kernel.function("sys_*").return { | ||
| + | if (target() != tid()) next | ||
| + | now = gettimeofday_us() | ||
| + | c = calltime[tid()] | ||
| + | if (!c) next | ||
| + | ttime[probefunc()] <<< now - c | ||
| + | delete calltime[tid()] | ||
| + | } | ||
| + | |||
| + | probe end { | ||
| + | printf("\n") | ||
| + | foreach (x in ttime) | ||
| + | printf("%-20s\tcalls:%6d\tavg time (ms):%5d\ttotal(ms):%7d\n", | ||
| + | x, @count(ttime[x]), @avg(ttime[x]), @sum(ttime[x])) | ||
| + | } | ||
| + | |||
| + | global calltime, ttime | ||
| + | </pre> | ||
| + | |||
| + | ==== keyhack.stp - Modifying variables in the kernel. (http://sourceware.org/systemtap/examples/keyhack.stp) ==== | ||
| + | |||
| + | <pre> | ||
| + | #! /usr/bin/env stap | ||
| + | |||
| + | # This is not useful, but it demonstrates that | ||
| + | # Systemtap can modify variables in a running kernel. | ||
| + | |||
| + | # Usage: ./keyhack.stp -g | ||
| + | |||
| + | probe kernel.function("kbd_event") { | ||
| + | # Changes 'm' to 'b' . | ||
| + | if ($event_code == 50) $event_code = 48 | ||
| + | } | ||
| + | |||
| + | probe end { | ||
| + | printf("\nDONE\n") | ||
| + | } | ||
| + | </pre> | ||
| + | |||
| + | |||
| + | ==== kmalloc.stp - Statistics example. (http://sourceware.org/systemtap/examples/kmalloc.stp) ==== | ||
| + | |||
| + | <pre> | ||
| + | #! /usr/bin/env stap | ||
| + | |||
| + | # Using statistics to examine kernel memory allocations | ||
| + | |||
| + | global kmalloc | ||
| + | |||
| + | probe kernel.function("__kmalloc") { | ||
| + | kmalloc <<< $size | ||
| + | } | ||
| + | |||
| + | # Exit after 10 seconds | ||
| + | probe timer.ms(10000) { exit () } | ||
| + | |||
| + | probe end { | ||
| + | printf("Count: %d allocations\n", @count(kmalloc)) | ||
| + | printf("Sum: %d Kbytes\n", @sum(kmalloc)/1000) | ||
| + | printf("Average: %d bytes\n", @avg(kmalloc)) | ||
| + | printf("Min: %d bytes\n", @min(kmalloc)) | ||
| + | printf("Max: %d bytes\n", @max(kmalloc)) | ||
| + | print("\nAllocations by size in bytes\n") | ||
| + | print(@hist_log(kmalloc)) | ||
| + | } | ||
| + | </pre> | ||
| + | |||
| + | |||
| + | ==== kmalloc2.stp - Example using arrays of statistics. (http://sourceware.org/systemtap/examples/kmalloc2.stp) ==== | ||
| + | |||
| + | <pre> | ||
| + | #! /usr/bin/env stap | ||
| + | |||
| + | # Using statistics and maps to examine kernel memory allocations | ||
| + | |||
| + | global kmalloc | ||
| + | |||
| + | probe kernel.function("__kmalloc") { | ||
| + | kmalloc[execname()] <<< $size | ||
| + | } | ||
| + | |||
| + | # Exit after 10 seconds | ||
| + | probe timer.ms(10000) { exit () } | ||
| + | |||
| + | probe end { | ||
| + | foreach ([name] in kmalloc) { | ||
| + | printf("Allocations for %s\n", name) | ||
| + | printf("Count: %d allocations\n", @count(kmalloc[name])) | ||
| + | printf("Sum: %d Kbytes\n", @sum(kmalloc[name])/1000) | ||
| + | printf("Average: %d bytes\n", @avg(kmalloc[name])) | ||
| + | printf("Min: %d bytes\n", @min(kmalloc[name])) | ||
| + | printf("Max: %d bytes\n", @max(kmalloc[name])) | ||
| + | print("\nAllocations by size in bytes\n") | ||
| + | print(@hist_log(kmalloc[name])) | ||
| + | printf("-------------------------------------------------------\n\n"); | ||
| + | } | ||
| + | } | ||
| + | </pre> | ||
| + | |||
=== Guide to Regular Expressions === | === Guide to Regular Expressions === | ||
| + | |||
| + | Regular expressions are used in SystemTap GUI to define how the GUI interprets information that it recieves | ||
| + | from the script file. If the user wishes to change the regular expression during runtime they may do so by | ||
| + | selecting '''<u>E</u>dit->Modify <u>P</u>arsing Expression'''. | ||
| + | |||
| + | Basic regex (taken from "http://java.sun.com/j2se/1.5.0/docs/api/ ) - | ||
| + | |||
| + | <pre> Summary of regular-expression constructs | ||
| + | |||
| + | Construct Matches | ||
| + | |||
| + | Characters | ||
| + | x The character x | ||
| + | \\ The backslash character | ||
| + | \0n The character with octal value 0n (0 <= n <= 7) | ||
| + | \0nn The character with octal value 0nn (0 <= n <= 7) | ||
| + | \0mnn The character with octal value 0mnn (0 <= m <= 3, 0 <= n <= 7) | ||
| + | \xhh The character with hexadecimal value 0xhh | ||
| + | \uhhhh The character with hexadecimal value 0xhhhh | ||
| + | \t The tab character ('\u0009') | ||
| + | \n The newline (line feed) character ('\u000A') | ||
| + | \r The carriage-return character ('\u000D') | ||
| + | \f The form-feed character ('\u000C') | ||
| + | \a The alert (bell) character ('\u0007') | ||
| + | \e The escape character ('\u001B') | ||
| + | \cx The control character corresponding to x | ||
| + | |||
| + | Character classes | ||
| + | [abc] a, b, or c (simple class) | ||
| + | [^abc] Any character except a, b, or c (negation) | ||
| + | [a-zA-Z] a through z or A through Z, inclusive (range) | ||
| + | [a-d[m-p]] a through d, or m through p: [a-dm-p] (union) | ||
| + | [a-z&&[def]] d, e, or f (intersection) | ||
| + | [a-z&&[^bc]] a through z, except for b and c: [ad-z] (subtraction) | ||
| + | [a-z&&[^m-p]] a through z, and not m through p: [a-lq-z](subtraction) | ||
| + | |||
| + | Predefined character classes | ||
| + | . Any character (may or may not match line terminators) | ||
| + | \d A digit: [0-9] | ||
| + | \D A non-digit: [^0-9] | ||
| + | \s A whitespace character: [ \t\n\x0B\f\r] | ||
| + | \S A non-whitespace character: [^\s] | ||
| + | \w A word character: [a-zA-Z_0-9] | ||
| + | \W A non-word character: [^\w] | ||
| + | |||
| + | POSIX character classes (US-ASCII only) | ||
| + | \p{Lower} A lower-case alphabetic character: [a-z] | ||
| + | \p{Upper} An upper-case alphabetic character:[A-Z] | ||
| + | \p{ASCII} All ASCII:[\x00-\x7F] | ||
| + | \p{Alpha} An alphabetic character:[\p{Lower}\p{Upper}] | ||
| + | \p{Digit} A decimal digit: [0-9] | ||
| + | \p{Alnum} An alphanumeric character:[\p{Alpha}\p{Digit}] | ||
| + | \p{Punct} Punctuation: One of !"#$%&'()*+,-./:;<=>?@[\]^_`{|}~ | ||
| + | \p{Graph} A visible character: [\p{Alnum}\p{Punct}] | ||
| + | \p{Print} A printable character: [\p{Graph}\x20] | ||
| + | \p{Blank} A space or a tab: [ \t] | ||
| + | \p{Cntrl} A control character: [\x00-\x1F\x7F] | ||
| + | \p{XDigit} A hexadecimal digit: [0-9a-fA-F] | ||
| + | \p{Space} A whitespace character: [ \t\n\x0B\f\r] | ||
| + | |||
| + | java.lang.Character classes (simple java character type) | ||
| + | \p{javaLowerCase} Equivalent to java.lang.Character.isLowerCase() | ||
| + | \p{javaUpperCase} Equivalent to java.lang.Character.isUpperCase() | ||
| + | \p{javaWhitespace} Equivalent to java.lang.Character.isWhitespace() | ||
| + | \p{javaMirrored} Equivalent to java.lang.Character.isMirrored() | ||
| + | |||
| + | Classes for Unicode blocks and categories | ||
| + | \p{InGreek} A character in the Greek block (simple block) | ||
| + | \p{Lu} An uppercase letter (simple category) | ||
| + | \p{Sc} A currency symbol | ||
| + | \P{InGreek} Any character except one in the Greek block (negation) | ||
| + | [\p{L}&&[^\p{Lu}]] Any letter except an uppercase letter (subtraction) | ||
| + | |||
| + | Boundary matchers | ||
| + | ^ The beginning of a line | ||
| + | $ The end of a line | ||
| + | \b A word boundary | ||
| + | \B A non-word boundary | ||
| + | \A The beginning of the input | ||
| + | \G The end of the previous match | ||
| + | \Z The end of the input but for the final terminator, if any | ||
| + | \z The end of the input | ||
| + | |||
| + | Greedy quantifiers | ||
| + | X? X, once or not at all | ||
| + | X* X, zero or more times | ||
| + | X+ X, one or more times | ||
| + | X{n} X, exactly n times | ||
| + | X{n,} X, at least n times | ||
| + | X{n,m} X, at least n but not more than m times | ||
| + | |||
| + | Reluctant quantifiers | ||
| + | X?? X, once or not at all | ||
| + | X*? X, zero or more times | ||
| + | X+? X, one or more times | ||
| + | X{n}? X, exactly n times | ||
| + | X{n,}? X, at least n times | ||
| + | X{n,m}? X, at least n but not more than m times | ||
| + | |||
| + | Possessive quantifiers | ||
| + | X?+ X, once or not at all | ||
| + | X*+ X, zero or more times | ||
| + | X++ X, one or more times | ||
| + | X{n}+ X, exactly n times | ||
| + | X{n,}+ X, at least n times | ||
| + | X{n,m}+ X, at least n but not more than m times | ||
| + | |||
| + | Logical operators | ||
| + | XY X followed by Y | ||
| + | X|Y Either X or Y | ||
| + | (X) X, as a capturing group | ||
| + | |||
| + | Back references | ||
| + | \n Whatever the nth capturing group matched | ||
| + | |||
| + | Quotation | ||
| + | \ Nothing, but quotes the following character | ||
| + | \Q Nothing, but quotes all characters until \E | ||
| + | \E Nothing, but ends quoting started by \Q | ||
| + | |||
| + | Special constructs (non-capturing) | ||
| + | (?:X) X, as a non-capturing group | ||
| + | (?idmsux-idmsux) Nothing, but turns match flags on - off | ||
| + | (?idmsux-idmsux:X) X, as a non-capturing group with the given flags on - off | ||
| + | (?=X) X, via zero-width positive lookahead | ||
| + | (?!X) X, via zero-width negative lookahead | ||
| + | (?<=X) X, via zero-width positive lookbehind | ||
| + | (?<!X) X, via zero-width negative lookbehind | ||
| + | (?>X) X, as an independent, non-capturing group | ||
| + | Match a position that is not a word boundary. | ||
| + | </pre> | ||
| + | |||
| + | Information regarding regular expressions can be found all over the Internet. A few examples have been listed | ||
| + | below: | ||
| + | |||
| + | * http://www.javascriptkit.com/javatutors/redev.shtml | ||
| + | * http://www.zytrax.com/tech/web/regex.htm | ||
= SystemTap Graphing = | = SystemTap Graphing = | ||
| Line 204: | Line 752: | ||
<p class="copyright">© Copyright Red Hat, Inc. 2009 | <p class="copyright">© Copyright Red Hat, Inc. 2009 | ||
| − | + | © Copyright Phil Muldoon <pkmuldoon@picobot.org> 2006. | |
| − | + | This documentation is licensed under the Eclipse Public License v. 1.0.</p> | |
Revision as of 13:09, 9 March 2012
Contents
- 1 Overview
- 2 SystemTap IDE
- 2.1 Getting Started
- 2.2 Concepts
- 2.3 Tasks
- 2.4 Reference
- 2.4.1 Views and Editors
- 2.4.2 Menus
- 2.4.3 Preferences
- 2.4.4 Frequently Asked Questions
- 2.4.5 Example SystemTap Scripts
- 2.4.5.1 top.stp - Prints the top 20 system calls (http://sourceware.org/systemtap/examples/top.stp)
- 2.4.5.2 prof.stp - Simple profiling (http://sourceware.org/systemtap/examples/prof.stp)
- 2.4.5.3 keyhack.stp - Modifying variables in the kernel. (http://sourceware.org/systemtap/examples/keyhack.stp)
- 2.4.5.4 kmalloc.stp - Statistics example. (http://sourceware.org/systemtap/examples/kmalloc.stp)
- 2.4.5.5 kmalloc2.stp - Example using arrays of statistics. (http://sourceware.org/systemtap/examples/kmalloc2.stp)
- 2.4.6 Guide to Regular Expressions
- 3 SystemTap Graphing
- 4 SystemTap Dashboard
Overview
Welcome to the SystemTapGUI Help pages. This section is intended to provide users with information and links about the SystemTap scripting language itself, in addition to a brief introduction to SystemTap GUI's structure for new users and a brief explanation of SystemTap.
SystemTap GUI's Plugin Design
SystemTap GUI was built with a modular goal in mind, namely, to provide the application as a series of plugins so that users may obtain just the ones they need without having to use a heavy-weight application should if they didn't need to. The most common example of this is to ship the Dashboard plugin independently, allowing non-SystemTap savvy users the ability to execute modules without having to write any scripts. The application in its complete state includes three perspective, each with a specific goal:
- IDE Perspective - Contains script editor and Function, Kernel Source, and Probe Alias browsers to assist in the creation and editting of SystemTap scripts.
- Graphics Perspective - Graphs data from SystemTap scripts in the desired graph form according to a regular expression passed to interpret the data.
- Dashboard Perspective - Allows the execution of modules, which are scripts with associated metadata that open one or more graphs in a dashboard environment that update in real time.This perspective is still under development
Each perspective has full documentation associated with it and is packaged in the respective plugin.
Systemtap
SystemTap provides free software (GPL) infrastructure to simplify the gathering of information about the running Linux kernel. This assists diagnosis of a performance or functional problem. SystemTap eliminates the need for the developer to go through the tedious and disruptive instrument, recompile, install, and reboot sequence that may be otherwise required to collect data.
SystemTap provides a simple command line interface and scripting language for writing instrumentation for a live running kernel. The internal tapset library as well as the published samples can be used to aid reuse and abstraction.
Current project members include Red Hat, IBM, Intel, and Hitachi.
Configuration Tutorial
This tutorial is written to guide a new SystemTap GUI user through some basic post-installation setup in order to get the most out of the application.
Installation
If SystemTap GUI is not yet installed, or for problems in basic installation, please see the Installation help page
Kernel Source Location
In order to use the kernel source browser you'll need to point it to the kernel source initially. Do this by either selecting the Kernel Source Browser in the browser pane or by going to Window->Preferences, then going to the SystemTap->IDE->Path tab and setting the location there. This configuration detail is relevent to the IDE Perspective only.
Tutorials
If you haven't already, you will want to take the IDE and Graphing tutorials. You can find them in the Getting Started section of each perspective's help pages. These tutorial provides fundamental knowledge on graphing in SystemTap GUI.
Preferences (Optional)
Finally, you may want to set certain non-essential preferences before using SystemTap GUI regularly. Use Window->Preferences to access the Preferences page.
Of particular note are Logging->Log To, SystemTap->Environment Variables, SystemTap->Graphing->Refresh Delay, SystemTap->IDE->Editor->Syntax Coloring.
Links to SystemTap Resources
The following links contain information specific to the SystemTap scripting language.
- SystemTap website - http://sourceware.org/systemtap/
- SystemTap wiki - http://sourceware.org/systemtap/wiki
- SystemTap tutorial - http://sourceware.org/systemtap/tutorial/
- Full list of documentation - http://sourceware.org/systemtap/documentation.html
The following links are related to the SystemTap GUI project:
- SystemTap GUI Sourceforge - https://sourceforge.net/projects/stapgui/
- SystemTap GUI Homepage - http://stapgui.sourceforge.net/
SystemTap IDE
Getting Started
IDE Tutorial
Lesson 1: Getting Started
In this tutorial we will orient you with IDE Perspective and its functions. At this point we assume that you are able to run Systemtap GUI and are unfamiliar with how to procede. If you cannot yet start the application, please refer to our Installation help page NOTE: If this is the first time opening the IDE Perspective it will take a while to load as it has to parse the tapsets.
The IDE Perspective's purpose is to allow the user to create, view, and edit Systemtap scripts. There are other editors built in (plain text and the C editor), however, they ultimately exist to facilitate the writing of Systemtap scripts.
In this lesson we will open a new Systemtap script file to familiarize ourselves with the IDE Perspective. Start by opening the File menu and selecting Open. A dialogue box will pop up and request the location of the file you want to open. We've included a folder called "examples" right in the tar ball. You may chose any of them to use; in this tutorial we will open top.stp. Go ahead and open the file.

You'll see the file is loaded into the editor pane of Systemtap GUI. You'll also noticed different colored text. Systemtap GUI supports syntax highlighting for the ease of the writer. Feel free to edit the file.
At this point proceed to Lesson 2: Writing Your First Script if you wish to learn how to write your own script file or Lesson 3: Running Your Script if you wish to run this one.
Lesson 2: Writing Your First Script
In this tutorial we will guide you through the process of writing your first Systemtap script. It is strongly recommended that you review the Systemtap website's tutorial - http://sourceware.org/systemtap/tutorial for up-to-date information on the latest version of Systemtap.
Start by selecting File->New. Specify a file name of your choosing, but be sure that it ends with an .stp extension. Click ok. Your blank script should be present in the editor pane.

Now type/copy the following:
	global read, write, start

	probe begin {
		start = gettimeofday_s()
	}
	probe syscall.write {
		write += count
	}

	probe timer.ms(1000) {
		printf("%d\t%d\t%d\n", (gettimeofday_s()-start), read, write)
		read=0
		write=0
	}
Now to demonstrate the functionality of the Probe Alias browser we will have you complete the read probe yourself. Start by opening the syscall folder in the Probe Alias browser. If you do not have any content in the browser you are experiencing a problem with Systemtap installation and should refer to our Installation help page. Ensure your cursor is located at the end of the file. Now scroll down and double click the read probe alias. Systemtap GUI will insert the skeleton probe at the point at which your cursor is at, and should look similar to the following:
probe syscall.read
{
	/*
	 * available variables on this probe:
	 * argstr, buf_uaddr, count, fd, name
	 */

}
Now insert the following line into the syscall.read probe:
read += count
You may remove the comment (/* ... */) if you wish.
This will count the number of bytes read and written each second and print it out. The begin probe executes first, by getting the time of day. The read and write probes increment each time the function is called. The timer probe prints the information every second. If you typed the script in manually you may have noticed that the editor provides code completion for probe aliasi. If you did not, type "syscall.". You'll see a box come up that you may use to select an item to complete your probe alias.
In Lesson 3 you will learn how to run Systemtap scripts in the IDE Perspective.
Lesson 3: Running Your Script
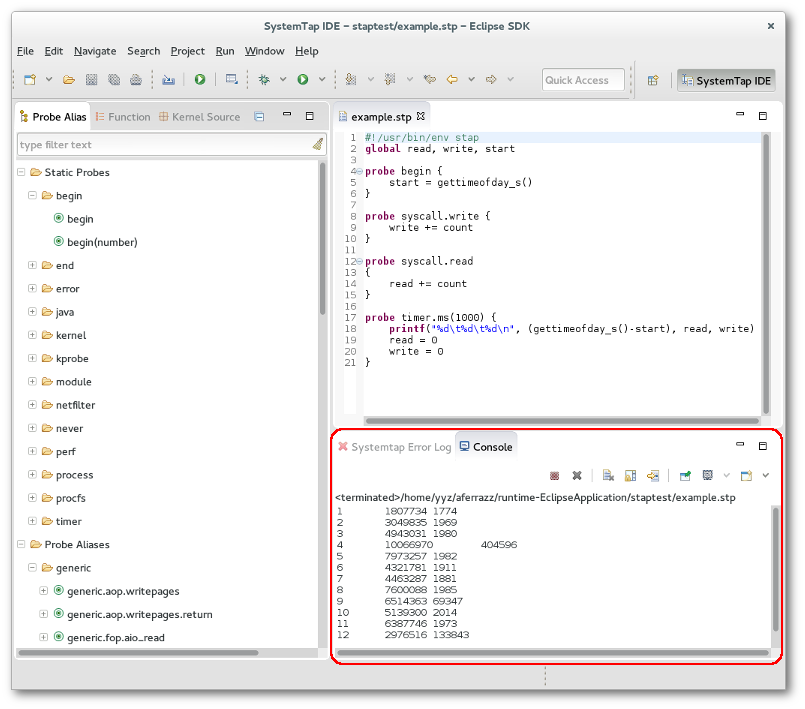
In this lesson we will cover running your script. You may use either the example script you opened in Lesson 1 or the script you wrote in Lesson two. Select Run->Run. Enter the remote server details. You should receive output in the console similar to the following, which shows the reads and write per second.

Now we will demonstrate running Systemtap scripts with graphs. In order to run the chart example you'll need to use the code provided in Lesson 2: Writing Your First Script ;. To do this select Run->Run w/ Chart. This feature will prompt the user for the number of columns for the chart, in addition to their titles and regular expressions. The regular expressions are used to parse the console output for the script and determine the values of each column at a certain sample point. The combined regular expression is shown at the bottom of the dialogue box.

For this example enter the following:
	Columns: 3

	TITLE	REGULAR EXPRESSION	DELIMITER
	Time		\d+		.*			\D+
	Read		\d+		.*			\D+
	Write		\d+		.*			\D+
The title fields simply display the associated string in the column's header. After clicking OK the script will prompt you for details regarding the Remote Server. Provide the ip address of the remote server that is running the systemtapgui Server or the Data Management Daemon. The port is by default 22462. Enter a username and password.This will give the application permissions to run your script on the remote machine. You have the option of saving your password as well, however be warned this is currently NOT encrypted so this convenience runs at a risk. The username is also used to transfer the file to the remote system using SCP. If the same machine is used as both the server and the client enter 'localhost' for the Host field. When the script is executed the application will switch into the Graphing perspective. A Data View chart is populated with live data, in addition to the output in the console. You should see a screen similar to the following:

You will see that the data table poplulates from live data parsed from the console. Now we'll make a graph to briefly illustrate the Graphing perspective. Click the Create Graph button next to bring up the Select Chart dialogue.Select line graph. You will be prompted to select a column of the X series and Y series; select "Time" and "Write" respectively. After you click ok you should see the line graph as follows:

Note that the multiple series graphs (Multi-Line, Multi-Bar, and Multi-Scatter) will request two Y series, Y1 and Y2. In the case of our example, these would be "Read" and "Write". Each series will be assigned a different color value for the purposes of differentiation and will be plotted both in respect to the specified X series.
Those are the basics behind running a script in Systemtap GUI.
Concepts
SystemTap Perspectives
SystemTap has three perspectives, each with its own purpose.
-
 IDE Perspective - This is the primary perspective for SystemTap script writers. It contains the Function Browser , Kernel Browser , Probe Alias Browser , and Views and Editors . The IDE Perspective contains the features necessary execute SystemTap scripts and the syntax highlighting and code
completion features that facilitate efficient development of scripts.
-
 Graphing Perspective - This perspective is invoked when the user calls the Run /w Chart option. It defaults to showing a data table containing the script results and is capable of producing six different chart types: Line Graph, Multi-Line Graph, Bar Graph, Multi-Bar Graph, Scatter Graph, and Multi-Scatter Graph.
 -
 Dashboard Perspective - This perspective is capable of storing meta-data related to each graph such as filters, aggregates, and display options in addition to showing a "dashboard" interface with multiple graphs updating simultaneously.
STP Editor
This editor is the most commonly used; it is used for the authoring and editing of Systemtap scripts. It is invoked when the user starts a new file or opens a file with the .stp extension. It provides syntax highlighting, code completion, and run support.
See also: Menus ,
Example SystemTap Scripts , Toolbars
Function Browser
The Funtion Browser lists all of the functions that are defined in the tapset library. Functions are grouped by the file that they are defined. Each listed function has an icon that corresponds to its return type.
-
 String
 -
 Long
Long -
 Void
Void
If you double click on any function a call to that function will be added to the active editor at the current cursor location. Also if you right click on a function and click "View Definition" the tapset file where the function is defined will be opened.

Kernel Browser
The Kernel Source Browser is used to display the kernel tree. This provides you with a quick way to locate places to add probes. Any file in the Kernel Source tree can be opened by double clicking on it. This will open up the selected file in the Editor view. You can then double click on the ruler next to any line that you wish to probe. If SystemTap can probe that line a probe point will be inserted at the end of the script you were most recently working on. If the line can't be probed, an error message will be displayed.

Probe Alias Browser
The Probe Alias Browser lists all of the probe aliases that are defined in the tapset library. Probes are grouped based on their type. In addition to the list of probes, each probe lists all of the variables that it has access to. Each variable is listed with an icon that represents its type. Types are as follows:
- String
- Long
-
 Unknown
If you double click on any probe alias, probe point will be added to the end of the active editor. Also if you right click on a probe and click "View Definition" the tapset file where the probe is defined will be opened.

Tasks
Creating SystemTap Scripts
Create a SystemTap script by selecting File->New in the IDE Perspective. You'll be prompted to enter a name for the file; make sure that you use a .stp extension or else SystemTap GUI will not recognize the file as a SystemTap script and certain editor and run features will not be active.
Your new file will be open and ready for coding in the Editor pane.
A IDE Tutorial is also provided in the help pages for a step by step demo.
For advanced SystemTap langauge help please see the SystemTap Development User's Guide and the documentation available at the SystemTap website's documentation page - http://sourceware.org/systemtap/documentation.html
Using the STP Editor
The STP Editor is used for the authoring and editing of Systemtap scripts. It is invoked when the user starts a new file or opens a file with the .stp extension. Using the editor is as easy as setting the focus to the editor pane and typing.
There are certain features within the editor you may want to take advantage of:
- Syntax Highlighting - Certain code items are colored in .stp and .c files based on a set of rules and
colors. You can turn this on or off and change the colors in Window->Preferences.
- Code Assist - SystemTap GUI will attempt to finish your probe alias names based on what you have already
typed. You can then select the appropriate probe alias or continue typing to filter the list down even more. You can turn this feature on and off or set the speed on it in Window->Preferences.
- Run Support - See the Lesson 3: Running Your Script
help page on a walk through use of the Run command. The Run command allows scripts to be executed directly through SystemTap GUI.
See also: Menus , Toolbars , Example SystemTap Scripts
Viewing Data Charts
Viewing data charts from a SystemTap script is accomplished by running that script with the Run->Run w/ Chart option. This is covered in the Lesson 3: Running Your Script . After running a script with the chart option, the user is taken into the Graphing Perspective and the Data Table is loaded by default. The data table immediately begins populating as it recieves input back through the console from the running SystemTap script.
Reference
Views and Editors
This section details the views and editor in relation to the IDE Perspective.
Views
The IDE Perspective consists of 5 views and and two editors.
- Probe Alias Browser - A list of all probe aliases currently available in your version of Systemtap. Covered in detail here .
- Function Browser - A list of functions currently supported in your version of Systemtap. Covered in detail here .
- Kernel Source Browser - Used to display the kernel tree. Covered in detail here .
- Console - The console view is where all of the output from the running script is shown. If more then one script is running at the same time you are able to switch between which console is currently displayed by clicking on the "Display Selected Console" button. The script can halt execution here if the user selects the Stop button. The user also has the option of saving the console output to a file, which can be done by clicking the Save log output button at the top of the console.
- Error Log - If the script you tried to run contained errors, this view will become active and display the errors. You can double click on the eror message to jump to the line in the file where the error occured.


Editors
Three editors are available in Systemtap GUI.
- STP Editor - This editor is the most commonly used; it is used for the authoring and editing of Systemtap scripts. It is invoked when the user starts a new file or opens a file with the .stp extension. It provides syntax highlighting, code completion, and run support.
- C Editor - This editor is available for the read only viewing of kernel source. It is invoked when the user opens a file of extension .c. Syntax highlighting is supported in this mode.
- Plain Text Editor - A plain text editor is also implemented for the user should they need it.
Menus
What follows is a comprehension list of the menu options available within the IDE Perspective of Systemtap GUI.
File
- New File - This option will bring up a dialog to create a new file. You may specify any location. Files ending in a .stp or .c extension will have syntax highlighting and code completion features as appropriate. (Shortcut: Crtl+L)

- Open File - This option will bring up a dialog to select a file to open. Once a file is selected it will open in the editor window. (Shortcut: Crtl+O)

- Close - This option closes the file in the editor pane that currently has the focus. (Shortcut: Crtl+F4)
- Close All - This option closes all files in the editor pane. (Shortcut: Shift+Crtl+F4)
- Save - This option saves the file that currently has the focus. (Shortcut: Crtl+S)
- Save As - This option prompts the user for a new location and file name and saves the file that currently has the focus under that new name and location.
- Save All - This option saves all files currently open in the editor pane. (Shortcut: Shift+Crtl+S)
- Revert - This option discards changes to the file currently under the focus replaces it with the last saved version.
- Print - This option prints the file in the editor pane currently holding the focus. (Shortcut: Crtl+P)
- Export Script - This option prompts the user to enter metadata associated with the Systemtap script to be exported and used in the Dashboard perspective. See the Creating Modules guide for instructions.
- Import Tapset - This option allows you to include additional tapset directories when you run a script. (Shortcut: Crtl+I)

- Exit - Exits Systemtap GUI.
Edit
- Undo - Undos the previous editor related action. (Shortcut: Crtl+Z)
- Redo - Redos the previous editor related action removed by Undo. (Shortcut: Crtl+Y)
- Cut - Removes the selected text from the editor pane and places it in the clipboard. (Shortcut: Shift+Delete, Ctrl+X)
- Copy - Copies the selected text from the editor pane and places it in the clipboard. (Shortcut: Ctrl+Insert, Crtl+C)
- Paste - Copies the text from the clipboard to the location of the focus in the editor pane. (Shortcut: Shift+Insert, Crtl+V)
- Select All - Selects all text within the file in the editor that the focus is currently in. (Shortcut: Crtl+A)
- Find/Replace - Opens the Find/Replace dialogue in which users may specify a text string to find and/or replace, with options to search forwards or backwards, the entire document or just the selected lines, and whether or not they want the following options:
- Case sensitive
- Wrap Search
- Whole Word
- Incremental
- Regular expressions
(Shortcut: Crtl+F)

- Find Next - Finds the next instance of the search string in the direction indicated in the Find/Replace dialogue box. (Shortcut: Crtl+K)
- Find Previous - Finds the previous instance of the search string in the direction indicated in the Find/Replace dialogue box. (Shortcut: Shift+Crtl+K)
- Incremental Find Next - Finds the next occurrence of the text and updates the selection after each character typed. To use Incremental Find:
- In the text (or Java) editor, press Ctrl+J or select Edit > Incremental Find Next from the menu bar.
- The workbench status line displays "Incremental Find:". The editor is now in the Incremental Find mode.
- As you type, the editor finds the next occurrence of the text and updates the selection after each character typed.
- Navigate to the next or previous match by pressing Arrow Down or Arrow Up.
- Undo the last action within the Incremental Find mode by pressing Backspace.
- You can leave the Incremental Find mode by pressing Esc
- Incremental Find Previous - Operates as illustrated in above bullet but in the reverse. (Shortcut: Shift+Crtl+J)
- Select All - Selects all the text in the file that currently has the focus. (Shortcut: Ctrl+A)
- Word Completion - Completes the string being typed by using the last example typed by the user. (Shortcut: Alt+/)
- Forward - Navigates to the next file in sequence as they were opened in the editor pane. (Shortcut: Alt+Right)
- Back - Navigates to the previous file in sequence as they were opened in the editor pane. (Shortcut: Alt+Left)
- Last Edit Location - Moves the focus to the file containing the last known edit. (Shortcut: Crtl+Q)
- Goto Line... - Moves the focus to the specified line number, with the range of line numbers listed in the dialogue box. (Shortcut: Ctrl+L)

Run
- Run - Available when a Systemtap script is loaded into the editor, this feature runs the script. You will be prompted to enter details of the remote machine running the systemtapgui server.ShortCut(Ctrl+F5)

- Run w/Chart - Available when a Systemtap script is loaded into the editor, this feature will prompt the user for the number of columns for the chart, in addition to their titles and regular expressions. The regular expressions are used to parse the console output for the script and determine the values of each column at a certain sample point. The combined regular expression is shown at the bottom of the dialogue box. The user has the option to use Command Line Options as well. When you click OK you will be prompted to enter the details of the remote machine running the systemtapgui server. When the script is executed the application will switch into the Graphing perspective. A Data View chart is populated with live data, in addition to the output in the console. More information regarding the Graphing perspective is available here.
- Stop - This option terminates the script thread associated with whichever script currently has the focus. (Shortcut: Ctrl+F9)
Window
- Open in New Window - This option opens a new instance of SystemTap GUI.
- Open Perspective - This submenu lists each of the available perspectives to open:
- IDE Perspective
- Graphing Perspective
- Dashboard Perspective
- Show Views - This submenus lists each of the available views to open:
- Console
- Error Log
- Functions
- Kernel Source
- Probe Alias
- Other - Lists all views in the application.

- Preferences - Due to the breath of this topic it is covered in another section. Please see Preferences .
Preferences
This section details each of the options listed under Window->Preferences. The Preferences dialog is the dialog used to set user preferences. The Preferences dialog pages can be searched using the filter function. To filter by matching the page title, simply type the name of the page you are seeking and the available pages will be presented below. The filter also searches on keywords such as appearance and java.
- Logging
- Enable logging - This option turns on and off the ability to log data from the console.
- Logging level - This dropdown box allows you to select one of our levels of logging.
- Debug - A very large quantity of debug information, difficult to identify what you are looking for but extremely exhaustive.
- Info - Displays most information regarding program execution; the default level.
- Critical - Lists only critical errors duration execution.
- Fatal - Lists only fatal errors during execution.
- Log to' - Specifies where you wish the logging to be written:
- Console - Writes the debug information directly to the console.
- File - Write the debug information to a file.
- File - The location of the file that logging sends the debug information to.
- SystemTap - This section contains options relevent to SystemTap itself.
- Remember window state - Preserves the state of the window on exitting SystemTap GUI.
- Dashboard Preferences - Preferences relate to the Dashboard Perspective.
- Additional Modules - Provides for the addition of more modules to the Dashboard. Modules are files containing a SystemTap script and associated metadata.
- Environment Variables - Allows the user to set specific values to the following environment variables
- LD_LIBRARY_PATH
- PATH
- SYSTEMTAP_TAPSET
- SYSTEMTAP_RUNTIME
- Graphing - Preferences related to the Graphing Perspective.
- Refresh Delay (ms) - Milliseconds in between re-painting the graph.
- Data Table - Preferences related to the data table.
- Jump to the newest entry - Determines whether the scroll bar maintains its location at the newest entry.
- Auto resize columns - Determines whether columns automatically resize to the width of the contents or whether they remain placed when moved.
- Max data items - Maximum number of entries that the table shows, though the table itself may have more not visible.
- Graph - Preferences related to graphs.
- Show grid lines - Turns on and off painting of the grid lines.
- Viewable data items - Number of maximum samples plotted at any time.
- IDE - Preferences when loading the IDE Perspective.
- Use stored tapset trees - Loads the stored tapset trees on initialization.
- Editor - Preferences related to the editor.
- Editor Background Color - Sets the color painted in the background of the editor pane.
- Show Line Numbers - Option to turn on and off line numbers in the editor pane.
- Code Assist
- Use Code Assist - Turns on and off the option to use Code Assist, which is a method that predicts what you are typing based on existing probe aliasi and opens a window that allows you to scroll down and select and/or continue typing for refined results.
- How Code Assist adds code - Method used in Code Assist.
- Insert - Inserts the selected text directly into the cursor point.
- Overwrite - Overwrites as you type.
- Activation Delay (requires restart) - Delay in milliseconds before the code assist routines attempts to run.
- Activation Trigger - This is the key that actives Code Assist. For SystemTap GUI it is set to the divider between tapset and probe alias.
- Syntax Coloring - These options assign color values to identified types within the .stp and .c editors.
- STP editor
- Default Color - Color of normal code.
- Keyword Color - Color of keywords.
- Embedded C Color - Color of embedded C code.
- Embedded Color - Color of embedded code.
- Comment Color - Color of comments.
- Type Color - Color of items identified as types.
- String Color - Color of strings.
- C editor
- Default Color - Color of normal code.
- Keyword Color - Color of keywords.
- Preprocessor Color - Color of preprocessor code.
- Comment Color - Color of comments.
- Type Color - Color of items identified as types.
- String Color - Color of strings.
- STP editor
- Typeing - No options available at this time.
- Path
- Kernel Source Directory - Location of the directory that the kernel source code is pulled from.
- Stap - No options available at this time.
- Tapsets - Preferences related to tapsets.
- Additional Tapsets - Allows you to specify additional tapsets scripts to be added in with every script.
- Tapsets - Preferences related to tapsets.
- Remote Server - Details regarding the remote machine running the systemtapgui Server
- Host Name - IP address of the remote machine
- Port - Port used for communication. Default is 22462.
- User Name - User name that has sufficient permissions to transfer and run the script on the remote machine.
- Password - Password for the above user.
Frequently Asked Questions
This section details frequently asked questions relating to the IDE Perspective.
Where can I find information regarding the Systemtap scripting language?
A: The best place to look for up to date information regarding Systemtap itself is its homepage - http://sourceware.org/systemtap/documentation.html
How do I run a script once I've written it?
A: There are different options as far as running your Systemtap script. Please visit the Menus to learn more about the four ways of running Systemtap scripts.
Why does the application seem to hang when switching to the IDE Perspective?
A: If this is the first time you are trying to open the IDE perspective, or have recently gotten a new version of SystemTap this is expected. In order to generate a full list of all of the available probes, and functions the GUI has to run the stap command. If there are tapsets that do not run correctly using the 'stap -up2' comamnd this takes a long time. In order to build as complete a list as possible it will use a binary filtering algorithm to figure out which tapset function is broken and generate data for all of the others.
Example SystemTap Scripts
What follows is a few SystemTap Scripts that you may use in SystemTap GUI, taken from and linked to http://sourceware.org/systemtap/documentation.html
There is also a description of the examples - http://sourceware.org/systemtap/examples/demo_script.txt
top.stp - Prints the top 20 system calls (http://sourceware.org/systemtap/examples/top.stp)
#!/usr/bin/env stap
#
# This script continuously lists the top 20 systemcalls on the system
#

global syscalls

function print_top () {
	cnt=0
	log ("SYSCALL\t\t\t\tCOUNT")
	foreach ([name] in syscalls-) {
		printf("%-20s\t\t%5d\n",name, syscalls[name])
		if (cnt++ == 20)
			break
	}
	printf("--------------------------------------\n")
	delete syscalls
}

probe kernel.function("sys_*") {
	syscalls[probefunc()]++
}

# print top syscalls every 5 seconds
probe timer.ms(5000) {
	print_top ()
prof.stp - Simple profiling (http://sourceware.org/systemtap/examples/prof.stp)
#!/usr/bin/env stap

# This is an example of profiling a specific command or pid.
# It works by recording the time when a system call is entered
# exited.

# Usage: prof.stp -c "top -n5"
# Will start up "top" and after 5 iterations, will exit.
#
# Usage: prof.stp -x 3323
# Will profile pid 3323 until it ^c is hit.
#

probe kernel.function("sys_*") {
	if (target() == tid())
		calltime[tid()] = gettimeofday_us()
}

probe kernel.function("sys_*").return {
	if (target() != tid())  next
	now = gettimeofday_us()
	c = calltime[tid()]
	if (!c) next
	ttime[probefunc()] <<< now - c
	delete calltime[tid()]
}

probe end {
	printf("\n")
	foreach (x in ttime)
		printf("%-20s\tcalls:%6d\tavg time (ms):%5d\ttotal(ms):%7d\n",
			x, @count(ttime[x]), @avg(ttime[x]), @sum(ttime[x]))
}

global calltime, ttime
keyhack.stp - Modifying variables in the kernel. (http://sourceware.org/systemtap/examples/keyhack.stp)
#! /usr/bin/env stap

# This is not useful, but it demonstrates that
# Systemtap can modify variables in a running kernel.

# Usage: ./keyhack.stp -g

probe kernel.function("kbd_event") {
	# Changes 'm' to 'b' .
	if ($event_code == 50) $event_code = 48
}

probe end {
	printf("\nDONE\n")
}
kmalloc.stp - Statistics example. (http://sourceware.org/systemtap/examples/kmalloc.stp)
#! /usr/bin/env stap

# Using statistics to examine kernel memory allocations

global kmalloc

probe kernel.function("__kmalloc") {
	kmalloc <<< $size
}

# Exit after 10 seconds
probe timer.ms(10000) { exit () }

probe end {
	printf("Count:   %d allocations\n", @count(kmalloc))
	printf("Sum:     %d Kbytes\n", @sum(kmalloc)/1000)
	printf("Average: %d bytes\n", @avg(kmalloc))
	printf("Min:     %d bytes\n", @min(kmalloc))
	printf("Max:     %d bytes\n", @max(kmalloc))
	print("\nAllocations by size in bytes\n")
	print(@hist_log(kmalloc))
}
kmalloc2.stp - Example using arrays of statistics. (http://sourceware.org/systemtap/examples/kmalloc2.stp)
#! /usr/bin/env stap

# Using statistics and maps to examine kernel memory allocations

global kmalloc

probe kernel.function("__kmalloc") {
	kmalloc[execname()] <<< $size
}

# Exit after 10 seconds
probe timer.ms(10000) { exit () }

probe end {
	foreach ([name] in kmalloc) {
		printf("Allocations for %s\n", name)
		printf("Count:   %d allocations\n", @count(kmalloc[name]))
		printf("Sum:     %d Kbytes\n", @sum(kmalloc[name])/1000)
		printf("Average: %d bytes\n", @avg(kmalloc[name]))
		printf("Min:     %d bytes\n", @min(kmalloc[name]))
		printf("Max:     %d bytes\n", @max(kmalloc[name]))
		print("\nAllocations by size in bytes\n")
		print(@hist_log(kmalloc[name]))
		printf("-------------------------------------------------------\n\n");
	}
}
Guide to Regular Expressions
Regular expressions are used in SystemTap GUI to define how the GUI interprets information that it recieves from the script file. If the user wishes to change the regular expression during runtime they may do so by selecting Edit->Modify Parsing Expression.
Basic regex (taken from "http://java.sun.com/j2se/1.5.0/docs/api/ ) -
 Summary of regular-expression constructs

Construct 	Matches

Characters
x 	The character x
\\ 	The backslash character
\0n 	The character with octal value 0n (0 <= n <= 7)
\0nn 	The character with octal value 0nn (0 <= n <= 7)
\0mnn 	The character with octal value 0mnn (0 <= m <= 3, 0 <= n <= 7)
\xhh 	The character with hexadecimal value 0xhh
\uhhhh 	The character with hexadecimal value 0xhhhh
\t 	The tab character ('\u0009')
\n 	The newline (line feed) character ('\u000A')
\r 	The carriage-return character ('\u000D')
\f 	The form-feed character ('\u000C')
\a 	The alert (bell) character ('\u0007')
\e 	The escape character ('\u001B')
\cx 	The control character corresponding to x

Character classes
[abc] 	a, b, or c (simple class)
[^abc] 	Any character except a, b, or c (negation)
[a-zA-Z] 	a through z or A through Z, inclusive (range)
[a-d[m-p]] 	a through d, or m through p: [a-dm-p] (union)
[a-z&&[def]] 	d, e, or f (intersection)
[a-z&&[^bc]] 	a through z, except for b and c: [ad-z] (subtraction)
[a-z&&[^m-p]] 	a through z, and not m through p: [a-lq-z](subtraction)

Predefined character classes
. 	Any character (may or may not match line terminators)
\d 	A digit: [0-9]
\D 	A non-digit: [^0-9]
\s 	A whitespace character: [ \t\n\x0B\f\r]
\S 	A non-whitespace character: [^\s]
\w 	A word character: [a-zA-Z_0-9]
\W 	A non-word character: [^\w]

POSIX character classes (US-ASCII only)
\p{Lower} 	A lower-case alphabetic character: [a-z]
\p{Upper} 	An upper-case alphabetic character:[A-Z]
\p{ASCII} 	All ASCII:[\x00-\x7F]
\p{Alpha} 	An alphabetic character:[\p{Lower}\p{Upper}]
\p{Digit} 	A decimal digit: [0-9]
\p{Alnum} 	An alphanumeric character:[\p{Alpha}\p{Digit}]
\p{Punct} 	Punctuation: One of !"#$%&'()*+,-./:;<=>?@[\]^_`{|}~
\p{Graph} 	A visible character: [\p{Alnum}\p{Punct}]
\p{Print} 	A printable character: [\p{Graph}\x20]
\p{Blank} 	A space or a tab: [ \t]
\p{Cntrl} 	A control character: [\x00-\x1F\x7F]
\p{XDigit} 	A hexadecimal digit: [0-9a-fA-F]
\p{Space} 	A whitespace character: [ \t\n\x0B\f\r]

java.lang.Character classes (simple java character type)
\p{javaLowerCase} 	Equivalent to java.lang.Character.isLowerCase()
\p{javaUpperCase} 	Equivalent to java.lang.Character.isUpperCase()
\p{javaWhitespace} 	Equivalent to java.lang.Character.isWhitespace()
\p{javaMirrored} 	Equivalent to java.lang.Character.isMirrored()

Classes for Unicode blocks and categories
\p{InGreek} 	A character in the Greek block (simple block)
\p{Lu} 	An uppercase letter (simple category)
\p{Sc} 	A currency symbol
\P{InGreek} 	Any character except one in the Greek block (negation)
[\p{L}&&[^\p{Lu}]]  	Any letter except an uppercase letter (subtraction)

Boundary matchers
^ 	The beginning of a line
$ 	The end of a line
\b 	A word boundary
\B 	A non-word boundary
\A 	The beginning of the input
\G 	The end of the previous match
\Z 	The end of the input but for the final terminator, if any
\z 	The end of the input

Greedy quantifiers
X? 	X, once or not at all
X* 	X, zero or more times
X+ 	X, one or more times
X{n} 	X, exactly n times
X{n,} 	X, at least n times
X{n,m} 	X, at least n but not more than m times

Reluctant quantifiers
X?? 	X, once or not at all
X*? 	X, zero or more times
X+? 	X, one or more times
X{n}? 	X, exactly n times
X{n,}? 	X, at least n times
X{n,m}? 	X, at least n but not more than m times

Possessive quantifiers
X?+ 	X, once or not at all
X*+ 	X, zero or more times
X++ 	X, one or more times
X{n}+ 	X, exactly n times
X{n,}+ 	X, at least n times
X{n,m}+ 	X, at least n but not more than m times

Logical operators
XY 	X followed by Y
X|Y 	Either X or Y
(X) 	X, as a capturing group

Back references
\n 	Whatever the nth capturing group matched

Quotation
\ 	Nothing, but quotes the following character
\Q 	Nothing, but quotes all characters until \E
\E 	Nothing, but ends quoting started by \Q

Special constructs (non-capturing)
(?:X) 	X, as a non-capturing group
(?idmsux-idmsux)  	Nothing, but turns match flags on - off
(?idmsux-idmsux:X)   	X, as a non-capturing group with the given flags on - off
(?=X) 	X, via zero-width positive lookahead
(?!X) 	X, via zero-width negative lookahead
(?<=X) 	X, via zero-width positive lookbehind
(?<!X) 	X, via zero-width negative lookbehind
(?>X) 	X, as an independent, non-capturing group
Match a position that is not a word boundary.
Information regarding regular expressions can be found all over the Internet. A few examples have been listed below:
SystemTap Graphing
For more details on the graphing perspective visit Graphing help page
SystemTap Dashboard
For more details on the Dashboard perspective visit Dashboard help page
© Copyright Red Hat, Inc. 2009 © Copyright Phil Muldoon <pkmuldoon@picobot.org> 2006. This documentation is licensed under the Eclipse Public License v. 1.0.