Notice: This Wiki is now read only and edits are no longer possible. Please see: https://gitlab.eclipse.org/eclipsefdn/helpdesk/-/wikis/Wiki-shutdown-plan for the plan.
Difference between revisions of "EDT:Tutorial: RUI With DataBase Lesson 8"
(New page: Access a database with EGL Rich UI {| style="float: right" |< Previous | [[EDT:Tutor...) |
|||
| Line 23: | Line 23: | ||
Make the following changes, ignoring the error marks: | Make the following changes, ignoring the error marks: | ||
| − | <ol><li>In the | + | <ol><li>In the '''allPayments_ui''' DataGrid declaration, |
add the following code immediately before the '''columns''' property: | add the following code immediately before the '''columns''' property: | ||
| − | + | selectionListeners ::= cellClicked, | |
| − | + | ||
| − | + | ||
The '''selectionListeners''' property | The '''selectionListeners''' property | ||
specifies one or more functions that are called whenever the user | specifies one or more functions that are called whenever the user | ||
selects a cell in the grid. In this case, you are appending a function | selects a cell in the grid. In this case, you are appending a function | ||
| − | name to a pre-existing array. You will write the | + | name to a pre-existing array. You will write the '''cellClicked''' function |
later in this lesson. | later in this lesson. | ||
| − | |||
<li>Formatters are functions that change the appearance of | <li>Formatters are functions that change the appearance of | ||
the values in DataGrid columns. To demonstrate the feature, find the | the values in DataGrid columns. To demonstrate the feature, find the | ||
DataGridColumn declaration for category. To ensure that the user sees | DataGridColumn declaration for category. To ensure that the user sees | ||
| − | a category description rather than an integer, add this code after | + | a category description rather than an integer, add this code after '''width=90''': |
| − | + | , formatters = [ formatCategory ] | |
| − | , formatters = [ formatCategory ] | + | |
| − | + | ||
<li>When you display dollar amounts in a column, you typically | <li>When you display dollar amounts in a column, you typically | ||
right-align the values. You do not need to code a function to cause | right-align the values. You do not need to code a function to cause | ||
right-alignment. Instead, add this code after the '''width''' entry | right-alignment. Instead, add this code after the '''width''' entry | ||
| − | for amount: | + | for amount: |
| − | + | , alignment = DataGridLib.ALIGN_RIGHT | |
| − | , alignment = DataGridLib.ALIGN_RIGHT | + | The '''allPayments_ui''' declaration |
| − | + | is now as follows, with error marks for '''cellClicked''' and '''formatCategory''': | |
| − | The | + | allPayments_ui DataGrid{ |
| − | is now as follows, with error marks for | + | layoutData = new GridLayoutData{ |
| − | + | row = 2, column = 1, | |
| − | allPayments_ui DataGrid { | + | verticalAlignment = GridLayoutLib.VALIGN_TOP}, |
| − | + | selectionListeners ::= cellClicked, | |
| − | + | columns =[ | |
| − | + | new DataGridColumn{name = "category", displayName = "Type", | |
| − | + | width = 90, formatters = [ formatCategory ]}, | |
| − | + | new DataGridColumn{name = "description", displayName = "Description", | |
| − | + | width = 120}, | |
| − | + | new DataGridColumn{name = "amount", displayName = "Amount due", | |
| − | + | width = 90, alignment = DataGridLib.ALIGN_RIGHT} | |
| − | + | ], | |
| − | + | data = allPayments as any[], | |
| − | + | selectionMode = DataGridLib.SINGLE_SELECTION}; | |
| − | + | ||
| − | + | ||
| − | + | ||
| − | + | ||
| − | + | ||
| − | + | ||
| − | + | ||
| − | + | ||
| − | + | ||
<li>Save the file. | <li>Save the file. | ||
</ol> | </ol> | ||
| Line 80: | Line 66: | ||
| − | The | + | The '''cellClicked''' function is invoked when |
the user clicks a cell in the data grid. | the user clicks a cell in the data grid. | ||
| − | Immediately below the | + | Immediately below the '''start''' function, |
add the following lines: | add the following lines: | ||
| Line 92: | Line 78: | ||
| − | First, the | + | First, the '''cellClicked''' function |
| − | updates the | + | updates the '''selectedPayment''' record with data from |
a single data-grid row. That row can include more fields than are | a single data-grid row. That row can include more fields than are | ||
displayed to the user. In this application, the single row in the | displayed to the user. In this application, the single row in the | ||
| Line 100: | Line 86: | ||
Second, | Second, | ||
the '''publish''' function causes the transfer | the '''publish''' function causes the transfer | ||
| − | of data from the | + | of data from the '''selectedPayment''' record to the '''selectedPayment_ui''' layout. |
That transfer is made possible by code that was provided for you when | That transfer is made possible by code that was provided for you when | ||
| − | you created the | + | you created the '''selectedPayment_ui''' layout, which |
is the single-record layout at the right of your web page. If you | is the single-record layout at the right of your web page. If you | ||
review the code, you can trace the relationships:Â | review the code, you can trace the relationships:Â | ||
| Line 109: | Line 95: | ||
<li>Each form field references a controller declaration. | <li>Each form field references a controller declaration. | ||
<li>The controller declaration relates a model to a view; in this | <li>The controller declaration relates a model to a view; in this | ||
| − | case, a field of the | + | case, a field of the '''selectedPayment''' record to a |
| − | child of the | + | child of the '''selectedPayment_ui''' layout. |
</ul> | </ul> | ||
| Line 118: | Line 104: | ||
Here is an explanation of two other | Here is an explanation of two other | ||
| − | issues"”the use of the bracketed array index ( | + | issues"”the use of the bracketed array index ('''[1]'''), |
and the use of the '''as''' operator: | and the use of the '''as''' operator: | ||
| Line 125: | Line 111: | ||
the data grid. However, when you declared the data grid, you specified | the data grid. However, when you declared the data grid, you specified | ||
the following setting to indicate that the user can select only one | the following setting to indicate that the user can select only one | ||
| − | row at a time:Â | + | row at a time:Â '''selectionMode = DataGridLib.SINGLE_SELECTION'''. |
When the user can select only one row, only one element is available. | When the user can select only one row, only one element is available. | ||
<li>Every element in the array returned by a '''getSelection''' function | <li>Every element in the array returned by a '''getSelection''' function | ||
is of type ANY. You typically use the same Record part to process | is of type ANY. You typically use the same Record part to process | ||
input to the grid and to process output from the grid, and in this | input to the grid and to process output from the grid, and in this | ||
| − | tutorial, the Record part is | + | tutorial, the Record part is '''paymentRec'''. The Record |
part has the following uses: | part has the following uses: | ||
| Line 188: | Line 174: | ||
affected only the data grid, and the description field in the single-row | affected only the data grid, and the description field in the single-row | ||
layout contains a numeric. The tutorial will address that issue later. | layout contains a numeric. The tutorial will address that issue later. | ||
| − | <li>Click the Source tab and change the | + | <li>Click the Source tab and change the '''start''' function |
| − | so that the first record in the prototype data includes a value for | + | so that the first record in the prototype data includes a value for '''payeeName''', |
| − | which is a | + | which is a '''paymentRec''' record field that is not displayed |
by the data grid: | by the data grid: | ||
| Line 215: | Line 201: | ||
<ol><li>Click the Source tab. | <ol><li>Click the Source tab. | ||
| − | <li>In the | + | <li>In the '''start''' function, select the complete |
assignment statement, right-click the area selected, and click Comment. [[Image:EDT_Tutorial_edt_richui_sql08_comment.jpg|The selection of code and the Comment menu item]] | assignment statement, right-click the area selected, and click Comment. [[Image:EDT_Tutorial_edt_richui_sql08_comment.jpg|The selection of code and the Comment menu item]] | ||
| Line 243: | Line 229: | ||
<ol><li>Near the top of the EGL source code, find the handler declaration | <ol><li>Near the top of the EGL source code, find the handler declaration | ||
| − | for | + | for '''PaymentFileMaintenance'''. Add a blank line, and |
| − | immediately before the | + | immediately before the '''ui''' GridLayout declaration, |
add the following statement: | add the following statement: | ||
| Line 261: | Line 247: | ||
<li>Fix the "œunresolved type"? error by pressing Ctrl+Shift+O. The new '''import''' statement provides | <li>Fix the "œunresolved type"? error by pressing Ctrl+Shift+O. The new '''import''' statement provides | ||
| − | access to the | + | access to the '''services''' package, '''SQLService''' part, |
which is in the '''PaymentService''' project. The | which is in the '''PaymentService''' project. The | ||
| − | reference to | + | reference to '''SQLService''' is resolved because that |
project is on the EGL build path of the '''PaymentClient''' project. | project is on the EGL build path of the '''PaymentClient''' project. | ||
<li>Save the file. | <li>Save the file. | ||
| Line 277: | Line 263: | ||
Begin by creating the function that reads all data. | Begin by creating the function that reads all data. | ||
| − | <ol><li>Leave a blank line after the | + | <ol><li>Leave a blank line after the '''cellClicked''' function |
and add the following code: | and add the following code: | ||
| Line 294: | Line 280: | ||
two function names: | two function names: | ||
| − | <ul><li> | + | <ul><li>'''updateAll''' |
| − | <li> | + | <li>'''serviceLib.serviceExceptionHandler''' |
</ul> | </ul> | ||
The two are ''callback functions'', which are invoked | The two are ''callback functions'', which are invoked | ||
by the EGL runtime code after the service responds or fails. If the | by the EGL runtime code after the service responds or fails. If the | ||
| − | service returns a value successfully, the | + | service returns a value successfully, the '''updateAll''' function |
is invoked. If the call fails, the EGL runtime code invokes a function | is invoked. If the call fails, the EGL runtime code invokes a function | ||
| − | that is associated with the name | + | that is associated with the name '''serviceLib.serviceExceptionHandler'''. |
By | By | ||
| Line 308: | Line 294: | ||
Console view (at development time) or at the bottom of the web page | Console view (at development time) or at the bottom of the web page | ||
(at run time). However, you can specify an error handler of your own, | (at run time). However, you can specify an error handler of your own, | ||
| − | typically by assigning a function name in place of | + | typically by assigning a function name in place of '''serviceLib.serviceExceptionHandler'''. |
</ol> | </ol> | ||
| Line 316: | Line 302: | ||
Alternatively, you could clicked anywhere in the statement, held down | Alternatively, you could clicked anywhere in the statement, held down | ||
the Ctrl key, and pressed 1. [[Image:EDT_Tutorial_edt_richui_sql08_callback.jpg|The Create Callback Functions option]] | the Ctrl key, and pressed 1. [[Image:EDT_Tutorial_edt_richui_sql08_callback.jpg|The Create Callback Functions option]] | ||
| − | EGL creates an empty | + | EGL creates an empty '''updateAll''' function. |
An error handler would have been created as well if you had specified | An error handler would have been created as well if you had specified | ||
| − | a function name for '''onException''', other than | + | a function name for '''onException''', other than '''serviceLib.serviceExceptionHandler'''. |
The | The | ||
| − | parameter list in the created | + | parameter list in the created '''updateAll''' function |
is equivalent to the type of return value that is expected from the | is equivalent to the type of return value that is expected from the | ||
service. Here are the relationships that explain the behavior of the | service. Here are the relationships that explain the behavior of the | ||
| Line 327: | Line 313: | ||
<ul><li>The parameter list in the callback function is correct because | <ul><li>The parameter list in the callback function is correct because | ||
| − | the | + | the '''getAllPayments''' function in the Service part is |
available to the editor. | available to the editor. | ||
<li>The function is available because you resolved the reference to | <li>The function is available because you resolved the reference to | ||
| − | the | + | the '''SQLService''' part in a previous step. |
</ul> | </ul> | ||
| Line 339: | Line 325: | ||
<ol><li>Click Ctrl-F to gain access to the Find/Replace dialog, | <ol><li>Click Ctrl-F to gain access to the Find/Replace dialog, | ||
| − | type | + | type '''SampleData''', and click '''Find'''. |
| − | <li>Update the | + | <li>Update the '''sampleData''' function so that |
the code is as follows: | the code is as follows: | ||
| Line 355: | Line 341: | ||
Next, create the function that adds data. | Next, create the function that adds data. | ||
| − | <ol><li>Update the | + | <ol><li>Update the '''addRow''' function so that the |
code is as follows: | code is as follows: | ||
| Line 364: | Line 350: | ||
<li>Click anywhere in the '''call''' statement, | <li>Click anywhere in the '''call''' statement, | ||
| − | right-click, and click '''Create Callback Functions'''. EGL adds the | + | right-click, and click '''Create Callback Functions'''. EGL adds the '''recordAdded''' function. |
</ol> | </ol> | ||
Create the function that deletes data. | Create the function that deletes data. | ||
| − | <ol><li>Update the | + | <ol><li>Update the '''deleteRow''' function so that |
the code is as follows: | the code is as follows: | ||
| Line 393: | Line 379: | ||
<li>Click anywhere in the '''call''' statement, | <li>Click anywhere in the '''call''' statement, | ||
| − | right-click, and click '''Create Callback Functions'''. EGL adds the | + | right-click, and click '''Create Callback Functions'''. EGL adds the '''recordRevised''' function. |
<li>Press Ctrl-Shift-F to format the code. | <li>Press Ctrl-Shift-F to format the code. | ||
<li>Save the file. | <li>Save the file. | ||
| Line 406: | Line 392: | ||
To initialize the data grid, add the following code before | To initialize the data grid, add the following code before | ||
| − | the '''end''' statement of the | + | the '''end''' statement of the '''start''' function: |
| Line 414: | Line 400: | ||
Although | Although | ||
| − | you could have assigned the | + | you could have assigned the '''readFromTable''' function |
directly to the '''onConstructionFunction''' property, | directly to the '''onConstructionFunction''' property, | ||
| − | you are advised to retain the | + | you are advised to retain the '''start''' function as a |
separate unit of logic in case you later decide to add other code | separate unit of logic in case you later decide to add other code | ||
that runs before the web page is rendered. | that runs before the web page is rendered. | ||
Retain the commented | Retain the commented | ||
| − | code in the | + | code in the '''start''' function in case you need to test |
the web page without accessing the database. You can use the comment | the web page without accessing the database. You can use the comment | ||
and uncomment capability of the Rich UI editor to quickly switch from | and uncomment capability of the Rich UI editor to quickly switch from | ||
| Line 432: | Line 418: | ||
automatically: | automatically: | ||
| − | <ul><li> | + | <ul><li>'''updateAll''' |
| − | <li> | + | <li>'''recordAdded''' |
| − | <li> | + | <li>'''recordRevised''' |
</ul> | </ul> | ||
| − | The | + | The '''updateAll''' function receives an array |
| − | of | + | of '''paymentRec''' records from the dedicated service. |
The function is called in the following ways: | The function is called in the following ways: | ||
| − | <ul><li>As a callback function at startup, after the | + | <ul><li>As a callback function at startup, after the '''readFromTable''' function |
calls the service. | calls the service. | ||
<li>As a callback function whenever the user clicks the '''Sample''' button | <li>As a callback function whenever the user clicks the '''Sample''' button | ||
| − | to invoke the | + | to invoke the '''sampleData''' function. |
</ul> | </ul> | ||
| − | <ol><li>Update the | + | <ol><li>Update the '''updateAll''' function so that |
the code is as follows: | the code is as follows: | ||
| Line 460: | Line 446: | ||
</ol> | </ol> | ||
| − | The | + | The '''recordAdded''' function receives the |
| − | record that was sent to and returned by the service function | + | record that was sent to and returned by the service function '''addPayment'''. |
| − | <ol><li>Update the | + | <ol><li>Update the '''recordAdded''' function so that |
the code is as follows: | the code is as follows: | ||
| Line 469: | Line 455: | ||
readFromTable(); | readFromTable(); | ||
end | end | ||
| − | The function | + | The function '''readFromTable''' reads |
all the rows from the database. The data stored by the grid can then | all the rows from the database. The data stored by the grid can then | ||
| − | contain the new row, including the | + | contain the new row, including the '''paymentID''' value |
that was automatically generated by the database and that is otherwise | that was automatically generated by the database and that is otherwise | ||
unavailable to the grid. | unavailable to the grid. | ||
</ol> | </ol> | ||
| − | The | + | The '''recordRevised''' function receives |
| − | the record that was sent to and returned by the service function | + | the record that was sent to and returned by the service function '''addPayment'''. |
| − | <ol><li>Update the | + | <ol><li>Update the '''recordRevised''' function so that |
the code is as follows: | the code is as follows: | ||
| Line 500: | Line 486: | ||
<li>Click '''Sample''' to create sample data. | <li>Click '''Sample''' to create sample data. | ||
| − | <li>If EGL requests a password, enter | + | <li>If EGL requests a password, enter '''admin''' for |
both the '''User ID''' and '''Password''' fields. | both the '''User ID''' and '''Password''' fields. | ||
Select '''Remember my user ID...''' and click '''OK'''. [[Image:EDT_Tutorial_edt_richui_sql08_pwd.jpg|The ID and password window]] | Select '''Remember my user ID...''' and click '''OK'''. [[Image:EDT_Tutorial_edt_richui_sql08_pwd.jpg|The ID and password window]] | ||
| Line 536: | Line 522: | ||
In the next lesson, you will complete the code for the Rich | In the next lesson, you will complete the code for the Rich | ||
UI handler. | UI handler. | ||
| − | |||
| − | |||
{| style="float: right" | {| style="float: right" | ||
|[[EDT:Tutorial: RUI With DataBase Lesson 7|< Previous]] | [[EDT:Tutorial: RUI With DataBase Lesson 9|Next >]] | |[[EDT:Tutorial: RUI With DataBase Lesson 7|< Previous]] | [[EDT:Tutorial: RUI With DataBase Lesson 9|Next >]] | ||
|} | |} | ||
| − | |||
[[Category:EDT]] | [[Category:EDT]] | ||
Revision as of 12:04, 30 November 2011
Access a database with EGL Rich UI
| < Previous | Next > |
Contents
Lesson 8: Add variables and functions to the Rich UI handler
Add source code that supports the user interface.In lessons 8 and 9, you update the EGL source code directly and review changes in the Preview tab.
Add code to support the data grid
Change the declaration of the data grid for two purposes:Â to cause the web page to react when the user selects a cell and to ensure that the grid output is formatted correctly.
- In Project Explorer, open PaymentClient > EGLSource > handlers and double-click PaymentFileMaintenance.egl.
- Click on the Source tab.
Make the following changes, ignoring the error marks:
- In the allPayments_ui DataGrid declaration, add the following code immediately before the columns property: selectionListeners ::= cellClicked, The selectionListeners property specifies one or more functions that are called whenever the user selects a cell in the grid. In this case, you are appending a function name to a pre-existing array. You will write the cellClicked function later in this lesson.
- Formatters are functions that change the appearance of the values in DataGrid columns. To demonstrate the feature, find the DataGridColumn declaration for category. To ensure that the user sees a category description rather than an integer, add this code after width=90: , formatters = [ formatCategory ]
- When you display dollar amounts in a column, you typically right-align the values. You do not need to code a function to cause right-alignment. Instead, add this code after the width entry for amount: , alignment = DataGridLib.ALIGN_RIGHT The allPayments_ui declaration is now as follows, with error marks for cellClicked and formatCategory: allPayments_ui DataGrid{ layoutData = new GridLayoutData{ row = 2, column = 1, verticalAlignment = GridLayoutLib.VALIGN_TOP}, selectionListeners ::= cellClicked, columns =[ new DataGridColumn{name = "category", displayName = "Type", width = 90, formatters = [ formatCategory ]}, new DataGridColumn{name = "description", displayName = "Description", width = 120}, new DataGridColumn{name = "amount", displayName = "Amount due", width = 90, alignment = DataGridLib.ALIGN_RIGHT} ], data = allPayments as any[], selectionMode = DataGridLib.SINGLE_SELECTION};
- Save the file.
== Code the function that responds when the user clicks the data grid ==
The cellClicked function is invoked when the user clicks a cell in the data grid.
Immediately below the start function, add the following lines:
function cellClicked(myGrid DataGrid in)
  selectedPayment = allPayments_ui.getSelection()[1] as paymentRec;
  selectedPayment_form.publish();
end
First, the cellClicked function
updates the selectedPayment record with data from
a single data-grid row. That row can include more fields than are
displayed to the user. In this application, the single row in the
data grid will have come from a single row in the database.
Second, the publish function causes the transfer of data from the selectedPayment record to the selectedPayment_ui layout. That transfer is made possible by code that was provided for you when you created the selectedPayment_ui layout, which is the single-record layout at the right of your web page. If you review the code, you can trace the relationships:Â
- A Form Manager declaration includes form fields.
- Each form field references a controller declaration.
- The controller declaration relates a model to a view; in this case, a field of the selectedPayment record to a child of the selectedPayment_ui layout.
The Form Manager provides various benefits but is essentially
a collection of controllers.
Here is an explanation of two other issues"”the use of the bracketed array index ([1]), and the use of the as operator:
- The getSelection function always returns a subset of the rows in the data array of the data grid. However, when you declared the data grid, you specified the following setting to indicate that the user can select only one row at a time:Â selectionMode = DataGridLib.SINGLE_SELECTION. When the user can select only one row, only one element is available.
- Every element in the array returned by a getSelection function
is of type ANY. You typically use the same Record part to process
input to the grid and to process output from the grid, and in this
tutorial, the Record part is paymentRec. The Record
part has the following uses:
- To be the basis of the array elements that you assign to the data property of the data grid, as shown in the following setting: data = allPayments as any[]
- To cast the array element that is returned by the getSelection function of the data grid, as shown here: allPayments_ui.getSelection()[1] as paymentRec
In each case, the as clause provides the necessary cast.
Format column values in the grid
To add the formatter function:
- Add the following code before the final end statement in the file: function formatCategory(class string, value string, rowData any in) value = PaymentLib.getCategoryDesc(value as INT); end Formatters have the parameters shown. In this case, the formatter wraps a library function you created earlier.
- Press Ctrl-Shift-O to organize the required import statements and save the file. All the error marks disappear.
== Test the formatting of the data grid and the transfer of data to the single-record layout ==
You can test your recent changes even before you gain access to the database.
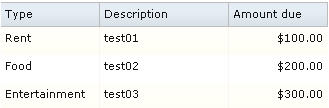
- Click the Preview tab and note that the categories are
now descriptions (for example, "œRent"? rather than "œ1"?).
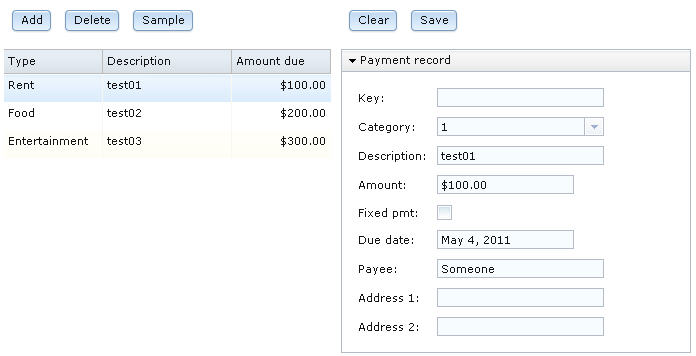
- Click one or another row in the data grid and note that the single-row layout is updated appropriately. However, the formatter affected only the data grid, and the description field in the single-row layout contains a numeric. The tutorial will address that issue later.
- Click the Source tab and change the start function so that the first record in the prototype data includes a value for payeeName, which is a paymentRec record field that is not displayed by the data grid: function start() allPayments_ui.data =[ new paymentRec{ category = 1, description = "test01", amount = 100.00 , payeeName = "Someone" }, new paymentRec{category = 2, description = "test02", amount = 200.00}, new paymentRec{category = 3, description = "test03", amount = 300.00}]; end
- Click the Preview tab and click the first row in the data
grid.


As shown, you can switch quickly from one tab in the Rich UI editor to another, to test even a small change.
Comment the prototype data
You can comment or uncomment code quickly, as shown in this step.
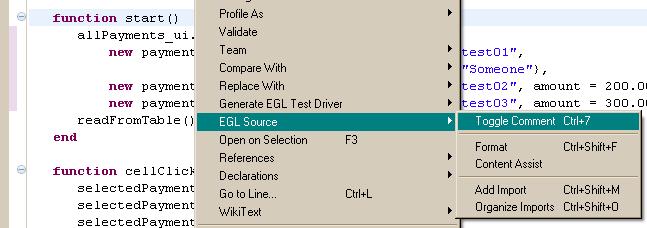
- Click the Source tab.
- In the start function, select the complete
assignment statement, right-click the area selected, and click Comment.
- Comment marks (//) are now at the start of each line. You
could remove the comments by repeating the task and clicking Uncomment instead
of Comment. However, leave the comments in
place. EGL also supports the use of slash asterisk (/*)
and asterisk slash (*/) delimiters, as shown here:
/*
You can add comments in either of two ways.
- /

Declare a service-access variable
You now declare a service-access variable, which will let you communicate with the service that you defined earlier.
To create the variable:
- Near the top of the EGL source code, find the handler declaration
for PaymentFileMaintenance. Add a blank line, and
immediately before the ui GridLayout declaration,
add the following statement:
dbService SQLService{@dedicatedService};
The @dedicatedService property
indicates that the service being referenced is a dedicated service,
which will be deployed with the Rich UI handler.
In the following
display, the red X in the margin indicates a problem in the code:
 To see the error message,
move the cursor over the X.
To see the error message,
move the cursor over the X.
- Fix the "œunresolved type"? error by pressing Ctrl+Shift+O. The new import statement provides access to the services package, SQLService part, which is in the PaymentService project. The reference to SQLService is resolved because that project is on the EGL build path of the PaymentClient project.
- Save the file.

== Create functions that use the service-access variable to invoke the service ==
You now create several functions to invoke different functions in the dedicated service. Once you understand how to set up one invocation, the others are straightforward.
Begin by creating the function that reads all data.
- Leave a blank line after the cellClicked function
and add the following code:
function readFromTable()
call dbService.getAllPayments() returning to updateAll
onException serviceLib.serviceExceptionHandler;
end
Note:
- The call statement in Rich UI is a variation used only to access services. The runtime communication in this case is asynchronous, which means that the user can continue to interact with the handler while the service is responding.
- The asynchronous call statement includes
two function names:
- updateAll
- serviceLib.serviceExceptionHandler
The two are callback functions, which are invoked by the EGL runtime code after the service responds or fails. If the service returns a value successfully, the updateAll function is invoked. If the call fails, the EGL runtime code invokes a function that is associated with the name serviceLib.serviceExceptionHandler.
By default, an error results in the display of error information in the Console view (at development time) or at the bottom of the web page (at run time). However, you can specify an error handler of your own, typically by assigning a function name in place of serviceLib.serviceExceptionHandler.
- Click anywhere in the call statement,
right-click, and click Create Callback Functions.
Alternatively, you could clicked anywhere in the statement, held down
the Ctrl key, and pressed 1.
 EGL creates an empty updateAll function.
An error handler would have been created as well if you had specified
a function name for onException, other than serviceLib.serviceExceptionHandler.
The
parameter list in the created updateAll function
is equivalent to the type of return value that is expected from the
service. Here are the relationships that explain the behavior of the
Rich UI editor:Â
EGL creates an empty updateAll function.
An error handler would have been created as well if you had specified
a function name for onException, other than serviceLib.serviceExceptionHandler.
The
parameter list in the created updateAll function
is equivalent to the type of return value that is expected from the
service. Here are the relationships that explain the behavior of the
Rich UI editor:Â
- The parameter list in the callback function is correct because the getAllPayments function in the Service part is available to the editor.
- The function is available because you resolved the reference to the SQLService part in a previous step.

Next, create the function that adds sample data.
- Click Ctrl-F to gain access to the Find/Replace dialog, type SampleData, and click Find.
- Update the sampleData function so that the code is as follows: function sampleData(event Event in) call dbService.createDefaultTable() returning to updateAll onException serviceLib.serviceExceptionHandler; end You do not use the Create Callback Functions feature because the callback functions exist.
Next, create the function that adds data.
- Update the addRow function so that the code is as follows: function addRow(event Event in) call dbService.addPayment(new paymentRec) returning to recordAdded onException serviceLib.serviceExceptionHandler; end
- Click anywhere in the call statement, right-click, and click Create Callback Functions. EGL adds the recordAdded function.
Create the function that deletes data.
- Update the deleteRow function so that
the code is as follows:
function deleteRow(event Event in)
for(i INT from 1 to allPayments.getSize())
if(allPayments[i].paymentID == selectedPayment.paymentID)
allPayments.removeElement(i);
exit for;
end
end
call dbService.deletePayment(selectedPayment) returning to recordRevised
onException serviceLib.serviceExceptionHandler;
end
The function acts as follows:
- Deletes the selected row from the local array of records
- Calls the database service to delete the row from the database itself
- Click anywhere in the call statement, right-click, and click Create Callback Functions. EGL adds the recordRevised function.
- Press Ctrl-Shift-F to format the code.
- Save the file.
Related information
[../../com.ibm.egl.pg.doc/topics/pegl_ui_richui_rest_call_statement.html Invoking a service asynchronously from a Rich UI application]
== Update the start function to initialize the data grid with database rows ==
To initialize the data grid, add the following code before the end statement of the start function:
readFromTable();
Although
you could have assigned the readFromTable function
directly to the onConstructionFunction property,
you are advised to retain the start function as a
separate unit of logic in case you later decide to add other code
that runs before the web page is rendered.
Retain the commented code in the start function in case you need to test the web page without accessing the database. You can use the comment and uncomment capability of the Rich UI editor to quickly switch from the function call to the prototype data and back again.
Complete the callback functions
You now complete the callback functions that were created automatically:
- updateAll
- recordAdded
- recordRevised
The updateAll function receives an array
of paymentRec records from the dedicated service.
The function is called in the following ways:
- As a callback function at startup, after the readFromTable function calls the service.
- As a callback function whenever the user clicks the Sample button to invoke the sampleData function.
- Update the updateAll function so that the code is as follows: function updateAll(retResult paymentRec[] in) allPayments = retResult; allPayments_ui.data = allPayments as any[]; end The function updates the global array of payment records with the data received from the service and then refreshes the data grid.
The recordAdded function receives the record that was sent to and returned by the service function addPayment.
- Update the recordAdded function so that the code is as follows: function recordAdded(newPayment paymentRec in) readFromTable(); end The function readFromTable reads all the rows from the database. The data stored by the grid can then contain the new row, including the paymentID value that was automatically generated by the database and that is otherwise unavailable to the grid.
The recordRevised function receives the record that was sent to and returned by the service function addPayment.
- Update the recordRevised function so that the code is as follows: function recordRevised(delPayment paymentRec in) allPayments_ui.data = allPayments as any[]; end The function refreshes the data grid.
- Press Ctrl-Shift-F to format the code. If you see errors in your source file, compare your code to the file contents in Code for PaymentLib.egl after lesson 8.
- Save the file.
Test the interface
Preview your work now that you are accessing a database.
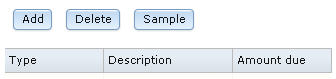
- Click the Preview tab. The data grid has
no content because you commented out the prototype data, and the database
has no rows.
- Click Sample to create sample data.
- If EGL requests a password, enter admin for
both the User ID and Password fields.
Select Remember my user ID... and click OK.
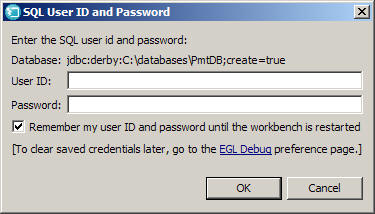 If you exit and restart the workbench
before you complete this tutorial, this window might be re-displayed
the next time you attempt to access the database.
Eventually
the grid is re-displayed with rows of sample data.
If you exit and restart the workbench
before you complete this tutorial, this window might be re-displayed
the next time you attempt to access the database.
Eventually
the grid is re-displayed with rows of sample data.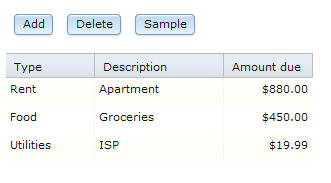
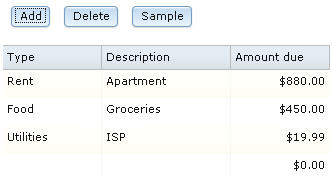
- Click the Add button. A new row with a single default value is displayed at
the bottom of the grid.
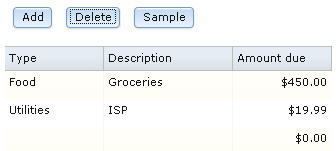
- Select the Apartment row and click Delete. The row is deleted from both the display and the database.
- Click the first row of the data grid.
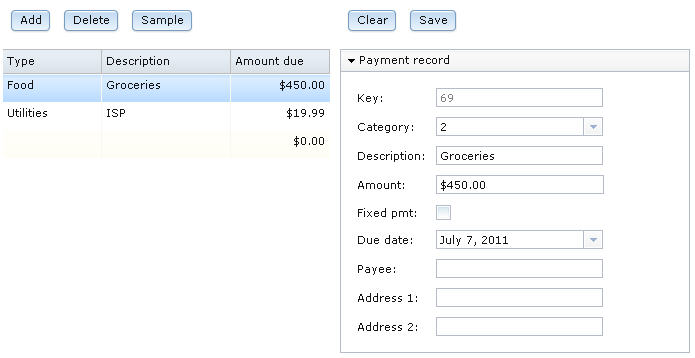 Data from the database was transferred
from the data grid to the single-record layout. Note that the value
of the Key field reflects how many rows were
added to the database and will probably not match the value on your
web page.
Data from the database was transferred
from the data grid to the single-record layout. Note that the value
of the Key field reflects how many rows were
added to the database and will probably not match the value on your
web page.


Lesson checkpoint
You learned how to complete the following tasks:
- To create formatters.
- To respond to the user's selection in a data grid.
- To transfer data from the data grid to a grid layout.
- To comment and uncomment code.
- To access services from a Rich UI application.
In the next lesson, you will complete the code for the Rich UI handler.
| < Previous | Next > |