Notice: This Wiki is now read only and edits are no longer possible. Please see: https://gitlab.eclipse.org/eclipsefdn/helpdesk/-/wikis/Wiki-shutdown-plan for the plan.
Difference between revisions of "Linux Tools Project/OProfile/User Guide"
| Line 11: | Line 11: | ||
== Step 1 - Locate Plug-in Installation Directory == | == Step 1 - Locate Plug-in Installation Directory == | ||
| − | Open up a terminal and locate the <code>scripts</code> directory. The install script is located in the org.eclipse.linuxtools.oprofile.core plug-in directory, but this directory can be in a few places: | + | Open up a terminal and locate the <code>scripts</code> directory. The install script is located in the <code>org.eclipse.linuxtools.oprofile.core</code> plug-in directory, but this directory can be in a few places: |
| − | * If you are using a distro-supplied version of Eclipse and installed the plug-in via the update site, it will most likely be under the ~/.eclipse directory, hence try the command | + | * If you are using a distro-supplied version of Eclipse and installed the plug-in via the update site, it will most likely be under the <code>~/.eclipse</code> directory, hence try the command |
::<code>find ~/.eclipse -name 'org.eclipse.linuxtools.oprofile.core_*'</code> | ::<code>find ~/.eclipse -name 'org.eclipse.linuxtools.oprofile.core_*'</code> | ||
| − | * Alternatively, if you are using an extracted tarball of Eclipse (ie: you downloaded a .tar.gz from [http://www.eclipse.org/downloads/ here]) then the plug-in will most likely be in the plugins sub-directory of where you extracted it. Let's say you extracted the tarball to /home/ksebasti, so your Eclipse installation would be in /home/ksebasti/eclipse, then try the command | + | * Alternatively, if you are using an extracted tarball of Eclipse (ie: you downloaded a .tar.gz from [http://www.eclipse.org/downloads/ here]) then the plug-in will most likely be in the plugins sub-directory of where you extracted it. Let's say you extracted the tarball to <code>/home/ksebasti</code>, so your Eclipse installation would be in <code>/home/ksebasti/eclipse</code>, then try the command |
::<code>find /home/ksebasti/eclipse -name 'org.eclipse.linuxtools.oprofile.core_*'</code> | ::<code>find /home/ksebasti/eclipse -name 'org.eclipse.linuxtools.oprofile.core_*'</code> | ||
Note that the quotes (') and asterisk (*) are necessary. Example output is something like this: | Note that the quotes (') and asterisk (*) are necessary. Example output is something like this: | ||
| Line 23: | Line 23: | ||
== Step 2 - Choose Which Installation Script To Run == | == Step 2 - Choose Which Installation Script To Run == | ||
| − | + | ||
| + | In the <code>scripts</code> directory there are two scripts, <code>install.sh</code> and <code>install-noconsolehelper.sh</code>. Both scripts will do some sanity checks to ensure oprofile is installed and that opxml, a C++ program required to interface with OProfile, exists and can be run. The difference is in how root authentication with the plug-in is set up. | ||
| + | |||
| + | * <code>install.sh</code> uses the pluggable authentication modules (PAM) mechanism. This is the default and recommended method for root authentication. When an OProfile task is required, you will be presented with this dialog to enter the root password: | ||
| + | |||
| + | [[Image:Screenshot-opcontrol_consolehelper.png]] | ||
| + | |||
| + | * <code>install-noconsolehelper.sh</code> can be used when consolehelper is not present on the system, or if required PAM modules are not on the system. It uses the sudo mechanism and a small wrapper script. The script will describe the text which should be written in the <code>sudoers</code> file, then run the command <code>visudo</code> to edit it. Note that the <code>sudoers</code> file is a sensitive system file and altering it in other ways may lead to system instability. Only users with enough knowledge of running a linux system should use this method. For these reasons this method of root authentication is discouraged. However, it may be the only option available to some users, and it has been tested to work well by developers and users of the plug-in. | ||
| + | |||
| + | = Troubleshooting = | ||
| + | * install script fails | ||
| + | * no samples | ||
Revision as of 11:48, 15 April 2009
{{#eclipseproject:technology.linux-distros}}
Contents
Getting Started
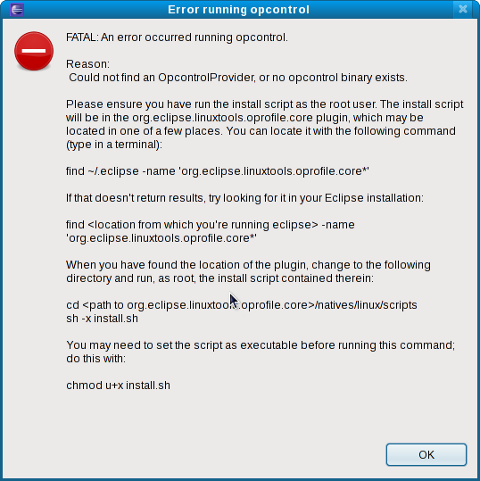
The OProfile plug-in requires a little extra set up compared to other Eclipse plug-ins. However, it only takes a few simple steps. After the plug-in is first installed, running most profile-related commands will bring up a dialog similar to the following:
As the dialog suggests, you must run the supplied install script to allow the plug-in to perform OProfile tasks as root (since OProfile can not be run as an unprivileged user). The steps below are the same as the dialog but described in more detail.
Step 1 - Locate Plug-in Installation Directory
Open up a terminal and locate the scripts directory. The install script is located in the org.eclipse.linuxtools.oprofile.core plug-in directory, but this directory can be in a few places:
- If you are using a distro-supplied version of Eclipse and installed the plug-in via the update site, it will most likely be under the
~/.eclipsedirectory, hence try the command
find ~/.eclipse -name 'org.eclipse.linuxtools.oprofile.core_*'
- Alternatively, if you are using an extracted tarball of Eclipse (ie: you downloaded a .tar.gz from here) then the plug-in will most likely be in the plugins sub-directory of where you extracted it. Let's say you extracted the tarball to
/home/ksebasti, so your Eclipse installation would be in/home/ksebasti/eclipse, then try the command
find /home/ksebasti/eclipse -name 'org.eclipse.linuxtools.oprofile.core_*'
Note that the quotes (') and asterisk (*) are necessary. Example output is something like this:
$ find /home/ksebasti/eclipse -name 'org.eclipse.linuxtools.oprofile.core_*'/home/ksebasti/eclipse/plugins/org.eclipse.linuxtools.oprofile.core_0.2.0.200904131051
Then, change the sub-directory natives/linux/scripts of this plug-in directory:
cd /home/ksebasti/eclipse/plugins/org.eclipse.linuxtools.oprofile.core_0.2.0.200904131051/natives/linux/scripts
Step 2 - Choose Which Installation Script To Run
In the scripts directory there are two scripts, install.sh and install-noconsolehelper.sh. Both scripts will do some sanity checks to ensure oprofile is installed and that opxml, a C++ program required to interface with OProfile, exists and can be run. The difference is in how root authentication with the plug-in is set up.
-
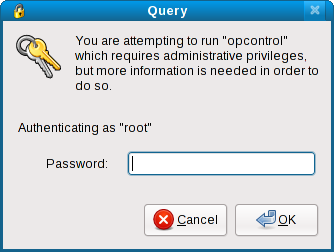
install.shuses the pluggable authentication modules (PAM) mechanism. This is the default and recommended method for root authentication. When an OProfile task is required, you will be presented with this dialog to enter the root password:
-
install-noconsolehelper.shcan be used when consolehelper is not present on the system, or if required PAM modules are not on the system. It uses the sudo mechanism and a small wrapper script. The script will describe the text which should be written in thesudoersfile, then run the commandvisudoto edit it. Note that thesudoersfile is a sensitive system file and altering it in other ways may lead to system instability. Only users with enough knowledge of running a linux system should use this method. For these reasons this method of root authentication is discouraged. However, it may be the only option available to some users, and it has been tested to work well by developers and users of the plug-in.
Troubleshooting
- install script fails
- no samples


